
Salted Brown Butter Chocolate Chip Cookies
Hi y’all. So it has been about 2 years …eeek. Sorry about that. There have been new jobs, new cities, new friends, lots of vacations, and 2 dog surgeries that have happened since then, but I have been cooking the whole time! I decided to start an instagram account (@spicenice), more for a personal way to keep a log of things I have made and liked; but I got a request for this chocolate chip cookie recipe and I figured, why not start blogging again!
I made these cookies for a very specific purpose – to give to the wonderful workers at Pet Palace, who saved our dear dog Houston’s life by recognizing immediately that something was wrong with our normally bubbly and light hearted pup, and got him to the vet ASAP. They really couldn’t have been more wonderful – between covering the initial diagnostic vet bill, to transporting him all the way across town to where he could have the needed emergency surgery done, to just generally loving our pup, we are really grateful. And so I figured they deserved a special cookie. Chocolate chip will forever be my favorite (and the most popular); but how can you make it even better….brown butter and flakey sea salt, that’s how. These were really good. I actually consider it a serious win on the new years resolutions that I managed to only eat 2. Enjoy, and hopefully you’ll be hearing from me again soon!

Salted Brown Butter Chocolate Chip Cookies
Ingredients
16 tablespoons (2 sticks) unsalted butter
2 and 1/4 cups flour
1 teaspoon salt
1 teaspoon baking soda
1/2 cup granulated sugar
1 cup light brown sugar
1 large egg
1 large egg yolk
2 tablespoons milk
1 and 1/2 teaspoons vanilla
One bag semisweet chocolate chip cookies
Fleur de Sel or flaky sea salt
Instructions
1. In a medium saucepan over medium heat, melt the butter and cook, swirling the pan occasionally, until it is frothy and browned, about 7-8 minutes or so (the browning process goes quickly once it starts so watch it carefully.)
2. Transfer the butter to a small bowl and let cool to room temperature, or place in fridge to help the process.
3. In a separate bowl, whisk together the flour, salt, and baking soda.
4. In the bowl of your standing mixer fitted with the paddle attachment, beat the browned butter and both types of sugar, until smooth and light, about 7 minutes. This will only work if you have let the butter cool completely.
5. Add in the whole egg, the egg yolk, milk, and the vanilla.
6. Decrease the mixer speed to low and add the dry ingredients.
7. Gently fold in the chocolate chips.
8. Cover the cookie dough tightly with plastic wrap and refrigerate overnight.
9. The next day, preheat the oven to 375 degrees and line two baking sheets with parchment paper or silicon mats.
10. Using a cookie dough scoop, place about 2-3 Tablespoons of dough onto the prepared baking sheets, spacing them about 2 inches apart. Sprinkle each cookie individual with flakey sea salt. For thinner cookies let the dough reach room temperature before baking.
11. Bake each cookie sheet until the cookies are golden brown on the bottom, about 12-14 minutes or so. Because of they previously browned butter they brown quickly so check yours accordingly.
Adapted from: The Curvy Carrot, Originally from Food and Wine magazine, June 2012 issue.
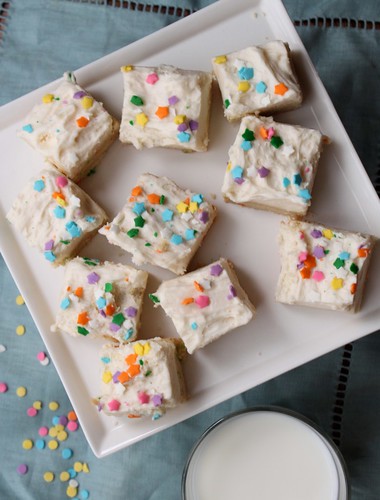
Funfetti Sugar Cookie Bars
In case you missed it, the super bowl was this weekend, and…it. was. amazing. While I will never give up hope of seeing a Browns super bowl in my lifetime, the caliber of the patriots vs. seahawks game really made appreciate ‘Merica. Also, can we please talk about that half time show? While I am by no means being unfaithful to my one true love (Taylor Swift), Katy Perry did a phenomenal job. The whole thing was American entertainment at its finest.
We had a small get together at our house, in the midst of a terrible snow storm. There may or may not have been multiple difficulties getting both in and out of the driveway, but everyone (amazingly and thankfully) made it both here and back safely. Thanks for braving the weather for us! There was lots of food, including my all time favorite pizza bites, and of course these cookie bars.
I picked these because they were relatively simple and can be made with ingredients you probably have lying around the house – butter, sugar and sprinkles -so they are perfect for a snow day. I actually used left over halloween sprinkles for the inside, and then some left over stars for the topping. What I like most about these bars is that they can so easily be adapted for any holiday depending on the sprinkles you choose. With valentine’s day around the corner, there may be another batch coming up shortly (I’m sure no one will protest). 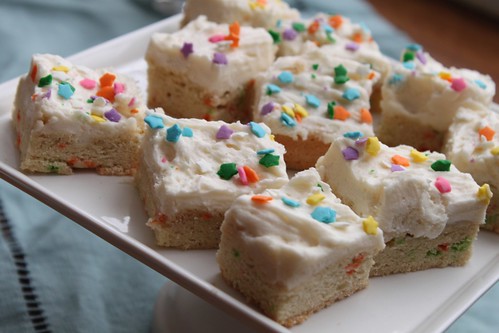
Funfetti Sugar Cookie Bars
adapted from Smells Like Home
Makes one 13×9 inch pan
- 2 1/2 cups all-purpose flour
- 1/2 tsp salt
- 1/4 tsp baking soda
- 1/2 cup (1 stick) unsalted butter, at room temperature
- 1 cups sugar
- 2 large eggs
- 1 tsp vanilla extract
- 3 Tbs sprinkles
Preheat oven to 350° F. Lightly grease a 9×13 inch baking dish and set aside.
Whipped Vanilla Frosting
- 1 cup (2 sticks) unsalted butter, at room temperature
- 2 cups confectioners’ sugar, sifted
- 2 tbsp heavy cream (substitute sour cream if unavailable)
- 1 tsp vanilla extract
Six Layer Chocolate Cake with Raspberry Buttercream and Whipped Ganache
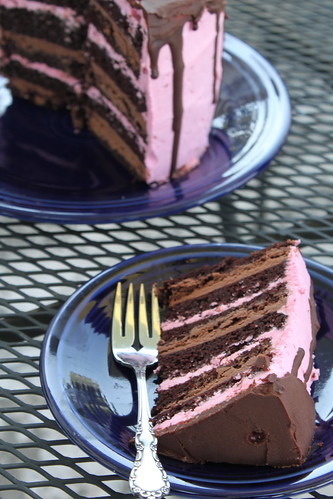
So I celebrated a big one a few weeks ago. Yep, a whole year has passed. Since my brother and I were born on the same day, our birthdays were always a big deal. It all started when I was 6, and my brother was turning 1. Tell a six year old that they have to share their birthday after 5 years of flying solo, and well, it could’ve been a little rough. Instead my parents went over the top and had an all out celebration with a tiered cake, our whole family, and a clown who doubled as a magician. I still cheered when the clown told me he was going to make my brother disappear, but overall, I LOVED sharing a birthday.
This year was no different. It’s been pretty great being back in Ohio and being able to once again share birthdays with my favorite brother. I insisted on making the cake, because it’s the one time of the year I don’t feel bad about going all out with an over the top birthday cake. Six layers was obviously a necessity, but because I didn’t want to be eating leftover cake for weeks, I thought 6 inches was perfect. The only problem – I didn’t have any six inch cake pans. Thankfully whole foods came to my rescue. I noticed they sold 6-inch cakes and jokingly asked the baker if she had any pans for sale. Well it turns out they bake all their cakes in disposable paper rounds – and she gave me 3 for a buck, steal!
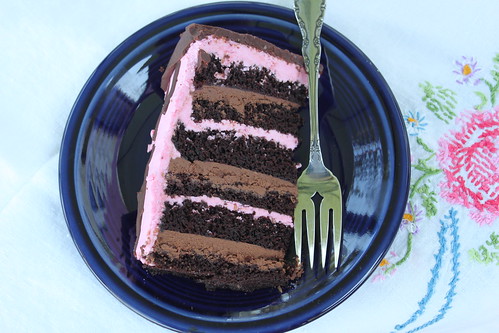
The initial recipe called only for the raspberry filling, which does make a beautiful contrasting interior, but I really wanted more chocolate, so I alternated a chocolate ganache frosting with the raspberry butter cream. It was not much more work because the ganache is just 2 ingredients, whipped to a fluffy consistency. But I will say the cake on it’s own is a moist, rich, dense chocolate cake, and could easily stand as the only chocolate in the cake if you want to double the strawberry buttercream instead. The whole thing is then topped with a rich chocolate ganache that drips down the sides and makes for a wonderful presentation. If your looking for some other wonderful birthday cakes, here’s a few I’ve made:
Six Layer Chocolate Cake with Raspberry Buttercream and Whipped Ganache
Makes 1- 6 layer, 6 inch cake.
For the Cake:
- 1-1/2 cups (180 g) all-purpose flour
- 1-1/3 cups (275 g) sugar
- 1/2 cup (60 g) dark cocoa powder
- 1-1/4 teaspoons (6 g) baking soda
- 1-1/4 teaspoons (6 g) baking powder
- 1 teaspoon (5 g) salt
- 140 ml (5 liquid oz) buttermilk
- 130 ml (4.5 liquid oz) espresso or strong, hot brewed coffee
- 75 ml vegetable oil
- 2 eggs, room temperature, lightly beaten
- 1 tablespoon (15 ml) pure vanilla extract
For the Raspberry Swiss Meringue Buttercream:
- 3 large, fresh egg whites (100 g)
- 3/4 cup sugar
- 1 1/2 teaspoons pure vanilla extract
- 2 sticks butter, cut into cubes and cool
- 1/4 cup raspberry puree, strained to remove seeds
- few drops of pink food coloring (optional)
For the Whipped Chocolate Ganache Filling:
- 8 oz bittersweet chocolate, chopped
- 1 cup heavy cream
For the Chocolate Glaze:
- 4 oz bittersweet chocolate, chopped
- 1/3 c. heavy cream
- 2 T unsalted butter
Instructions
- Preheat oven to 350° F. Prepare three 6-inch round cake pans with butter, parchment paper rounds, and flour or cocoa powder. Tap out excess.
- In bowl of electric mixer, sift all dry ingredients.
- Add all remaining ingredients to bowl with the dry ingredients and with paddle attachment on mixer, mix for 2 minutes on medium speed (you may need the plastic splash-guard that comes with mixer) and pour into prepared pans. If possible, use digital kitchen scale and weigh pans for even layers. Batter will be liquidy.
- Bake for 20 minutes and then rotate pans in oven. Cakes are done when toothpick or skewer comes out with a few crumbs, about 30 minutes total. Try not to over-bake.
- Cool on wire racks for 20 minutes then gently invert onto racks until completely cool.
- If using raspberry puree, place a handful of fresh or frozen raspberries in a food processor, and process until a smooth. Press through a mess sieve to remove seeds and retain at least 1/4 cup to add to frosting.
- Wipe the bowl of an electric mixer with paper towel and lemon juice, to remove any trace of grease. Add egg whites and sugar, and simmer over a pot of water (not boiling), whisking constantly but gently, until temperature reaches 160°F, or if you don’t have a candy thermometer, until the sugar has completely dissolved and the egg whites are hot.
- With whisk attachment of mixer, begin to whip until the meringue is thick, glossy, and the bottom of the bowl feels neutral to the touch (this can take up to 10 minutes or so). *Don’t begin adding butter until the bottom of the bowl feels neutral, and not warm.
- Switch over to paddle attachment and, with mixer on low speed, add butter cubes, one at a time, until incorporated, and mix until it has reached a silky smooth texture (if curdles, keep mixing and it will come back to smooth). *If mixture is too runny, refrigerate for about 15 minutes and continue mixing with paddle attachment until it comes together. Add vanilla and salt, continuing to beat on low speed until well combined.
- Add raspberry puree to taste and if desired a few fresh raspberries, and blend until combined. Add small amount of pink food coloring, if desired.
For the Whipped Chocolate Ganache.
- Heat heavy cream in a small saucepan until just before boiling.
- In a heat safe bowl, pour cream over chopped chocolate. Let sit for ~5 minutes, then stir to melt chocolate.
- Allow mixture to cool to room temperature, stirring occasionally (about 30-45 minutes). (Or place in the fridge for a few minutes at a time to expedite the process)
- Whip mixture on high until it becomes paler and fluffy, about 2-4 minutes.
- Place the chocolate, butter and heavy cream in a medium heatproof bowl over a pot of simmering water. Stir the mixture using a rubber spatula until melted and smooth. *Be careful to not get even a droplet of water into your bowl of chocolate and butter.
- Slice the 1st cake layer in half horizontally, using a large serrated knife or dental floss and place cut side up on your cake board, pedestal, or plate.
- The general order of the cake starting from the bottom will be:
- Cake
- Whipped Ganache
- Cake
- Raspberry Buttercream
- Cake
- Whipped Ganache
- Cake
- Raspberry Buttercream
- Cake
- Whipped Ganache
- Cake
- Raspberry Buttercream
- Finish with layer of Chocolate Glaze
- Using a small offset palette knife, spread approximately 1/2 cup of whipped ganache evenly on top.
- Add a layer of cake and cover with about 1/2 cup raspberry buttercream.
- Repeat this with remaining cake layers, until you come to the final layer, which you will place face-down on the top of the cake.
- Place cake on a turntable (if possible), and using a small offset palette knife for the top of the cake, and medium straight palette knife for the sides, cover the cake in a thin layer of buttercream to seal in crumbs. Refrigerate for 30 minutes (or more). *This does not need to be perfect, as that will come with the top “coat” of buttercream.
- Chill cake.
- If glazing the cake, make the glaze and set aside for a few moments to cool a bit. Pour glaze over chilled cake, smoothing the top with a clean small offset palette knife.
- Chill again to set, serve at cool room temperature.
Cake and Swiss Meringue Buttercream adapted from Sweetapolita, Chocolate Ganache from Martha Stewart
Apple Cider Caramels

I know you are probably up to your ears in left over Halloween candy, and the last thing you want to think about is making your own candy….but I promise you, these are worth it! This recipe has been circulating the internet for over a year, and despite coming from THE Smitten Kitchen, I was still a bit hesitant as to whether these would actually taste like apple cider. Well my friends, I can attest to ahhhmazingness of these caramels. Somehow, magically, they do indeed taste like apple cider. (Or maybe not so magically….you do use an entire quart of the stuff and boil it down to a mere 1/3 cup to infuse the caramel with cider flavor).
I actually had made these for our pumpkin carving party, but because of the unpredictable nature of intern year (and medicine in general), I was 2 hours late to my own party…. so instead, I have been enjoying these myself for the past 2 weeks. (Good thing I’m not the dentist in the family…) I also insist that everyone who comes to our house tries at least one – and the response is always the same….”ahhhhmazing.” So before cider is gone until next fall, make these. You won’t regret it.

Apple Cider Caramels
Makes 64 caramels
- 4 cups apple cider
- 1/2 teaspoon ground cinnamon
- 2 teaspoons flaky sea salt, such as Maldon, or less of a finer one
- 8 tablespoons (1 stick) unsalted butter, cut into chunks
- 1 cup granulated sugar
- 1/2 cup packed light brown sugar
- 1/3 cup heavy cream
Boil the apple cider in a 3- to- 4- quart saucepan over high heat until it is reduced to a dark, thick syrup, between 1/3 and 1/2 cup in volume, stirring occasionally. This took about 1 hour on my stove.
Line the bottom and sides of an 8- inch straight- sided square metal baking pan with 2 long sheets of crisscrossed parchment, then butter. Set it aside. Stir the cinnamon and flaky salt together in a small dish.
Once you are finished reducing the apple cider, remove it from the heat and stir in the butter, sugars, and heavy cream. Return the pot to medium- high heat with a candy thermometer attached to the side, and let it boil until the thermometer reads 252 degrees, about 5 minutes. Do not take your eyes off it as it burns quickly.
Immediately remove caramel from heat, add the cinnamon- salt mixture, and give the caramel several stirs to distribute it evenly. Pour caramel into the prepared pan. Let it sit until cool and firm—about 2 hours, though it goes faster in the fridge. Once caramel is firm, use your parchment paper sling to transfer the block to a cutting board. Use a well- oiled or buttered knife to cut the caramel into 1-by-1-inch squares. Sprinkle with additional flaky sea salt if desired. Wrap each one in a 4-inch square of parchment or waxed paper twisting the sides to close. Caramels will be somewhat on the soft side at room temperature, and chewy/firm from the fridge.
Caramels keep, in an airtight container at room temperature.
Source: Smitten Kitchen
Pumpkin Whoopie Pies

While it may be the end of October, it’s certainly not the end of fall inspired treats. I made these for a trip down to Lexington to see some of our best friends, and they were definitely a big hit. I knew Samiya in particular would like them because, well, because they’re cute and little and involve pumpkin! Moving to a new place, with new people, has really made me miss the awesome friends we had in med school. Following college, I moved to Louisiana with three crazy awesome roommates, and there was pretty much a constant source of entertainment and adventure at our house (and in Louisiana in general). Then in medical school, our apartment complex was basically like a grown-up college dorm, where study groups, dinner parties and watching people play video games was always only a step away. It’s a lot different now, living in a neighborhood, with friends scattered all over, and schedules that are completely different because of residency. But I guess that’s just part of growing up, and it’s not so bad.

Now these pumpkin whoopie pies were described as a pumpkin cupcake in a different form, and I’d say that’s pretty close to accurate! The batter is a bit more dense than a cupcake, but just as moist, and the filling is strikingly similar. Truthfully, can you go wrong with cream cheese frosting? I really liked these because they are visually appealing, and easy to eat…which turned out to be both a good and bad thing. Just glad I had people to help me finish them off :-).

Pumpkin Whoopie Pies
Makes approximately 36 sandwiches
For the pumpkin cookies:
- 3 cups all-purpose flour
- 1 tsp. salt
- 1 tsp. baking soda
- 1 tsp. baking powder
- 2 tbsp. cinnamon
- 1 tsp. ground ginger
- ½ tsp. ground nutmeg
- 1 cup granulated sugar
- 1 cup dark brown sugar, firmly packed
- 1 cup canola oil
- 3 cups chilled pumpkin puree
- 2 large eggs
- 1 tsp. vanilla extract
For the maple cream cheese filling:
- 3 cups powdered sugar, sifted
- ½ cup unsalted butter, at room temperature
- 8 oz. cream cheese, cold
- 2 tbsp. maple syrup
- 1 tsp. vanilla extract
To make the pumpkin cookies, preheat the oven to 350° F. Line two baking sheets with parchment paper or silicone baking mats. In a large bowl, whisk together the flour, salt, baking soda, baking powder and spices. Set aside. In a separate bowl, whisk sugars and oil together. Add the pumpkin puree and whisk to combine thoroughly. Add the eggs and vanilla and whisk until combined. Sprinkle the flour mixture over the pumpkin mixture and whisk until completely combined.
Transfer the cookie batter to a pastry bag fitted with a large plain round tip. Pipe small rounds of the batter onto the prepared baking sheets, about 1½-2 inches in diameter. If desired, smooth the top of cookies with a few drops of water and the bottom of a spoon.
Bake for 10-12 minutes, until the cookies are just starting to crack on top and a toothpick inserted into the center of a cookie comes out clean. Remove from the oven and let the cookies cool on the pan for about 10 minutes. Transfer to a wire rack to cool completely. Repeat with remaining batter.
To make the filling, combine the butter and cream cheese in the bowl of an electric mixer. Beat on medium-heat speed until smooth, about 1-2 minutes. Add the powdered sugar, maple syrup and vanilla and beat until smooth. Be careful not to overbeat the filling or it will lose structure, if this occurs refrigerate for 20 minutes. Transfer the filling to a pastry bag fitted with a plain tip.
To assemble, pair the cookies up by size. Pipe filling onto the flat side of one cookie of each pair, and sandwich together with the remaining cookie. Refrigerate for at least 30 minutes to firm before serving.
Adapated from Annie’s Eats
Apple Cider Muffins with Browned Butter Glaze

So, you know my previous obsession with California? Well, because we’ve had the most amazing weather for the last month, I’m starting to realize that Ohio is pretty awesome! The leaves are starting to change, there is fog over the valleys when I drive to work, and the sun has that autumn glow. It’s wonderful! Although you will surely need to remind me of this come February, when I cannot wait for winter to be over! To keep my California dream alive, my best friend from like the fourth grade just landed a coveted fellowship spot at UCLA, so I’m quite sure my love will be rekindled when I go to visit. But for now, I’m loving Ohio.
Now about these muffins. Obviously, they totally go with October, but they would be equally perfect for Thanksgiving breakfast. They are actually pretty healthy – chunks of apple and apple sauce keep them very moist without much fat. Then of course you add this browned butter glaze, which sort of ruins the healthy aspect, but you absolutely cannot leave it off. It is amazing. Together, these were best apple muffins I’ve ever had.
A few technical points…. First, you precook the apple with a bit of sugar and spice. This step gives the apples a pie-like texture, instead of the dehydrated apple you find in some baked goods. Additionally, I found out the hard way that there are so many liquid components to these, that they will seep if allowed to sit in an air tight container. I’m quite sure this didn’t make the best presentation when John brought them into class, but apparently they were still well loved. To avoid this, go a little lighter on the amount of apple in the batter, and store with a rack underneath. These muffins are just hearty enough that you can call them breakfast without too much guilt.
Apple Cider Muffins with Browned Butter Glaze
- 4 Tablespoons butter
- 2 -2 ½ honeycrisp apples, peeled and diced
- 3 tablespoons apple cider
- 1 1/2 cups whole wheat pastry flour
- 1/2 cup old-fashioned rolled oats
- 1 teaspoon baking soda
- 1/2 teaspoon baking powder
- 3/4 teaspoon cinnamon
- 1/4 teaspoon allspice
- 1/4 teaspoon salt
- 1 pinch of nutmeg
- 1 large egg
- 1/3 cup loosely packed brown sugar
- 2 teaspoons vanilla extract
- 1 cup unsweetened applesauce
- 1/4 cup apple cider
For the Glaze:
- 4 tablespoons browned butter, melted and cooled*
- 1 1/2 tablespoons apple cider
- 1 cup powdered sugar
Directions:
Begin by melting the butter in a small skillet over medium heat. Continue to cook, swirling occasionally until the butter turns a deep golden brown. Be careful not to burn. *Repeat this step for the browned butter in the glaze.
Preheat oven to 350 degrees F. Heat a small skillet over medium-low heat and add diced apples with 3 tablespoons apple cider, and a pinch of cinnamon and salt. Cook, stirring occasionally, until apples are soft and caramely, about 8-10 minutes. In a bowl, whisk together flour, oats, baking soda, baking powder, salt and spices. Set aside. Line a muffin tin with liners.
In a large bowl, whisk egg and brown sugar together until smooth and no lumps remain. Add in vanilla extract, butter, apple sauce and apple cider, whisking again until smooth. Gradually add in dry ingredients, mixing until just combined. Fold in diced apples. Do not overmix. Fill each muffin liner 3/4 full to scantly full.
Bake for 15-17 minutes, or until tops slightly golden. When cool enough to handle, transfer to a wire rack to cool.
Brown Butter Apple Cider Glaze
In a medium bowl, combine browned butter, vanilla extract and powdered sugar. Whisk until the mixture comes together then add in 1 tablespoon of apple cider, continuing to mix. If it still doesn’t appear glaze-like, add in cider 1/2 tablespoon at a time and mix again. Don’t worry if it becomes too liquidy – just add a tiny bit of powdered sugar until you get the desired consistency. Spoon glaze on warm muffins or dip each top in the glaze, then serve.
Slightly Adapted from How Sweet It Is
Pumpkin Doughnuts

Let me just profess how incredibly happy I am that it is October! Not only for the amazing weather, the change of leaves, and a special someone’s birthday, but also because my work schedule is much more manageable, and I actually have a few minutes to breathe. Of course at the top of my weekend to do list was celebrating the season by making baked goods! My friend Val also happens to be very found of October, seasonal festiveness and baking, so I knew pumpkin spice doughnuts would be right up her alley. I actually felt like a normal person, chit chatting on a Saturday afternoon, experimenting in the kitchen, and enjoying fall. It was so much fun!
Truth be told, I had bought a doughnut cutter specifically for these doughnuts more than a year ago, and had yet to use it. Fall passed me by, and making pumpkin doughnuts in December just seemed wrong. We found that the doughnuts “holes” made with the cutter were much larger than expected, so we ended up cutting them into fourths and making more snack size bites.
Now, I know people “bake” doughnuts, and that is much healthier, but let’s be honest, by definition doughnuts are fried. I’m not about to go redefining the very essentials of a doughnut by baking them, so yes, I fried these. Healthy? No. Guilty pleasure? Yes. I have only fried things one other time in my life, and it was pretty much the worst disaster I’ve had yet in the kitchen. (Picture an apartment so smoke filled you couldn’t reenter it for hours….). Happy to say this time went much more smoothly. The only difficult part is getting the oil to stay at the right temperature. Don’t be tempted to turn the heat to high – stick with medium – and use a heavy duty pan, like cast iron, that will keep consistent heat. Overall, these were considerably easier than I was expecting, but just as fun and festive as I was hoping.

Pumpkin Doughnuts
Makes 14-16 doughnuts and doughnut holes
Ingredients:
For the doughnuts:
- 3 1/2 cups all-purpose flour
- 4 teaspoons baking powder
- 1/2 teaspoon baking soda
- 1 teaspoon salt
- 2 teaspoons ground cinnamon
- 1 teaspoon ground ginger
- 1/2 teaspoon ground nutmeg
- 1/4 teaspoon ground cloves
- 1 cup sugar
- 3 tablespoons unsalted butter, at room temperature
- 1 large egg
- 2 large egg yolks
- 1 teaspoon vanilla extract
- 1/2 cup buttermilk
- 1 cup canned pure pumpkin
- Canola or Peanut Oil (for deep-frying)
For the cinnamon-sugar:
- 1/2 cup sugar
- 2 teaspoons cinnamon
For the spiced glaze:
- 1 cup powdered sugar
- 1/4 teaspoon ground cinnamon
- Dash of ground nutmeg
- Dash of ground ginger
- Dash of ground cloves
- 2 tablespoons milk
Directions:
In a medium bowl, whisk together the flour, baking powder, baking soda, salt, cinnamon, ginger, nutmeg and cloves and set aside. In the bowl of a stand mixer fitted with the paddle attachment, beat together the sugar and butter until well blended. Add egg, then yolks and vanilla. Add the pumpkin mixture and stir. Alternating buttermilk and flour mixture, continue to mix until all ingredients added and well blended. Cover the mixture and freeze for 1 hour, or refrigerate for 3.
Line two baking sheets with parchment or wax paper and lightly flour your work surface. Gently roll dough to about 1 – 1.5 cm thickness. Using a floured doughnut cutter or 3-inch round cutter, cut out dough rounds. If needed, use a floured 1-inch cutter to remove the centers (or the bottom of a 1 m piping tip). Arrange the doughnuts and holes on the prepared baking sheets, and if possible chill until ready to fry. Gather dough scraps and continue cutting until all the dough is used.
Line a cooling rack with several paper towels. Add enough oil to a skillet or Dutch oven to reach a depth of 1 – 1½ inches. Heat oil until the temperature reaches 365º to 370º. Fry doughnuts a few at a time, adjusting heat as needed to maintain temperature, until golden brown, about 2 minutes per side. Fry doughnut holes in a couple batches, turning occasionally, until golden brown, about 3 minutes. Use a strainer to transfer doughnuts to paper towels.
To make the cinnamon-sugar, whisk together the cinnamon and sugar in a small, shallow bowl until combined. When doughnuts are cool enough to touch, dip in cinnamon-sugar mixture and turn to coat completely.
Make the spiced glaze by combining powdered sugar and spices in a small bowl. Add the milk and whisk to combine, until a thick glaze is formed. Add more milk as needed to achieve desired consistency. Dip the remaining doughnuts in the glaze and allow to set before serving.
Source: Cook like a Champion
Cinnamon Chip Scones

The end of last week marked the end of my 14th week of AHECs (also known as rural health rotations). We are required to do 8 weeks in a rural health setting as part of our medical school curriculum, but I have had such good experiences in these small towns that I chose to do another 6! This last one was definitely no exception. I got to work one-on-one with probably the second nicest radiologist I’ve ever met (father-in-law will always be first!), who taught me something new everyday, and really helped me to feel prepared for residency by letting me go through films on my own when we had free time. The staff was all so welcoming and made me feel like part of the team, and the patients are just so sweet and so in need of good healthcare in these rural areas.

I had seen this recipe for cinnamon scones almost a year ago and hunted down some cinnamon chips shortly after; but then never actually made these. Then randomly, I saw 2 of my favorite bloggers post scone recipes within days of each other, and I took it as a sign. Scones were clearly the answer of what to bring for my last day of my last rural health rotation! I ended up going with the original recipe I found, because I already had a lot of the ingredients on hand, and I liked that I didn’t have to buy a lot of heavy whipping cream or buttermilk. You can certainly use the method I used in the lemon blueberry scones, and freeze these unbaked, and then bake from a frozen state whenever a morning treat is calling. I am confident they would turn out wonderfully, as cold butter is one of the key ingredients to good scones. I’m certainly glad I had some wonderful staff members to share these with because free time + baked goods is not a good combination around here :-).
Cinnamon Chip Scones
– Makes 16-24 scones
- 3 cups All-purpose Flour
- 1/4 cup granulated sugar
- 2 Tablespoons brown sugar
- 5 teaspoons Baking Powder
- 1/2 teaspoon Ground Cinnamon
- 2 sticks (1 Cup) Unsalted Butter
- 3/4 cups Heavy Cream
- 1 whole Egg
- 1 teaspoon Vanilla Extract
- 1 cup Cinnamon Chips
- Topping
- 1/2 cup Sugar
- 1 teaspoon Ground Cinnamon
- 1-1/2 teaspoon Heavy Cream
1) Preheat oven to 350 degrees. (Unless you chose to freeze and bake later*)
2) In a large bowl, mix together flour, granulated and brown sugar, 1/2 teaspoon ground cinnamon, and baking powder. Cut butter into pieces, then cut into dry ingredients with a pastry cutter or 2 knifes until mixture resembles coarse crumbs. Stir in cinnamon chips.
3) Mix together cream, egg, and vanilla extract. Pour into flour/butter mixture, stirring gently with a fork to combine.
4) Turn onto work surface (mixture will be very crumbly and falling apart.) Divide the dough into 2-3 equal portions. Gently press together the sides as you roll the top of each. Form either into either 2 large circles (to make 16 scones) or 3 medium circles (to make 24 smaller scones).

5) Mix together topping ingredients, stirring with a fork. Sprinkle over the top of the dough, lightly pressing.
6) Cut each circle into 8 wedges. Transfer to a cookie sheet and bake for 20 to 25 minutes. Allow to cool completely. Serve with coffee.
*If freezing, flash freeze for 20 minutes, then wrap individually and store in freezer. When ready to bake, preheat oven to 375º and bake for 25-30 minutes or until just beginning to brown.
Adapted from The Pioneer Woman
Cookies and Cream Cupcakes

I promised you the recipe for these cupcakes, and I didn’t want to disappoint! I had a few ideas in mind for my friend’s birthday, which perfectly coincided with the academy awards, but I’m so glad she chose these! I made them once before for another birthday, but for some reason decided I didn’t like the pictures I took, and so never posted the recipe. Of course with the business of the party, I didn’t get around to taking any better pictures this time, but in retrospect the ones I took way back in June aren’t bad! In fact, they look so delicious, they kind of make me want to make these cupcakes again!

I really made my day when one of the guests at the party said, “Seriously…These look so good, I thought they were from Cake in a Cup! ” – which is the local cupcake place that happened to have won Cupcake Wars. The truth is, it’s pretty easy to make these look professional, and as long as you follow the recipe, you can’t go wrong with taste. In fact, I think these cupcakes are even better then any you could buy, because I don’t think too many places put a half an oreo on the bottom of the cupcake, and then another 20 in the batter. Let’s just say this isn’t exactly a “light cupcake”…like seriously when you pick it up you will be like, OMG this is heavy! But it is SO good!

In order to get half an oreo with the frosting on the bottom of the cupcake, I ended up using a sharp knife to get the frosting all on one side. I tried the old “twist” method, but ended up breaking (and then eating) a few too many oreos. Overall you will need 56 oreos for these, so be sure to buy 2 packs.
Cookies and Cream Cupcakes
– Makes 24 Cupcakes
- 24 Oreo halves, with cream filling attached
- 2¼ cups all-purpose flour
- 1 tsp. baking powder
- ½ tsp. salt
- 8 tbsp. unsalted butter, at room temperature
- 1 2/3 cup sugar
- 3 large egg whites, at room temperature
- 2 tsp. vanilla extract
- 1 cup milk
- 20 Oreo cookies, coarsely chopped (I quarter them)
- 8 oz. cream cheese, at room temperature
- 6 tbsp. unsalted butter, at room temperature
- 1 tbsp. vanilla extract
- 4 cups confectioners’ sugar, sifted
- 2 tbsp. heavy cream
- Oreo cookie crumbs
- 24 Oreo cookie halves
1) Preheat the oven to 350˚ F. Line the wells of two cupcake pans with 24 paper liners. Place an Oreo halve in the bottom of each liner, cream side up. In a medium bowl, combine the flour, baking powder and salt; stir together with a fork to blend and set aside.
Salted Caramel Dark Chocolate Cake

So I finally downloaded my camera card, and realized I have way too many things I haven’t shared yet! But I decided to start with birthday cake, well because who doesn’t love birthday cake?! It has become somewhat of a tradition around here that I make my own birthday cake and then have friends over to share in eating it. Now there are those people who think that you shouldn’t have to bake on your birthday – but I would assume those are people who don’t like baking as much as I do. Really there is no other opportunity to make exactly the kind of birthday cake you’d like from start to finish, and I like to take advantage of that. Now this year I went overboard (and for me to say that is really saying something!). I decided to make a completely separate recipe of overly complicated cupcakes in addition to this three layer cake, and truthfully by the end of the day, I was starting to wonder if I’d get it all done before my birthday was over. Thankfully, John helped out a lot, but for my future reference and yours: this cake is plently on it’s own – both in terms of amount of cake and work.
First you start with a rich, moist dark chocolate cake. To really get the dark chocolate effect you should invest in some dutch processed (or dark) cocoa powder. I made the layers a day ahead, but I would guess you could even make them several days in advance and store in the fridge because they are so moist. Then you create a salted caramel, which will flavor the swiss meringue buttercream filling. Personally, I’m still kind of on the fence about swiss meringue buttercream, but I thought it worked well in this recipe because it’s not overly sweet like traditional buttercream. It also happens to be very stable, and so is able to adequately support the layers of this cake. Finally, you top it all with a dark chocolate ganache frosting and some decorative fleur-de-sel.

Although it would be really hard to top the malted chocolate and marshmallow cake of last year, this cake came close. Since I’m partial to six layer cakes, I think if I made this again that I would cut each layer in half, and then fill the additional layers with a small amount of plain salted caramel. (Simply double the recipe for caramel below.) Compared to the cupcakes I made, the caramel flavor was fairly subtle in this cake, and I think that would help to make it stronger. And if you want to save yourself some time, a traditional carmael buttercream like the one used here, would also work for the layers. This cake was quite rich, and so I decided to freeze some to take home for a second birthday celebration, and I can also say that it freezes wonderfully! Since my brother and I were born on the same day (5 years apart) we always try to get together for a fun birthday celebration – we kept it fun this year with an inflatable cake, and of course an entire table filled with desserts :-)!

Salted Caramel Dark Chocolate Cake
– Makes a 3 layer cake with 8-inch rounds (Serves ~16)
Ingredients:
For the cake:
2¼ cups all-purpose flour
2¼ cups sugar
1 cup plus 2 tablespoons dark unsweetened cocoa powder
2¼ tsp. baking soda
1½ tsp. baking powder
1½ tsp. salt
6 tbsp. vegetable oil
1 cup plus 2 tbsp. buttermilk
1 cup plus 2 tbsp. brewed coffee
3 large eggs, at room temperature
1 tbsp. vanilla extract
For the filling:
1 cup sugar, divided
¼ cup water
¼ cup heavy cream
Generous pinch of sea salt, such as fleur de sel
4 large egg whites, at room temperature
1½ cup (3 sticks) unsalted butter, at cool room temperature
For the frosting:
12 oz. good quality semisweet chocolate, finely chopped
¼ cup unsweetened Dutch-process cocoa powder
¼ cup very hot water
1 cup plus 2 tbsp. (18 tbsp.) unsalted butter, at room temperature
1/3 cup plus 1 tbsp. confectioners’ sugar
Pinch of salt
Fleur de sel, for finishing
Directions:
To make the cake, preheat the oven to 350˚ F. Grease and flour the edges of 3 8-inch baking pans, shaking out the excess. Line the bottoms with rounds of parchment paper. In the bowl of an electric mixer, combine the flour, sugar, cocoa powder, baking soda, baking powder, and salt. Mix on low speed to blend. Add the vegetable oil, buttermilk, coffee, eggs, and vanilla to the bowl and mix on low speed until well blended and completely incorporated. Divide the batter evenly between the prepared pans, using a kitchen scale if desired. Bake 20-25 minutes, or until a toothpick inserted in the center comes out clean. Let the cakes cool in the pans about 15 minutes, then invert onto a wire rack and allow to cool completely. Remove the parchment paper. Can be wrapped in plastic and stored in the refrigerator prior to assembly for 1-2 days.
To make the caramel buttercream filling, place ½ cup plus 2 tablespoons of the sugar in a medium saucepan. Mix in the water. Bring the mixture to a boil over medium heat. Stop stirring and let the caramel cook, gently swirling from time to time, until it is a deep amber color (test a drop on a white plate or bowl if necessary), watching it carefully to avoid burning. Remove the mixture from the heat and slowly whisk in the cream and then the salt. Set aside and let cool.
Combine the egg whites and the remaining ¼ cup plus 2 tablespoons sugar in a heatproof bowl set over a pot of simmering water. Heat, whisking frequently, until the mixture reaches 150-160° F and the sugar has dissolved. Transfer the mixture to the bowl of a stand mixer fitted with the whisk attachment. Beat on medium-high speed until stiff peaks form and the mixture has cooled to room temperature, about 8 minutes. (The bowl should be cool to the touch.)
Reduce the speed to medium and add the butter, 2 tablespoons at a time, adding more once each addition has been incorporated. If the frosting looks soupy or curdled, continue to beat on medium-high speed until thick and smooth again, about 3-5 minutes more (or longer – don’t worry, it will come together!) Blend in the cooled caramel until smooth and completely incorporated, scraping down the sides of the bowl as needed.
To make the frosting, place the chopped chocolate in a heatproof bowl set over a pan of simmering water. Heat, stirring occasionally, until the chocolate is completely melted and smooth. Set aside and let cool to room temperature. In a small bowl, combine the cocoa powder and water and stir until smooth. In the bowl of an electric mixer, combine the butter, confectioners’ sugar and salt. Beat on medium-high speed until light and fluffy, about 5 minutes. With the mixer on low speed, gradually blend in the melted and cooled chocolate until well incorporated. Blend in the cocoa powder-water mixture until smooth.
To assemble the cake, level the cake layers to get a more stable and cylindrical cake. Place one of the cake layers on a cake board or serving platter. Top with half of the caramel buttercream and smooth in a thick, even layer. Place a second cake layer on top and smooth the remaining caramel buttercream over that. Place the final cake layer on top. Cover the top and sides of the cake with the chocolate frosting and smooth with an offset spatula. Refrigerate until ready to serve. Before serving, sprinkle with fleur de sel.
Source: adapted from Annie’s Eats, originally from Sweetapolita

Star Spangled Apple Pie

Between pinterest, google reader, and an ever growing cookbook collection, I read a lot of recipes. Usually I file them away so that I can peruse my favorites when trying to plan a menu. But every once in a while a recipe is so memorable that it pops into your head a whole year later, while at the grocery store frantically trying to finalize the memorial day barbeque. This recipe would fall into that category.
Normally I wouldn’t think of apple pie as a traditional Fourth of July dessert, but a star spangled apple pie – well that’s entirely patriotic. It’s amazing what a few star cut outs can do for the “festive” level of a dessert. Served with ice cream, a possibly a slice of cheddar cheese, it’s perfect for summertime. And after all the saying does go, “As American as apple pie”.

The other thing I really liked about this recipe was how simple it was – most of the ingredients you probably already have in your pantry. But since the crust is really the “star” in this pie, I think a homemade one is almost imperative. I had a little bit of trouble with overbrowning, so next time I make this I plan to tent some foil over the top to help even cooking. As you may know, I’m somewhat partial to sugar, but I truly did think that the sugar crystals elevated the crust from good to great, and would probably add even more when I make this for the next patriotic holiday.
Star Spangled Apple Pie
Makes 1 9-inch pie
- Pie Crust
- 6 medium/large Granny Smith apples (about 2½ lbs.), peeled, cored and sliced
- 1/3 cup granulated sugar
- 3 tbsp. brown sugar
- 1 tbsp. all-purpose flour
- ¾ tsp. ground cinnamon
- ¼ tsp. grated nutmeg
- 2 tbsp. freshly squeezed lemon juice
- 2 tbsp. cold unsalted butter, cut into pieces
- 1 large egg beaten with 1 tablespoon cold water (for egg wash)
- Coarse sugar/Sugar sprinkles
On a lightly floured surface, roll out half of the pie dough into approximately a 12-inch round. (Keep the other half of the pie dough chilled for now.) Transfer the dough to a 9-inch pie plate, trimming the excess and crimping the edges. Cover with plastic wrap and freeze for 30 minutes in order to help the crust hold it’s shape while baking.
Preheat the oven to 400˚ F. In a large mixing bowl, combine the sliced apples, sugars, flour, spices and lemon juice. Toss well to combine. When the bottom crust is finished chilling, pour the apple mixture and accumulated juices into the bottom pie crust and use a spatula to even the top out slightly. Place thin slices of cold butter over the apples. Roll out the remaining pie dough on a floured work surface. Cut out numerous star shapes and use these to cover the top of the pie, using as much of the dough as possible. Brush the top and edges of the crust with the egg wash, then sprinkle with coarse sugar.
Place the pie on the upper rack and bake until the crust is golden brown and the juices are bubbling, about 50-60 minutes. Watch carefully and tent with foil for the 2nd half of baking if necessary to prevent overbrowning. Transfer to a wire rack and allow to cool for at least 30 minutes before slicing. Serve warm or at room temperature.
Slightly Adapted from Annie’s Eats

Blueberry Crumble Coffee Cake

I can hardly believe it but Friday marks the end of my third year of medical school! I can remember at the beginning of this year wondering how I was ever going to make it- “working” at the hospital everyday on top of studying for standardized exams every five weeks, and trying to live a somewhat normal life on top of it. Then before I even had time to get really stressed out about it – it’s over! Not complaining one bit :-). I am finishing up the year with pediatrics, which quite to my surprise turned out to be one of my favorite rotations of the year. I have never been one of those people who thinks, “Awwwwwwwwww, little kids are sooooooooo cute.” In fact, I kind of grouped those people into the “lovers of unicorn and all things rainbow” that I just didn’t fit in with. However, in retrospect I realize that I had never really spent enough time with the little ones in order to make such a judgement. Little kids are pretty amazing little people, and they definitely do say the darndest things. And also, children’s hospitals = 1000x cooler than adult hospitals.
So in order to commemorate the end of another very good rotation, I decided to make coffee cake for the office to enjoy. I wanted something summery yet decadent and something that would work equally well for both breakfast and dessert. I think this cake hit the nail on the head. The lemon in the batter gives it a fresh appeal, and the streusel topping makes it a crumbly delight. I really thought this cake was over the top good – and based on the number of people at the office that asked for the recipe, I’m pretty sure I’m not alone. The only thing I might change for the future is to make individual serving sizes. I think it would work well in a muffin tin – just make sure you equally distribute the amazing streusel, otherwise you might cause some fights (at least when there are little kiddos involved).

Blueberry Crumble Coffee Cake
Makes a 9-inch round cake
For the Streusel:
- 1/4 cup granulated sugar
- 1/3 cup light brown sugar, lightly packed
- 1 teaspoon ground cinnamon
- 1/8 teaspoon ground nutmeg
- 1/4 pound (1 stick) unsalted butter, melted
- 1 1/3 cups all-purpose flour
For the Cake:
- 6 tablespoons unsalted butter, at room temperature (3/4 stick)
- 3/4 cup granulated sugar
- 2 extra-large eggs
- 1 ½ teaspoons pure vanilla extract
- zest from 1/2 a lemon
- 2/3 cup sour cream
- 1 1/4 cups all purpose flour
- 1 teaspoon baking powder
- 1/4 teaspoon baking soda
- 1/2 teaspoon kosher salt
- 1 cup fresh blueberries
Directions:
Preheat the oven to 350 degrees F. Butter and flour a 9-inch round baking pan.
For the Streusel: Combine granulated sugar, brown sugar, cinnamon and nutmeg in a bowl. Stir in melted butter, then flour and mix well.
For the Cake: In a stand mixer, cream butter and sugar on high speed for 4-5 minutes, until light. Reduce speed to low to add the eggs, then add the vanilla, lemon zest, and sour cream. In a medium bowl, sift together the flour, baking powder, baking soda, and salt. With the mixer on low speed, add the flour mixture to the batter until just combined. Fold in the blueberries and stir with a spatula to evenly mix in berries. Spoon the batter into the prepared pan and spread with a knife to level the top. With your fingers, crumble all the topping evenly over the batter. Bake for 40 to 50 minutes, until a cake tester comes out clean. Cool completely and serve. Sprinkle with powdered sugar if desired.
Barely Adapated from Barefoot Contessa (Ina Garten)
Chocolate Oatmeal Moon Pies

These babies have been on my “To Make” list for a long time, but they are the kind of cookie that you absolutely cannot make unless you have people to share them with (or have better will power than myself ). So when our friend planned a dinner party, , I immediately knew that I wanted to bring these. Everyone enjoyed them, but I think they are a new personal favorite of mine. The cookie itself is to die for. If you don’t want to go to the trouble of making the whole sandwich, just make the cookies- you won’t be sorry. They have chocolate chunks, pecans, dried cherries, oatmeal and brown sugar.

Then sandwiched between that goodness is a marshmallow frosting. If you really want to get fancy, you could try toasted marshmallow frosting instead. And if you aren’t drooling yet, on top of all that is a dark chocolate ganache. The only problem I had with these was that they are very messy if you try to eat them right after making them. For a more refined dessert, just place them in a fridge for at least an hour before serving. And since these taste so good cold, I think chocolate oatmeal ice cream sandwiches are in store for later this summer. Perhaps I will make some toasted marshmallow ice cream to go with them – because a cookie as fabulous as this can’t settle for plain old vanilla.

Chocolate Cherry Pecan Oatmeal Moon Pies
Makes about 20 large sandwich cookies
For the cookies:
- 1¼ cups all-purpose flour
- ¾ tsp. baking powder
- ½ tsp. baking soda
- ½ tsp. coarse salt
- 2¼ cups old-fashioned oats
- 1 cup dried tart cherries, chopped
- 1 cup pecans, chopped
- 4 oz. chocolate chunks
- 12 tbsp. unsalted butter, at room temperature
- 1½ cups packed brown sugar
- 1 large egg + 1 large egg yolk
- 2 tsp. vanilla extract
For the filling:
- 12 tbsp. unsalted butter, at room temperature
- 1½ cups confectioners’ sugar, sifted
- 6 oz. marshmallow fluff
- 1 tbsp. vanilla extract
For the drizzle:
- 4 oz. bittersweet chocolate, finely chopped
- ½ cup heavy cream
- 2 tbsp. unsalted butter
Preheat the oven to 325˚ F. Line baking sheets with silicone baking mats or parchment paper. Combine the flour, baking powder, baking soda, and salt in a medium bowl. Whisk to blend, and set aside. In a large bowl, combine the oats, cherries, pecans, and chocolate. In the bowl of an electric mixer, beat together the butter and sugar on medium-high speed until light and fluffy, about 2 minutes. Blend in the egg and vanilla. With the mixer on low speed, add in the flour mixture, beating just until incorporated. Fold in the oat mixture with a spatula until incorporated.
Use a scant ice cream scoop or a 1 oz cookie scoop to shape dough balls. Place the dough balls on the prepared baking sheets, spacing each 2-3 inches apart. Bake for 14-18 minutes, until cookies are light brown in color. Transfer to a wire rack and let cool completely.
To make the filling, place the butter in the bowl of a mixer fitted with the paddle attachment. Beat on medium-high speed until smooth, 1-2 minutes. Blend in the confectioners’ sugar until incorporated. Beat in the marshmallow fluff and vanilla until light and fluffy, 2-3 minutes.
Match the cookies up in pairs by size. Fill a pastry bag fitted with a large plain round tip with the marshmallow filling. Pipe a dollop of filling onto the flat side of one cookie of each pair, and sandwich the cookies together, pushing the filling to the edges.
To make the ganache, place the chopped chocolate in a medium bowl. In a small saucepan, bring the cream to a simmer over medium heat. Once simmering, remove from the heat and immediately pour over the chocolate. Let stand 1-2 minutes. Whisk in small circular motions until a smooth ganache has formed. Whisk in the butter until completely incorporated. Let the mixture stand at room temperature until slightly thickened, about 10 -20 minutes. Drizzle over the assembled cookies. Chill to set the ganache and stabilize the filling.
Adapted from Annie’s Eats
Lime Coconut White Chocolate Macadamia Nut Cookies

Phew, that was a long title. But these cookies deserve it. Now before you go clicking away because this recipe doesn’t include real chocolate, let it be known that I, a dark chocolate is aways better kind of gal, really love these cookies. I bookmarked them a few weeks ago because they sounded like an interesting variation to the monotony of chocolate chip, but when the weather reached 80 degrees in March (in Ohio!), I really had no choice but to make tropical cookies. I also reasoned that since I’m not a huge white chocolate-macadamia nut lover, these cookies would be safe to have around the house. Ha. I wish I could tell you that I didn’t eat 6 for breakfast one day.
After that incident, I was almost afraid to make them again, but I also felt guilty letting the left over macadamia nuts go to waste (they were the most expensive part of the cookie). So I decided to make a half batch the second time around. Well wouldn’t you know- when I went to toast the leftover macadamia nuts, I burnt them to a crisp. I swear, one moment they were white, and 20 seconds later they were black. What can I say, “I got it from my momma”. Toasting nuts just isn’t in our blood :-). But since I had all the other ingredients mixed together, I decided to improvise with some slivered almonds. The cookies still turned out pretty amazing so if you are trying to cut cost, try some slivered almonds as a substitute. Also don’t be afraid (like I was) about putting 2 tablespoon of lime zest, you need at least the entire rind from one lime just to get some lime flavor. If you can imagine what a lime pina colada would taste like, I think it would be these cookies. They will definitely be making a reappearance this summer – barbecues, pool parties, breakfasts, etc.

Lime Coconut White Chip Macadamia Nut Cookies
- 2 cups flour, spooned lightly into measuring cups and leveled with knife
- 1/2 teaspoons baking soda
- 1/2 teaspoon table salt
- 12 tablespoons unsalted butter melted and cooled until luke warm
- 1 cup brown sugar
- 1/2 cup granulated sugar
- 1 large egg + 1 egg yolk
- 2 teaspoons vanilla extract
- 1 cup chopped white chocolate or white chocolate chips
- 1 cup coconut (toasted or untoasted)
- 1 cup toasted macadamia nuts
- 1 1/2-2 tablespoons grated lime zest (1-2 limes)
Melt 10 tablespoons of the unsalted butter, then add the remaining two tablespoons and stir until smooth (This helps the butter return to room temperature quickly).
Heat oven to 325 degrees. Mix flour, salt, and baking soda together in medium bowl; set aside.
Either by hand or with electric mixer, mix butter and sugars until thoroughly blended. Mix in egg, yolk, and vanilla. Add dry ingredients; mix until combined.
Add white chocolate chips, coconut, macadamia nuts, and lime zest. Mix to distribute.
Scoop cookie dough into large balls and place on parchment lined baking sheets. Bake until cookies are set around outer edges, yet centers are still soft and puffy, and appear slightly under-baked, about 10-12 minutes. Cool cookies on cookie sheets for a few minutes and then transfer to a cooling rack.
Source: Our Best Bites
Turtle Cheesecake

Sometimes I take for granted that certain things are not common knowledge. Now I’m not talking about fancy medical terms, chemistry or physics here, I’m just talking about day-to-day life stuff that you can’t actually put a finger on when, or how you learned it – you just know it and therefore assume that others must too. Well turtle sundaes were an example of such knowledge. I mean I literally have no idea when I discovered a turtle sundae, but I definetely just assumed it was common knowledge that they consist of pecans, hot fudge and caramel. Well let me tell you folks, this is not the case.
The first time I suggested that John get a turtle sundae – he didn’t know what it was! Blasphemy! After he ordered it and thought it was amazing, he was shocked to discover that almost every major ice cream shop in America makes some type of turtle sundae! How did he go so long without discovering this? Well I’m guessing it’s because he only recently started frequenting ice cream shops on a regular basis (perhaps because his wife has an unhealthy obsession with ice cream.) Imagine that :-).

When I was trying to figure out what type of birthday cake I wanted to make for John’s brother, the only request I got was “cheesecake”. Well the list of cheesecake possibilities was quite overwhelming, but I decided on this one because I was hoping that the love of turtle sundaes would run in the family. I was really looking for something that incorporated all parts of the turtle sundae into the cheesecake (not just as toppings), and I couldn’t really find one, so instead I put together a few of the things I liked best about different recipes. The results were well worth it. The crust is to-die-for and I think it would probably work well in a variety of recipes. After eating a slice of this, my sister-in-law who is from Turkey exclaimed that cheesecake may be America’s greatest invention :-). Be fairly warned, it is really hard to eat more than a sliver of this because it’s quite rich, but if you find yourself with leftovers, I think this would freeze wonderfully.
P.S. Sorry I’ve been MIA from the blog lately. Surgery clerkship has gotten the best of me. It’s true what they say – you really do work 14 hour days, but for the most part I’ve really been enjoying it. Future surgeon? We shall see….

Turtle Cheesecake
– Make 1- 9 inch round
For the Crust:
- 1 ¼ cups graham cracker crumbs
- 2/3 cup finely ground pecans
- 3 T. packed brown sugar
- 6 T. melted butter
For the Filling:
- 4 packages (8 oz each) cream cheese, softened (I used 2 regular, 2- 1/3 less fat)
- 1 cup sugar
- 1/3 cup packed brown sugar
- 1/4 cup PLUS 1 teaspoon flour, divided
- 2 T. heavy whipping cream
- 1- ½ teaspoons vanilla extract
- 4 eggs, lightly beaten
- ½ cup milk chocolate chips, melted and cooled
- 1/3 cup ice cream caramel sauce (Will be posting a homemade and easy recipe soon)
- 1/2 cup coarsely chopped pecans
For the Topping:
- 1/2 cup milk chocolate chips
- 1/4 cup heavy whipping cream PLUS 1-2 tablespoons depending on preference
- Pecan halves and additional caramel topping for garnish
To Make the Crust:
- Pre heat oven to 400 F. Wrap 9-inch spring foam pan with heavy duty foil or parchment-foil paper (this is all I had and it worked wonderfully). Be sure to wrap both sides of the pan because you don’t want any water seeping through the cracks when you bake it in a water bath.
- Mix all crust ingredients until combined. Press into 9 inch pan, pressing firmly and evenly. Bake at 400° for 15-18 minutes. Let cool completely before filling.
To Make the Filling:
- In a large bowl beat cream cheese and sugars until well combined. Then beat in 1/4 cup of flour, vanilla, and eggs until well combined.
- Remove a heaping cup of cream cheese mixture and combine with melted chocolate. Pour mixture over cooled crust.

- Combine pecans, caramel sauce and flour (not pictured here because I forgot it, but add it to stop caramel from leaking). Drop pecan mixture over chocolate layer.

- Pour remaining plain cream cheese mixture over top and spread evenly. Place spring foam pan in a large, deep pan and add about 1 inch of water to larger pan to create a water bath.

- TURN OVEN DOWN to 325º and bake for about 1 hour 20 minutes, or until the top appears dull. Carefully remove springfoam pan from water bath, and cool for 10 minutes. Refrigerate for several hours or overnight.
To Make the Topping
- Place chocolate chips in a heat-proof measuring cup. Bring cream to a boil over medium heat. Pour hot cream over chocolate chips and stir to combine. Pour ganache over cooled cheesecake and spread evenly. *NOTE: if you would like the ganache to drip down the sides, like the effect in this cake, add another tablespoon or 2 of cream to the mixture and make sure it is still very warm when you pour it over the cake.
- Top ganache with pecans, and drizzle caramel sauce before serving.
Inspired by Taste of Home
King Cake with Cream Cheese Filling & Happy Mardi Gras!

As I’ve mentioned on this blog before, I used to live in Louisiana. I’ve also mentioned how much I absolutely love it, but I’m just going to tell you again. It has got to be the most cultural place in America. It’s the kind of place where you go to take your trash out and end up spending the evening sharing a beer with your neighbor as you sit on the sidewalk. It’s also the kind of place where any excuse to celebrate is not taken for granted. Pretty sure there is no other place in America that gets a whole week off school in the middle of February. And most importantly, it’s the kind of place that seriously knows good food. King cake is no exception.
Now originally king cake was a rather plain cake filled with cinnamon and sugar, and the toppings were the really delicious part; but as we tend to do in America, we have made it more and more gluttonous over the years. Nowadays even the most famous bakeries like Gambino’s , serve cream cheese filled king cake as their “simple” selection. I’ve also heard that the bread has gotten much sweeter over the years, but I’m not complaining. This was a delicious and pretty simple recipe, even though I managed to mess it up a bit. There are quite a few steps, but each of them takes less than 20 minutes of hands on time. The problem I ran into was that I attempted to roll the dough into a huge rectangle, which made for a huge mess when I went to fill it with the cream cheese filling, but I have adapted the instructions below to make for an easier outcome. Other than that, this recipe really surprised me with how easy, and pretty much foolproof it was. I promise if you make it as soon as you get home from work, you will still be able to eat it for Fat Tuesday!
King Cake with Cream Cheese Filling
Makes 1 round king cake, about 10 servings
Dough
- 2 ½ tablespoons unsalted butter
- 8 ounces sour cream
- ¼ cup + 1 T. granulated sugar, divided
- Pinch of salt
- 1 package (2¼ teaspoons) active dry yeast
- ¼ cup warm milk (between 100 and 110 degrees)
- 1 egg
- 3 to 3½ cups all-purpose flour
- Oil for your hands and the bowl
Filling
- 8-ounce package cream cheese
- 1/2 cup (3 1/2 ounces) sugar
- 3 tablespoons All-Purpose Flour
- 1 large egg, lightly beaten
- 2 teaspoons vanilla
Icing
- 2 cups powdered sugar
- 1 teaspoon vanilla extract
- 1 tablespoon unsalted butter, melted
- 4 tablespoons whole milk
- Pinch of salt
Sprinkling Sugar
- 1 1/2 cups granulated sugar, separated into 3 bowls
- yellow, green, and purple (or blue + red) food coloring
- Bean/plastic baby for tradition
1. In a small saucepan over medium heat, add the butter, 1/4 c. of sugar and salt. Stir. Once butter has melted, add the sour cream and heat until lukewarm. Meanwhile, in a mixing bowl, add ¼ cup warm water, yeast, and 1 tablespoon of the sugar; stir. Allow the yeast to sit for about five minutes until it bubbles and becomes active.
2. Once the yeast is active, whisk in the warm butter/sour cream mixture, the egg, and 1 cup of the flour. Whisk until smooth. Using an oiled wooden spoon, being mixing in small amounts of the remaining flour until you form a soft dough. This will take about another 2 1/4 cups of flour. You want the dough to be tacky, but not sticky.
3. Using the dough hook of a mixing bowl, knead the dough until smooth and elastic, about 5-8 minutes, adding flour by the teaspoon if the dough is stickin to the sides of the bowl, more than itself.
4. Place the ball of dough into a large, well-oiled bowl, then flip the dough so all of the surface area of the dough is oiled. Cover the bowl with oiled plastic wrap, then set the bowl in a warm, draft-free area and allow the dough to rise until it has doubled in size, about 1 hour.
5. To make the filling: beat together the cream cheese, sugar and flour until smooth. Add the egg and vanilla and stir to combine.
6. Once the dough has doubled in size, turn it out onto a lightly floured surface. Lightly flour the dough and a rolling pin. Roll the dough into a rectangle about 24 inches long and 6 inches wide.
7. Dollop the filling down the center of the long strip of dough. Then fold each edge up and over the filling till they meet at the top; roll and pinch the edges together, to seal the filling inside as much as possible. Don’t worry about making the seal look perfect; it’ll eventually be hidden by the icing and sugar.
8. Place the log of dough seam side down or to the side onto a baking sheet covered with parchment paper. (A ring mold would be most helpful for this, but I didn’t have one). into the prepared ring mold, seam down or to the side (just not on top), or onto the baking sheet. The dough will be very extensible, i.e., it’ll stretch as you handle it. So pick it up and position it in the pan quickly and gently. Pinch the ends together to form a ring. Cover and let rise for about an hour, until it’s puffy. Preheat the oven to 350°F while the dough rises.
9. Once risen, bake at 350 for 25-30 minutes. Once golden, remove from oven and cool on a wire rack for 15 minutes.
10. While the cake is baking, make the sugar. (This can also be made far in advance). Combine 1/2 cup of sugar with a few drops of food coloring and stir continously until desired color is reached. *Gel colors will also work here, but you need to work the color into the sugar by pressing against the bottom of a spoon.
10. Once the cake is mildly cool, it is tradition to poke a small plastic baby, or a dried bean somewhere in the cake. Whoever gets this piece in their cake is supposed to buy/make the king cake for next year.
11. While the cake is cooling, make the icing. Combine all ingredients and whisk until smooth. Pour over the cooled cake. Before the icing has set (ie within 10-15 minutes), sprinkle sugar over the icing in 3 equal portions.
Cake Adapted from Brown Eyed Baker, Filling adapted from King Arthur Flour Company
Chocolate Sugar Cookies for Valentines Day

Happy Valentine’s Day! Let this post be my contract that next year I will actually get these cookies made ahead of time so that 1) you can actually make them in time for Valentine’s day if you wish, 2) I won’t be writing this post at 11 pm when I have to get up at 4:30 for surgery tomorrow), and 3) so that I can actually get them in the mail to some people in time for the holiday. I had to laugh when I looked back at my Valentine’s post from last year and realized I stated almost the exact same thing (you’d think I’d learn to plan ahead….this is clearly a difficult concept for me).
I’ll admit that the multiple layers of royal icing that was required for these cookies was a little bit more than I had planned for, but the cookies themselves are quite easy and completely delicious. Besides, if you don’t want to go to the trouble of icing, try sprinkling powdered sugar or topping with Nutella + sprinkles. The mixture of a chocolate with a touch of cinnamon added a really nice layer of complexity to this cookie. I still think the conversation heart cookies are one of the most clever Valentine’s ideas, but you can really never have too many Valentine’s cookies, can you?

Chocolate Cutout Cookies
Makes about 18-20 large heart cut-outs
- 2-1/4 cups All-purpose Flour
- 1 teaspoon Baking Powder
- 1/4 teaspoon Salt
- 1/2 teaspoon Ground Cinnamon
- 1/4 cup Unsweetened Cocoa Powder (I used Dutch processed)*
- 1 cup Firmly Packed Brown Sugar
- 1 whole Large Egg
- 1-1/2 teaspoon Vanilla Extract
- 2 sticks (1 Cup) Unsalted Butter, Softened
- Icing, powdered sugar or Nutella for finishing
Preparation Instructions
Combine flour, baking powder, salt, cinnamon, and cocoa powder in a bowl. Whisk together and set aside.
In the bowl of an electric mixer, cream butter and brown sugar until fluffy. Add egg and vanilla and beat until combined. Add flour/cocoa mixture in two or three batches, mixing well after each addition.
Form dough into a disc, wrap in plastic wrap and refrigerate for at least 2 hours.
To make to cookies, preheat oven to 350 degrees. Remove dough from bag and place on a floured surface. You may need to let the dough warm up for several minutes to make rolling easier. Roll out to 1/4-inch thickness and cut with a heart cutter.
Place on a cookie sheet lined with parchment paper or a baking mat. Bake for 12 minutes, or until set (but not browning at all.) Remove from oven and allow to cool completely.
Ice as desired, using royal icing, sifted powdered sugar, or Nutella (yummm).
Pecan Bars

Eeek. I can’t believe I’m already done with more than half of my third year of medical school. Seriously! When patients ask me how much time I have left, I have started saying, “About a year” because it just seems easier than saying 16 months. To mark the end of my internal medicine rotation, and the end of a very good 3 weeks working in Lima, I decided to make these pecan bars to bring into the office. I have to admit that when I started this rotation, I was a little bummed about having to leave our brand new puppy for 3 weeks, but it has really worked out for the best. I’ve gotten to come home quite a bit, the gym in Lima is really nice, and being somewhere unfamiliar with no real television has a way of making you get a lot done. Plus, the doctor I’m working with is a great teacher, and now I can actually read an EKG confidently! He has also reminded me that being stressed out at your job is really your choice- it doesn’t get the job done any better, or faster, and it makes me feel like crap.
So about these pecan bars. Everyone at the office (including myself), loved these, and a few people even asked me for the recipe. (Of course, I was immediately excited to be able give them the “Spice is Nice” business cards I got for Christmas… it’s the little things.) I was between this recipe and one from Barefoot Contessa. I went with one because the Ina version called for over a pound of butter (granted it made a larger pan…but still!) I’m certainly glad I did because there is really nothing I would change about this recipe. I accidentally forgot to drizzle chocolate over the top, but in retrospect I’m kind of glad I left it off. These were plenty rich on their own, but if you are a true chocolate lover, feel free to make this into a chocolate and pecan dessert.

Pecan Bars
Makes about 16 bars
- 1 cup unbleached all-purpose flour
- 1/4 teaspoon baking powder
- 1 teaspoon salt
- 1/3 cup packed light brown sugar
- 1/4 cup pecans, toasted and chopped coarse
- 6 tablespoons (3/4 stick) cold unsalted butter, cut into small pieces
- 4 tablespoons (1/2 stick) unsalted butter, melted
- 1/2 cup packed light brown sugar
- 1/2 cup light corn syrup
- 2 teaspoons vanilla extract
- 1 tablespoon bourbon
- 1/2 teaspoon salt
- 1 large egg, lightly beaten
- 1 and 3/4 cups pecans, toasted and chopped coarse
- 1/3 cup semisweet chocolate
- For the crust: Preheat oven to 350º.
- To prepare the pan, spray a 9-inch square baking pan with nonstick cooking spray. Fold two 16-inch pieces of foil or parchment paper perpendicular to one another in the baking pan so that there is overhang around all the edges. Overlap is important to ensure filling doesn’t leak below one layer. Spray the sheets with nonstick cooking spray.
- Place the flour, baking powder, salt, brown sugar, and 1/4 cup pecans in a food processor.
- Process the mixture until it resembles coarse cornmeal, about 5 one-second pulses.
- Add the butter and pulse until the mixture resembles sand, about 10 one-second pulses.
- Pat the mixture evenly into the prepared pan and bake until the crust is light brown, about 20 minutes.
- For the filling: While the crust is in the oven, whisk together the melted butter, brown sugar, corn syrup, vanilla, bourbon, and salt and egg, in a medium bowl until just combined.
- Pour the filling on top of the hot crust and sprinkle the 1 & 3/4 cups pecans evenly over the top.
- Bake until the top is brown and cracks start to form across the surface, 22 to 25 minutes.
- Cool on a wire rack for about 1 hour.
- For the drizzle: Melt the bittersweet chocolate, if using, in the microwave for about 30 seconds, stirring frequently. Drizzle the chocolate evenly over the cooled bars.Let sit until room temperature, about 1 hour.
- Remove the bars from the pan using the foil or parchment paper “handles” and transfer to a cutting board; cut into desired sizes.
Source: The Curvy Carrot, originally from Baking Illustrated
Chocolate Covered Butter Toffee

I know Christmas is going to be hard for our family this year, but I have been trying to keep busy -both at school and in the kitchen. I have a habit of going a little cookie crazy this time of year. I realize that it would be much easier to make one or two kinds of cookies and to make a lot of them, but the problem is that everyone seems to have a favorite so I want to make them all. The hardest part about this is that I also happen to love trying new recipes, so every year seems to bring a new favorite that I just have to make again the following year. Hence how this toffee came into being. As a Skor bar lover (the better version of Health), I knew as soon as a saw this recipe that I had to try it. It has easily become my favorite dessert of all time, and if it weren’t for the fact that I could eat the whole tray in one sitting alone, I would most definitely make it other times than Christmas. It is great for so many reasons that I feel the only appropriate way to get my point across is to list them…
- It is so buttery that it melts in your mouth the way no other store bought toffee could ever hope too.
- You can make a double or triple batch without the extra effort it would normally require to make a double or triple batch of individual cookies.
- It is covered in chocolate….need I say more.
- It has simple ingredients that are all delicious – butter, sugar, vanilla, chocolate
- It’s easy enough that you could make it today (Christmas Eve), and still have it ready for Christmas.
- You can cover it in just about anything that you want including crushed peppermints, sea salt, or nuts. I have to mention that after my mom tried the sea salt covered toffee, she exclaimed “This might be the best thing I’ve ever eaten.” No biggie :-).

Now if your intimidated by making candy, I completely understand your point of view, but please don’t let that stop you. I would say to just be patient, watch the color of the candy (it starts off yellow, as below, but you want it toffee colored – not brown), and don’t try to rush the cooking process. If you make a big batch, it might take up to 30 minutes to heat this to 298°, but it is well worth the wait.

Chocolate Covered Butter Toffee
– Makes one standard baking sheet
- 1 pound Butter, Melted
- 1 pound granulated sugar (by weight)
- 3 oz fluid Water
- 1 teaspoon Salt
- 1 teaspoon pure vanilla Extract
- 18 oz weight of semisweet chocolate chips, melted*
- Chopped Topping: finely chopped nuts (1/2 lb), Candy Canes (1/2 lb), Sea Salt (sprinkle), Etc.
*If you want the chocolate to look really professional, use good quality, tempered chocolate. If you don’t mind if the chocolate looks a little dull (like mine), chocolate chips will work fine.
Combine butter, sugar, water, and salt in a saucepan. Bring to a boil, stirring constantly. It will heat slowly at first, but once all the water has evaporated the temperature increases quickly.
Cook over medium high heat, stirring gently, until candy thermometer registers 298 degrees, but no higher than 310°. Undercooked toffee is chewy and sticks to your teeth, but on the flip side it can burn if it gets to hot.
Once at ~300°, remove from heat and stir in vanilla until well combined.
Pour the mixture onto a silicone baking mat or good parchment paper, (last year I used tin foil because it was all I had, and it still worked). Use a heatproof rubber spatula or offset spatula to spread quickly before the toffee sets. Thinner is generally better.
Allow toffee to cool completely, at least 30 minutes (while you go wrap some presents). Blot with paper towel to remove excess oil from the surface. Coat surface with half of the melted chocolate and immediately sprinkle with topping.
When chocolate has totally set (you can place it somewhere cold to help the process), carefully flip over (your going to break it apart anyways, so it’s okay if this happens now). Then coat the other side with the rest of the chocolate and sprinkle on topping of your choice.
Allow to set, then break into bite-size pieces.
Store in an airtight container.
Recipe from Lia via The Pioneer Woman

Snowball Cookies for Daddy-O
I thought about telling you all sooner, but I was too beside myself when I first found out to write something that would even come close to describing how I was feeling. In all honesty I still don’t know what to say. My dad passed away suddenly and unexpectedly on November 30, 2011. These past few weeks have been very difficult, but I want to thank everyone for your kind words, actions, thoughts and prayers. I have been so comforted by the love others have shown me and my family.
I used to talk to my Dad almost everyday on my way home from school. I had just been talking to him on about how excited I was to be starting my internal medicine rotation, because it was my dad’s specialty and I was really looking forward to being able to discuss it with him. Just on Monday he had explained the mechanism, symptoms, diagnostic tests and treatment of pleural effusions to me. I had told him to get excited for Christmas, and I had even mentioned how I was planning to make a bunch of cookies including his favorite – these snowballs. I have such found memories of my dad sneaking into the cookie tins in the kitchen to get just one more cookie. I can even remember John joking with him last Christmas, “Ahhh, now I see where Jacqueline gets her sweet tooth from,” as my dad was slyly removing yet another powdered sugar covered cookie and plopping the whole thing in his mouth. (Personally I always thought these were more like 2 bite cookies – but he seemed to think differently :-)).
So Daddy-O, these are for you…
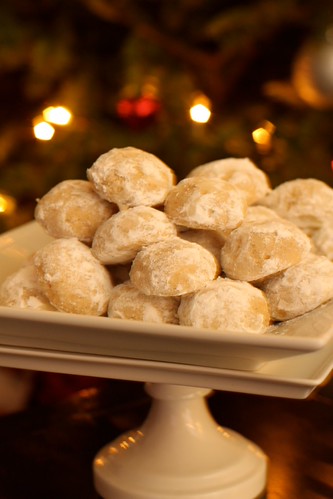
Snowball Cookies
Makes 8-9 dozen cookies
- 1 ½ cups butter, softened (3 sticks)
- 1/4 cup crisco
- 3/4 cup sugar
- 1 c. finely chopped nuts*
- 2 Tablespoons vanilla
- 4 cups flour
- Powdered sugar for rolling
*Pecans are my favorite, but walnuts work too
1. Cream butter, crisco and sugar. Add nuts, vanilla, flour.
3. Before baking, preheat oven to 300º.
4. Remove ball from refrigerator and allow dough to sit long enough until able to handle. Roll into smaller than walnut sized balls – small is better. Remember they will be slightly bigger once they are covered with powered sugar.
6. Place cookies about 1 inch apart on an un-greased cookie sheet.
7.Turn oven down to 275° and bake cookies for 30-35 minutes, or until very light in color. Cool for about 15 minutes then roll in powdered sugar to help sugar stick. They can be re-rolled in powered sugar before serving.
From my favorite Christmas cookbook: Christmas from Heart of the Home, by Susan Branch

Brown Sugar Spice Cookies for Fall

At first I was kind of bummed when I got assigned Neuro-Psych for my second rotation block – namely because I really wanted to get one of the very time intensive, 10 week long rotations out of the way earlier in the year. However, I’m learning that everything works out in the end because I have truly loved having some free time to enjoy the fall. (Remind me of this when I am waking up for surgery at 4:30 and driving through a snowstorm). Beyond the obvious fall cooking adventures, I have really enjoyed running in the park, which has been continuously blanketed with colorful leaves for several weeks now. Every time I enter Wildwood I think, ” I wish I could take my camera on runs” or “I really need to get John out here to see this before its gone”. (He gets a little reluctant to go running….well usually…..but especially when the weather drops below 70º ). I’ve managed to get him out a few times though and it has been truly gorgeous.
In celebration of the wonderful season, we had the pleasure of attending a bon fire and a halloween party. I really wanted to impress with my improving cookie decorating skills, but unfortunately I forgot how long it takes to work with royal icing. I managed to finish a few cookies to bring over, but if you really want to use royal icing, plan on making the cookies the night before. Nevertheless, I thought that these were a perfect autumn treat- just a hint of spice, but enough to remind you of fall. I’m hoping to make them again to take down for thanksgiving (especially because the 3 cookie cutter set I bought also came with a turkey!) Any icing will work for these, but if you plan on using royal icing check out my tutorial for instructions.
Brown Sugar and Spice Cookies
Makes about 40 cookies depending on the size of your cutouts
- 3 c unbleached, all-purpose flour
- 2 tsp baking powder
- 1/2 tsp cinnamon
- 1/4 tsp ginger
- 1/4 tsp pumpkin pie spice
- 1/8 tsp nutmeg (freshly grated, if possible)
- 1/8 tsp allspice
- 1/2 c granulated sugar (I use sugar that I’ve stored vanilla beans in)
- 1/2 c light brown sugar (packed)
- 2 sticks butter
- 1 egg
- 1 tsp pure vanilla extract
Preheat oven to 350.
Whisk the flour, baking powder and spices, set aside.
Cream the sugar and butter. Add the egg and extracts and mix until well-blended.
Gradually add the flour mixture and beat just until combined, scraping down the bowl, especially the bottom. (The dough will be quite thick…you may need to knead in stray bits of flour from the bottom of the bowl by hand.)
Roll dough to 1/4 inch thickness and cut into desired shapes.
Place on a cookie sheet lined with parchment paper or a silicon baking mat. Refrigerate or freeze tray for about 5 minutes if you want to insure that cookies will retain shape. Bake for 10-12 minutes
Let cool on cookie sheet for 1 minute. Then transfer to a cooling rack to cool completely.
Ice the cookies as desired.
Recipe barely adapted from Bake at 350°

On a side note, I was really excited about these containers. 40% off Hobby Lobby is the best…

Pumpkin Cupcakes with Cream Cheese Frosting

Based on my experience thus far in life, I can firmly say that you can never go wrong with pumpkin flavored anything and cream cheese frosting. I made a different version of these cupcakes last year, and there are a few things I liked about each recipe. Last year’s recipe was ridiculously moist, but almost to the point where the cupcakes stuck to the wrapper and couldn’t support the weight of the frosting when you went to take a bite. I liked this new recipe because the cupcakes are a little bit sturdier, and you don’t have to use part of a box of cake mix (what does one do with a left over 2/3 cup of cake mix? ). Plus, when I’m going to the trouble of making cupcakes from scratch I really prefer ones made with unique ingredients that wouldn’t be part of a box mix – like butter instead of oil and buttermilk for some extra moisture. I used to think that recipes that called for buttermilk were a bit annoying because you generally have to buy a whole quart, but I’ve found it lasts a lot longer than milk (like over a month) and I’ve found several other things to do with it in that time – like John’s birthday cake, ranch dressing, and then these cupcakes. But as I said before, you can’t go wrong with pumpkin and cream cheese so if your so inclined, try both recipes!
I actually made these for the children’s Halloween party that our medical school hosts every year. Now technically this party if for children with diabetes, and while you might think cupcakes wouldn’t be the best idea, the point of the party was to help the children learn how to balance their carbohydrates with their insulin. (And it is really hard to find low carbohydrate halloween desserts). So I made a double batch of these cupcakes, and calculated that each cupcake with frosting has 35 grams of carbohydrate. I got about 40 cupcakes from the double batch, and saved a few to take with us to Cincinnati for my now living in Ohio brother and sister -in-law. These went so fast that I’m pretty sure my father-in-law thought he wasn’t going to get one. Apparently they were also a big hit at the halloween party – but really what kid can resist sprinkles?

Pumpkin Cupcakes with Cream Cheese Frosting
Yield: 20-24 cupcakes with piped frosting
- 1/2 cup unsalted butter, room temperature
- 1 1/3 c brown sugar, lightly packed
- 2 eggs, room temperature
- 1/2 teaspoon vanilla
- 2 cups flour
- 1 1/2 teaspoons baking powder
- 1/2 teaspoon baking soda
- 1 teaspoon cinnamon
- 1/4 teaspoon nutmeg
- 1/4 teaspoon pumpkin pie spice
- 1/4 teaspoon salt
- 3/4 cup pumpkin puree
- 3/4 cup buttermilk
For the Icing:
- 8 oz cream cheese
- 1 stick butter (softened)
- 1/2 teaspoon vanilla
- 10 oz powdered sugar (about 3 cups), sifted
To Make the Cupcakes:
Line two muffin pans with cupcake liners; set aside.
Preheat the oven to 350˚F.
In the bowl of a stand mixer fitted with the paddle attachment, cream together the butter and brown sugar until light and fluffy. Beat in the eggs one at a time. Mix in the vanilla until fully incorporated.
In a separate mixing bowl, whisk together the flour, baking powder, baking soda, cinnamon, nutmeg and salt. In another small mixing bowl, combine the pumpkin and buttermilk until smooth.
Turn the stand mixer on to the lowest setting and alternately add the dry ingredients and the pumpkin mixtures to the creamed butter. Start and end with the dry ingredients. Mix until just combined.
Spoon the batter into the pans, filling about 2/3 full. Bake for 20 minutes, or until a toothpick inserted in center comes out clean. Allow to cool enough to handle and then move to a cooling rack. Store in airtight containers until frosted. Store frosted cupcakes in the refrigerator.
To Make the Icing:
Cream the butter, cream cheese and vanilla together on high speed. Add the powdered sugar, a small amount at a time and blend until smooth and creamy. To ice the cupcakes using a pastry bag, chill icing in the refrigerator or freezer for about 15 minutes in order to harden the icing enough to frost. Alternatively, frosting can be added immediately to cooled cupcakes using an offset spatula.

Cupcakes from Pennies on a Platter, Originally from My Kitchen Addiction
Icing inspired Ina Garten
Candy Corn Shortbread Cookies

Ina Garten’s Shortbread
- 3/4 pound unsalted butter, at room temperature
- 1 cup sugar, plus extra for sprinkling
- 1 teaspoon pure vanilla extract
- 3 1/2 cups all-purpose flour
- 1/4 teaspoon salt
Directions
1) In the bowl of an electric mixer fitted with a paddle attachment, mix together the butter and 1 cup of sugar until they are just combined. Add the vanilla. In a medium bowl, sift together the flour and salt, then add them to the butter-and-sugar mixture. Mix on low speed until the dough starts to come together. Divide the dough evenly into 3 separate bowls. Using gel food coloring color 1 bowl of dough orange, 1 bowl yellow and leave one uncolored. Mix until the colors are thoroughly incorporated.

2) Line a baking pan with plastic wrap (smaller pans work best if you have one).

3) Press the plain colored dough into the bottom of the pan, spreading to an even layer. I did not fill the entire length of the pan because I wanted slightly taller cookies. Continue with the orange and then the yellow layers.


4) Refrigerate the dough for 1 hour, or up to 3 days. You want the dough to be firm and easy to cut. Once chilled, remove from the pan and place on a cutting surface.

5) Slice the the dough into a 1/2 inch wide slice. You may also want to cut a straight line across the top yellow layer in order to get a more finished look. Then cut diagonally through the slice in order to get 5-6 pieces of candy corn. You may have some small, not perfectly shaped pieces at the edges, but that’s okay – they still bake up nicely and someone will eat them.

6) Preheat oven to 350º
7) If you have coarse sugar, you can sprinkle the piece with sugar. Place on a baking sheet and bake for 18-22 minutes. Do not over bake or they will become discolored from browning.

Recipe adapted from Barefoot Contessa, Idea from Our Best Bites
Tuxedo Cake

For as long as I can remember, I have loved making from scratch birthday cakes. One of the first ones that comes to mind is a chocolate hazelnut birthday cake for my brother’s (and my) birthday. Unfortunately, I somehow measured the wrong amount of hazelnuts in that cake, and it pretty much ruined Nutella for me for at least 5 years (don’t worry, I’ve now come to my senses). There were other times in college, where cooking in a small dorm kitchen that literally had no cooking utensils seemed like a great idea. There was freshman year, where I figured I had nothing better to do than to make a 3 layer meringue cake with whipped cream and fruit. There were several $50 german chocolate cakes, since they required buying not only the ingredients, but also pans, bowls and something to stir with. There were multiple coffee cheesecakes that served as birthday cakes, pies that served as birthday cakes and then of course the most recent Malted Chocolate and Marshmallow Six Layer Cake.
So last year, when John’s only wish for his birthday cake was boxed chocolate cake mix with simple whipped cream as the frosting, I was slightly appalled. I made the cake, I even ate a piece, and I was glad he liked it, but seriously – how boring! As his birthday approached this year, I was almost afraid to ask what kind of cake he might like, because I knew that no matter what I suggested, he would come back with the same chocolate cake with whipped cream. Then this cake popped into my mind, or rather popped up on my google reader. I had seen it earlier on Annie’s blog, but it was way back in January when I wasn’t thinking about October birthdays. I immediately knew that this would be the perfect birthday cake for John because it’s basically a dressed up of version of his favorite. The flavors are still simple, but the ganache adds just that oomph it needed to make it not only more delicious but also quite stunning. The strawberries are obviously optional, but they certainly add to the presentation. I sized down the original recipe because everyone mentioned how it was such a tall cake, and I felt a little guilty putting 4 cups of sugar in a cake (but of course, in my head, 3 was fine). I thought it came out perfectly with a slightly downsized recipe, and so that is the version I have included below. This cake is definitely a keeper and I’m really glad I was able to find something that both I enjoyed making and John enjoyed eating. Happy Birthday baby! I still love you no matter what kind of birthday cake you want :-)!

Tuxedo Cake
Yield: 3- 9 inch layers
For the cake:
3/4 cup (1.5 sticks) unsalted butter
1 1/2 cups water
3/4 cup canola oil
3 cups sugar
3/4 cup unsweetened cocoa powder
3 cups all-purpose flour
3 large eggs
3/4 cup buttermilk
2 1/2 t. baking soda
1/2 tsp. salt
1 tbsp. vanilla extract
For the frosting:
4 cups chilled heavy whipping cream
1¼ cups confectioners’ sugar, sifted
For the chocolate topping:
4 oz. bittersweet chocolate, finely chopped
½ cup heavy whipping cream
¼ cup light corn syrup
2 tsp. vanilla extract
Directions:
To make the cake layers, preheat the oven to 350˚ F. Line three 9-inch round cake pans with parchment paper. Butter and flour the inside edges of the pan, shaking out the excess flour.
In a saucepan over medium heat, combine the butter, water and canola oil; heat until the butter is melted. In a large mixing bowl, combine the sugar, cocoa powder, and flour; whisk to blend. Pour the melted butter mixture into the dry ingredients and whisk until smooth. Whisk in the eggs one at a time, then whisk in the buttermilk. Add the baking soda, salt and vanilla to the bowl and whisk just until incorporated. Divide the batter evenly between the prepared pans. Bake for 35-40 minutes or until a toothpick inserted in the center comes out clean.
Let cool in the pans for 15 minutes. Run a knife around the edge of each cake layer and invert onto a wire cooling rack. Allow the cake layers to cool completely before frosting, at least 2 hours.
To make the frosting, add the heavy cream to the bowl of an electric mixer fitted with a whisk attachment. Whip on medium-high speed until soft peaks form. Add the powdered sugar and continue to whip until thoroughly combined and stiff peaks form. Be careful not to over-beat!
To assemble the cake, place one cake layer on a cake platter and spread a layer of the whipped cream frosting over the top. Top with a second cake layer, more frosting (and the third cake layer, if using). Frost the top and sides of the assembled cake. Refrigerate until the frosting has stabilized, at least 1 hour.
To make the chocolate glaze, place the chocolate in a medium bowl. Heat the cream in a small saucepan over medium heat until simmering. Pour the hot cream over the chocolate and let sit 1-2 minutes. Whisk until the mixture is smooth and homogenous. Blend in the corn syrup and vanilla. Pour the glaze into a pitcher or measuring cup and let cool for 10 minutes. (Do not let the glaze cool longer or it may become difficult to pour over the cake.) Slowly pour the glaze over the cake, ensuring that the top is covered and the glaze drips over the sides.
Refrigerate the cake until the glaze is set and the whipped cream frosting is firm, at least 1 hour. Slice with a long, sharp knife, wiping the blade clean between slices.
Adapted from: Confections of a Foodie Bride, who adapted it from The Pastry Queen by Rebecca Rather


