
Baked Oatmeal with Fruit

You can really ask anyone who knows me – I’m not much of a breakfast person. It used to be the standing joke that John would go out to breakfast with our friend Amanda and order and entire platter of biscuits plus other breakfast monstrosities, while I would go on a 20 mile run. It’s not that I don’t love breakfast food, I just don’t like eating it in the morning. Sometimes I wish that people went out to brunch for dinner. I would most certainly order a plate full of pecan waffles, slather them with syrup and not feel guilty at all about eating what is basically a dessert and counting it as dinner. However, I just don’t like doing this for breakfast.
On any given weekday, I’m franticly trying to get out the door, half dressed and planning to put my makeup on at stoplights on my way to school. Breakfast is usually a granola bar I grab as I’m running around like a chicken with my head cut off. So the fact that I have eaten a warm breakfast everyday for the last 2 weeks must tell you that something is up. I don’t want to go so far as to say this oatmeal has changed my life, but after all they do say a good breakfast is the start to a good day and I have had a very good past 2 weeks.
This dish has taken the reigns as the best oatmeal I have ever eaten, and this is coming from someone who usually eats oatmeal all winter. It’s moist, flavorful and filled with fruit. The flavor of the toasted pecans really come through, so don’t try to save yourself a step by tossing them in un-toasted. It’s a well balanced meal and it keeps you full a lot longer than a granola bar. I think that perhaps the best thing about this oatmeal is that you can make a batch and easily reheat it for breakfast for the rest of the week. Since I have no desire to get up earlier than necessary to make myself food, I have made this on Sunday night the last 2 weeks and then reheated it throughout the week. I ate it 5 days later and it still tasted great. I plan on making this many more times as the weather gets colder, and I can’t wait to experiment with an apple or pumpkin flavor. I’ll be sure to share those with you as soon as I’ve got the recipe down :-)!

Baked Oatmeal with Fruit
– Make a 1 & 1/2 quart casserole (4-6 servings)
- 1 cup old fashioned rolled oats
- 1/3 cup pecans, light toasted then chopped
- 1/2 teaspoon baking powder
- 3/4 teaspoon ground cinnamon
- pinch of salt
- 1/4 cup maple syrup
- 1 cup milk (I used skim)
- 1 large egg
- 2 T. butter, melted
- 1 teaspoon vanilla extract
- 2 ripe bananas, sliced into 1/2 inch pieces
- 1 cup blueberries and/or raspberries
1. Preheat oven to 375°. Grease a 1 & 1/2 quart casserole with butter or cooking spray.
2. In a medium bowl toss together oats, pecans, baking powder cinnamon and salt (dry ingredients).
3. In a small bowl whisk together the liquid ingredients reserving 1 T. of butter (maple syrup, milk, egg, 1 T. butter and vanilla).
4. Line the bottom of the baking dish wish sliced bananas. Then top with about 2/3 of the blueberries and/or raspberries.
5. Spread the oat mixture over the fruit. Drizzle the milk mixture over the oats, trying to distribute as evenly as possible.
6. Bake the oatmeal for 35-45 minutes. Remove from oven and top with remaining 1 T. of butter.
7. Dish can be served straight from the oven and topped with additional toppings if desired. (I didn’t find this necessary). Alternatively, this can be made, refrigerated and individual pieces can be reheated in the microwave for about 1 – 1 1/2 minutes.
Slightly Adapted from The Curvy Carrot, originally from Super Natural Everyday by Heidi Swanson
Best-Ever Raspberry Pie
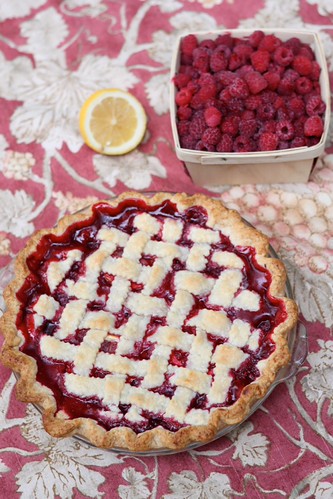
I promised you that there would be more raspberry recipes to come, and I don’t lie. I made this as part of the dinner part I had with my family over labor day weekend, but the truth is we ate so much of it for dinner that I felt the need to make another pie the next day :-). I’m planning on making a 3rd one, likely today, that’s how much I love this pie.
Now to give you an idea of why this must be the best ever raspberry pie, you should know that I am not much of a fruit pie fan. I’m not one to turn down any dessert, but fruit pie would never be my first choice. This pie is an exception. I really think it is the best recipe ever created for raspberry pie. I have never met a person who didn’t love it, and my mom has been making it every year since I can remember. Now there are a few keys to this pie that make it so delicious. First of all it really does help if you use good quality raspberries. I’ve bought a few of the store bought variety this year and have been sorely disappointed. This could be because I bought them before they were truly in season, but still I think raspberries are best either hand-picked or bought from a farmers market. Second, it uses crème de cassis or blackberry liqueur. I know that it’s a pain to buy one bottle of liqueur that you only use for one recipe, but that bottle will last you through several years of raspberry pie making – so it’s totally worth the investment. And third, there is butter and lemon slices in the pie filling itself – how can you go wrong.
For a while I have tried to avoid the realization that homemade pie crust is about 7864 times better than store-bought, mostly because I have been trying to avoid the extra work that comes with making homemade pie crust. However, I have (somewhat remorsefully) come to my senses. Homemade pie crust is just so much better. Its flakier, it melts in your mouth and it doesn’t have artificial taste that hints through in store bought crust. Since I learned the trick about rolling the pie crust out between 2 pieces of parchment paper, it has become infinitely easier to make. I think it is totally worth the extra 10 minutes, but I won’t tell if you still want to use store-bought :-). I haven’t included a recipe for pie crust here because it seems that everyone has there own favorite. I used a recipe from the pioneer woman, but I can’t say I’ve tried enough to really say it is the best ever. And really, if you are trying to save time my mom has made this countless times with store bought pie crust and I have still loved it. I also would guess that you could easily make this into a blackberry pie but I have never tried this since I love raspberries. If you do, let me know how it turns out!

Best Ever Raspberry Pie
– Makes 1 standard 9 inch pie
- 5 cups raspberries (2 1/2 pints)
- 1 cup granulated sugar
- 1/3 cup Crème de Cassis or blackberry liqueur
- 4 Tablespoons cornstarch
- 1 Tablespoon fresh squeezed lemon juice
- Pinch of salt
- 2 tablespoons butter sliced paper thin
- 3 paper thin slices of lemon (a mandoline would be best for this)
- Top and bottom layer of pie crust
- Preheat oven to 425 F.
- Toss raspberries and sugar gently together in mixing bowl.
- In a measuring cup, whisk liqueur and cornstarch together until smooth.
- Stir Cassis mixture, lemon juice and salt gently into berries.

- Line a standard 9 inch pie pan with crust. (Do not use a deep dish pie unless you significantly increase the number of berries) Spoon in the berries, and arrange lemon slices and butter over the berries.
- With the top pie crust layer, cut it into about ½ inch strips, preferably using a pastry cutter like this. Arrange over berries in a lattice pattern, alternating under-over. Crimp the edges of the pastry together.
 (This was the first pie we made)
 - Set on the middle rack of the oven and bake at 425F for 15 minutes. *Then lower heat to 350F and bake for another 30 to 40 minutes, or until crust is golden brown and filling is bubbling.
Slightly adapted from The Silver Palate Cookbook

Parmesan Encrusted Goat Cheese with Basil Oil

Last weekend, John and I came back to b-ville to spend time with my Mom and brother who just returned from Alaska. We didn’t have any big plans for the weekend, but we all usually try to get together for dinner with family. Luckily both my grandparents, my cousin Johnny and his girlfriend Val were able to make it over. Of course I think of this as a great excuse to make a fancy meal I wouldn’t normally make for just the 2 of us and to have 8 guinea pigs to try it. It happens to help that my brother returned from Alaska with over 12 pounds of halibut for me to put to use!
While it got kind of late in the evening to try to photograph the whole meal, this appetizer was one of the first things we enjoyed on Saturday (of course this came after my grandparent’s favorite – Manhattans). I have to admit I overdid it on the garlic in this recipe – you would’ve thought we were trying to keep vampires away. Sometimes more is not better, so I would recommend sticking to the 1-2 cloves of garlic indicated in the recipe. I think my favorite thing about this dish was the presentation. It looks like art but truthfully takes less than 10 minutes to put together. In order to save time (and because I mis-read the recipe :-)), I skipped the step in which you blanch the basil. It still turned out beautifully but if you want a truly stunning green color, blanching would be the way to go. I also left the basil leaves in the oil but for a smoother texture you can strain them out with a fine mesh sieve. Pulsing the basil in the food processor should’ve flavored the oil sufficiently that they are not necessary in the final dish.

Parmesean Encrusted Goat Cheese with Basil Oil
– Makes a 4 or 8 oz goat cheese ball depending on your preference
For the goat cheese:
1/2 oz. Parmesan cheese
¼ cup panko
Freshly ground pepper
4 -8 oz. semi-firm plain goat cheese
1 clove garlic
¼ tsp. coarse salt, plus more to taste
For the basil oil:
¼ cup fresh basil leaves
1 clove garlic
¼ cup extra-virgin olive oil
Baguette Slices
1. In the bowl of a food processor add the block of parmesan cheese and pulse until finely grated. Add the panko and pulse to combine. Season with pepper. Transfer mixture to a separate bowl and wipe out the bowl of the food processor.
2. With a fork, smash the garlic and salt together. Add garlic/salt to the goat cheese and sir to combine. Form the goat cheese into a ball and roll in the parmesean-panko mixture. Wrap in plastic wrap and refrigerate until ready to serve.
3. If blanching the basil: Bring a few cups of water to a boil. Add the basil leaves to the saucepan and boil for 30 seconds. Drain and rinse immediately with cold water. Blot the basil leaves with a towel to remove all of the excess water.
4. Add basil and garlic to the food processor and pulse. Scrape down the sides of the bowl. With the food processor running add oil until texture is liquidly (you may need slightly more than 1/4 cup).
5. To serve, pour the bail oil onto a plate and top with goat cheese ball. Serve with baguette slices.
Source: Annie’s Eats
Raspberry Lemonade Bars

This week marks the end of another wonderful rotation and so therefore also another baked good. As I said, I’m working on dermatology and I’ll have to say I’m spoiled. Not because I have the best hours (we work 11-12 hour days, there is a dermatologist shortage!) But I’m spoiled because I think I am working with one of the kindest, most cheerful and sincere doctors I have ever met, and I’m just not sure if my future rotations can live up to these high standards.
Since I went home this weekend, I had the pleasure of going raspberry picking with my mom (and dragging John along), which opened a new world of recipe possibilities. Despite the fact that it was about 97 degrees, we had a lot of fun and came home with quite a loot of berries. I have come up with quite a few fun ways to put them to use, so consider this fair warning if you soon tire of seeing raspberry recipes on this blog. As far as I’ve heard raspberry season (at least in Ohio) doesn’t end until mid-October so go ahead and pick some berries for yourself – you won’t even have to suffer through the heat.
About the bars themselves, I brought them in today, and they were a big hit. I described them as raspberry bars , and one of the nurses said, “They taste like raspberry lemonade!” I thought this was ironic because that was the actual name of the original recipe but she came up with that description de novo. If you notice this recipe requires a lot of juicing of lemons. I found this to be the most troublesome part, especially considering that after I had juiced 8 lemons I somehow managed to spill the entire cup of lemon juice all over myself. Since I didn’t have enough lemons to make another cup, I used some bottled lemon juice to make up the difference. They still tasted good but I wouldn’t recommend substituting all of the fresh squeezed lemon juice for the bottled stuff as it tends to be more tart. The other tedious part of this recipe is separating all those egg whites. If your wondering what to do with the leftover yolks, that’s easy – make ice cream! Of course you could also make traditional lemon bars if you want to skip the raspberry flavor all together, but I’m not advocating that.
Raspberry Lemonade Bars
Makes a 13 x 9 inch pan. * Recipe can be halved to make an 8×8 pan, but will need a slightly reduced baking time.
For the Crust:
- 2 sticks unsalted butter, softened
- 1/2 cup sugar
- 1 3/4 cup all-purpose flour, plus more for sprinkling
- 1/2 teaspoon salt
For the Raspberry Lemon Layer:
- 3 cups sugar
- 1 1/3 cups flour
- 3 T. lemon zest
- 1/4 teaspoon salt
- 3 cups raspberries (thaw if using frozen)
- 6 large egg whites
- 2 large eggs
- 1 1/3 cups freshly squeeze lemon juice
- Powdered sugar for dusting (if desired)
To make the Crust:
Preheat oven to 350°. Line a 13×9 inch pan with parchment paper.
Combine butter, sugar, flour and salt in a medium bowl and mix until butter is evenly cut into dough. Press dough evenly into pan, sprinkling additional flour if dough is sticky. Bake for 25 minutes, until golden brown. Remove from oven and keep warm
To make Filling:
Add flour, sugar, lemon zest and salt to a large bowl and whisk to combine.
Add the berries to a fine mesh sieve and mash through with a spatula to extract as much pulp and juice as possible, leaving behind the berry seeds.
Add the raspberry puree, egg whites and eggs and lemon juice to the flour mixture and whisk until evenly mixed. Pour over the warm crust.
Bake pan for 35-40 minutes until the center is almost set. Remove from oven and cool. Cover and refrigerate for at least 2 hours. Remove bars from pan using the parchment paper and run a sharp knife under water to slice bars. Sprinkle with powdered sugar before serving, if desired.
Adapted from Annie’s Eats, Originally from Sophistimom
Quick and Light Key Lime Pie

I know there are about 400 different recipes available for key lime pie. I have made my fair share of them, but it seems that I always go back to this recipe. It is not particularly traditional and it certainly takes some short cuts, but I think that’s why I like it. It’s easy to put together, doesn’t require a huge list from the grocery store and still tastes better than any store-bought version. In fact, I can remember making this on more than one occasion while we were vacationing at the beach without access to my usual kitchen repetoire. If you are having trouble finding key lime juice with the other drinks, try looking in the cocktail aisle as sometimes I’ve found it there. This pie also happens to be a lightened version, which no one would know, but generally just gives you an excuse to eat more than one piece :-).
I know that summer is coming to a close, but perhaps if you are looking for something to take to a labor day bbq today, you could have this ready in time. Besides, I would guess that we might be blessed with a few more hotter than h-e-double hockey sticks days before summer officially goes away. And heck, this pie is so good that no one is going to complain if you serve it in the middle of fall at thanksgiving dinner.
Quick and Light Key Lime Pie
– Makes 1 9-inch pie
- 2 large eggs
- 2 large egg whites
- 1/2 cup Key lime juice (I use Nellie and Joes)
- 1 teaspoon grated lime rind
- 1 (14 oz) can reduced fat sweetened condensed milk
- 1 reduced fat graham cracker crust (6 oz)
- 2 cups lite whipped topping, thawed
1. Preheat oven to 350°.
2. Beat eggs and egg whites with a mixer on medium until well blended. Add juice, lime rind and milk and blend.
3. Pour mixture into crust and bake for 20 minutes. Center should be almost set, but will set more as it cools.
4. Cool pie on wire rack. Transfer to refrigerator and chill for 4+ hours. Top with cool whip before serving.

Slightly adapted from Cooking Light
Pineapple Upside Down Cake

If I had my choice of desserts, pineapple upside down cake would not be at the top of my list. Well at least it wasn’t until I made this cake. If you think like me, you might think that pineapple upside down cake is stuck in the 1980s. While I must admit that the ho-hum yellow-tan color occasionally mixed with the bright red of a maraschino cherry is somewhat unappetizing and does indeed remind me of 1980s wallpaper, I must give some respect to the deliciousness that is this cake.
I made this for my dad’s birthday because for as long as I can remember, it has been his favorite cake. Perhaps this is because I was raised in the 80s, at a time when yellow-tan was in style. Or perhaps my dad has not ventured out into the world of other cake flavors. But most likely I think that my dad just realized that this is a simple cake base that could be eaten on it’s own, combined with a pineapple-carmel syrup that is to die for.
When I decided that I was going to make this for his birthday, I searched high and low for what I thought would be the best recipe. I have made a few pineapple upside down cakes in the past, but I wanted something that would be truly exceptional. While I am not normally one to alter a baking recipe much from the original, I had to make an exception for this cake. I ended up combining the best parts from 2 separate recipes so that I could get a rich cake that would fit in a 9-inch pan and not use the entire pound of butter. I think it turned out to be a success. The cake has a rich and nutty flavor and is so moist in part because of the sour cream and pineapple juice and in part because of the rich syrup sauce it is drenched in. Of course the pineapple itself is on the of the best parts, so feel free to use real pineapple if you have it handy. I have a feeling that I will be making this around September 1st again next year :-).

Pineapple Upside Down Cake
– Makes one 9-inch cake
Pineapple Topping
- 1-20 oz can pineapple slices in juice (reserve juice)
- 3/4 stick unsalted butter
- 3/4 cup brown sugar
Cake
- 1 cup all purpose flour
- 1/4 cup cake flour
- 1/4 cup ground almonds
- 1 teaspoon baking powder
- 1/2 teaspoon salt
- 1 cup sugar
- 1 teaspoon vanilla extract
- 1/4 cup pineapple juice
- 10 Tablespoons butter (1 stick + 2 T.)
- 2 large eggs
- 1/2 cup light sour cream
1. Heat brown sugar and butter in a saucepan over medium heat until bubbling (several minutes). Remove from heat and pour mixture into a non-stick 9 inch cake pan. Place slices of pineapple over the sauce, cutting pieces as necessary to fit as many as possible.
2. Preheat oven to 325º.
3. Whisk flours, almonds, baking powder and salt in a medium bowl. In the bowl of a mixer blend sugar and butter. Add eggs, one at a time and then mix in vanilla and pineapple juice. Once blended slowly add the flour mixture, alternating with the sour cream. Batter will be thick.
4. Pour batter on top of pineapple slices in pan. Bake at 325 for 50-60 minutes or until a toothpick inserted in center comes out clean.
5. Cool for 5-10 minutes and then invert cake on a rimmed plate to insure no juices are lost. Serve warm or refrigerate for 1-2 days before serving.
Inspired by Smitten Kitchen and Simply Recipes

