
Pecan Bars

Eeek. I can’t believe I’m already done with more than half of my third year of medical school. Seriously! When patients ask me how much time I have left, I have started saying, “About a year” because it just seems easier than saying 16 months. To mark the end of my internal medicine rotation, and the end of a very good 3 weeks working in Lima, I decided to make these pecan bars to bring into the office. I have to admit that when I started this rotation, I was a little bummed about having to leave our brand new puppy for 3 weeks, but it has really worked out for the best. I’ve gotten to come home quite a bit, the gym in Lima is really nice, and being somewhere unfamiliar with no real television has a way of making you get a lot done. Plus, the doctor I’m working with is a great teacher, and now I can actually read an EKG confidently! He has also reminded me that being stressed out at your job is really your choice- it doesn’t get the job done any better, or faster, and it makes me feel like crap.
So about these pecan bars. Everyone at the office (including myself), loved these, and a few people even asked me for the recipe. (Of course, I was immediately excited to be able give them the “Spice is Nice” business cards I got for Christmas… it’s the little things.) I was between this recipe and one from Barefoot Contessa. I went with one because the Ina version called for over a pound of butter (granted it made a larger pan…but still!) I’m certainly glad I did because there is really nothing I would change about this recipe. I accidentally forgot to drizzle chocolate over the top, but in retrospect I’m kind of glad I left it off. These were plenty rich on their own, but if you are a true chocolate lover, feel free to make this into a chocolate and pecan dessert.

Pecan Bars
Makes about 16 bars
- 1 cup unbleached all-purpose flour
- 1/4 teaspoon baking powder
- 1 teaspoon salt
- 1/3 cup packed light brown sugar
- 1/4 cup pecans, toasted and chopped coarse
- 6 tablespoons (3/4 stick) cold unsalted butter, cut into small pieces
- 4 tablespoons (1/2 stick) unsalted butter, melted
- 1/2 cup packed light brown sugar
- 1/2 cup light corn syrup
- 2 teaspoons vanilla extract
- 1 tablespoon bourbon
- 1/2 teaspoon salt
- 1 large egg, lightly beaten
- 1 and 3/4 cups pecans, toasted and chopped coarse
- 1/3 cup semisweet chocolate
- For the crust: Preheat oven to 350º.
- To prepare the pan, spray a 9-inch square baking pan with nonstick cooking spray. Fold two 16-inch pieces of foil or parchment paper perpendicular to one another in the baking pan so that there is overhang around all the edges. Overlap is important to ensure filling doesn’t leak below one layer. Spray the sheets with nonstick cooking spray.
- Place the flour, baking powder, salt, brown sugar, and 1/4 cup pecans in a food processor.
- Process the mixture until it resembles coarse cornmeal, about 5 one-second pulses.
- Add the butter and pulse until the mixture resembles sand, about 10 one-second pulses.
- Pat the mixture evenly into the prepared pan and bake until the crust is light brown, about 20 minutes.
- For the filling: While the crust is in the oven, whisk together the melted butter, brown sugar, corn syrup, vanilla, bourbon, and salt and egg, in a medium bowl until just combined.
- Pour the filling on top of the hot crust and sprinkle the 1 & 3/4 cups pecans evenly over the top.
- Bake until the top is brown and cracks start to form across the surface, 22 to 25 minutes.
- Cool on a wire rack for about 1 hour.
- For the drizzle: Melt the bittersweet chocolate, if using, in the microwave for about 30 seconds, stirring frequently. Drizzle the chocolate evenly over the cooled bars.Let sit until room temperature, about 1 hour.
- Remove the bars from the pan using the foil or parchment paper “handles” and transfer to a cutting board; cut into desired sizes.
Source: The Curvy Carrot, originally from Baking Illustrated
Raspberry Lemonade Bars

This week marks the end of another wonderful rotation and so therefore also another baked good. As I said, I’m working on dermatology and I’ll have to say I’m spoiled. Not because I have the best hours (we work 11-12 hour days, there is a dermatologist shortage!) But I’m spoiled because I think I am working with one of the kindest, most cheerful and sincere doctors I have ever met, and I’m just not sure if my future rotations can live up to these high standards.
Since I went home this weekend, I had the pleasure of going raspberry picking with my mom (and dragging John along), which opened a new world of recipe possibilities. Despite the fact that it was about 97 degrees, we had a lot of fun and came home with quite a loot of berries. I have come up with quite a few fun ways to put them to use, so consider this fair warning if you soon tire of seeing raspberry recipes on this blog. As far as I’ve heard raspberry season (at least in Ohio) doesn’t end until mid-October so go ahead and pick some berries for yourself – you won’t even have to suffer through the heat.
About the bars themselves, I brought them in today, and they were a big hit. I described them as raspberry bars , and one of the nurses said, “They taste like raspberry lemonade!” I thought this was ironic because that was the actual name of the original recipe but she came up with that description de novo. If you notice this recipe requires a lot of juicing of lemons. I found this to be the most troublesome part, especially considering that after I had juiced 8 lemons I somehow managed to spill the entire cup of lemon juice all over myself. Since I didn’t have enough lemons to make another cup, I used some bottled lemon juice to make up the difference. They still tasted good but I wouldn’t recommend substituting all of the fresh squeezed lemon juice for the bottled stuff as it tends to be more tart. The other tedious part of this recipe is separating all those egg whites. If your wondering what to do with the leftover yolks, that’s easy – make ice cream! Of course you could also make traditional lemon bars if you want to skip the raspberry flavor all together, but I’m not advocating that.
Raspberry Lemonade Bars
Makes a 13 x 9 inch pan. * Recipe can be halved to make an 8×8 pan, but will need a slightly reduced baking time.
For the Crust:
- 2 sticks unsalted butter, softened
- 1/2 cup sugar
- 1 3/4 cup all-purpose flour, plus more for sprinkling
- 1/2 teaspoon salt
For the Raspberry Lemon Layer:
- 3 cups sugar
- 1 1/3 cups flour
- 3 T. lemon zest
- 1/4 teaspoon salt
- 3 cups raspberries (thaw if using frozen)
- 6 large egg whites
- 2 large eggs
- 1 1/3 cups freshly squeeze lemon juice
- Powdered sugar for dusting (if desired)
To make the Crust:
Preheat oven to 350°. Line a 13×9 inch pan with parchment paper.
Combine butter, sugar, flour and salt in a medium bowl and mix until butter is evenly cut into dough. Press dough evenly into pan, sprinkling additional flour if dough is sticky. Bake for 25 minutes, until golden brown. Remove from oven and keep warm
To make Filling:
Add flour, sugar, lemon zest and salt to a large bowl and whisk to combine.
Add the berries to a fine mesh sieve and mash through with a spatula to extract as much pulp and juice as possible, leaving behind the berry seeds.
Add the raspberry puree, egg whites and eggs and lemon juice to the flour mixture and whisk until evenly mixed. Pour over the warm crust.
Bake pan for 35-40 minutes until the center is almost set. Remove from oven and cool. Cover and refrigerate for at least 2 hours. Remove bars from pan using the parchment paper and run a sharp knife under water to slice bars. Sprinkle with powdered sugar before serving, if desired.
Adapted from Annie’s Eats, Originally from Sophistimom
Strawberry, Cream Cheese, Pretzel Squares

This dessert is kind of hard to describe. When you hear “Strawberry-Pretzel” it sounds weird, and even slightly gross, and I get that. Let me just tell you that when I was describing it to my mom, before I could even finish telling her about the middle layer of the dessert, she said, “That is my all time favorite summer dessert!,” and then she was disappointed that she couldn’t partake in eating it. I’m pretty sure that at some point in your life, you have eaten this dessert, perhaps without ever knowing what went into making it so delicious. I made this for the 4th of July BBQ we had when we got back from our camping adventure and since I wanted it to be red white and blue, I added some blueberries to the cream cheese layer. Unfortunately, you could hardly see the blue, or taste the blueberries, which should only tell you that this dessert should not simply be relegated to the 4th of July – you should probably just eat it all summer, or all year for that matter.
I’m sorry I didn’t get to take pictures of all the steps, but I was in kind of a hurry because I started making this without first reading the instructions carefully. This is probably the type of thing you should make the day before, or at least the morning of an evening BBQ, because jello takes a long time to set! I cut down the chilling time significantly (because I needed it ready by 7 pm), and it still turned out fine, so I have indicated this change in the recipe below. However, other than the waiting time between each layer, this was much simpler to put together than I imagined. Each layer is super easy- just mix and pour into the pan. The only baking required is the 10 minutes to set the pretzel crust. I even took the liberty of “lightening” this dessert, and it didn’t taste any different than I remember as a kid. In fact, a lot of people call this “Strawberry, Pretzel Salad”, so I’m pretty sure that means that you can eat a lot of it without feeling guilty ;-).
Strawberry, Cream Cheese and Pretzel Squares
Hands on time: 20 minutes Total Time with Cooling: 3 1/2 hours
Makes 1-13×9 inch pan, about 15-20 servings
- 2 cups finely crushed pretzels (Pulse in the food processor)
- ½ cup sugar, divided
- 10 T. butter (1 stick + 2 T.), melted
- 1½ pkg. (10 oz. total) PHILADELPHIA 1/3 less fat Cream Cheese, softened
- 2 Tbsp. milk
- 1 cup thawed COOL WHIP Whipped Topping
- 2 cups boiling water
- 1 pkg. (4 servings) JELL-O Brand Strawberry Flavor Gelatin
- 1 pkg. (4 servings) Sugar Free JELL-O Brand Strawberry Flavor Gelatin
- 1½ cups ice cold water (ice cubes are fine)
- 1 qt. (4 cups) strawberries, sliced
- 1 cup blueberries, if desired
Pretzel Layer: Preheat oven to 350°F. Mix pretzel crumbs, 1/4 cup of the sugar and all the butter. Press into bottom of 13×9-inch baking pan. Bake 10 min. Cool.
Cream Cheese Layer: Beat cream cheese, remaining 1/4 cup sugar and the milk until well blended. Gently stir in whipped topping and blueberries (if using). Spread over cooled crust. Refrigerate until ready to use.
Strawberry Jello Layer: While the above layers are in the fridge, stir boiling water into dry gelatin mix in large bowl for at least 2 minutes, until completely dissolved. Stir in ice cold water (it is fine if ice cubes are still in the water, they will melt). Put bowl in the freezer for 20 minutes, then remove and stir in strawberries. Pour cool jello over the cream cheese layer, and allow to solidify in the fridge for about 3 hours. Slice in squares and serve with a fork.
Adapted from Brown Eyed Baker, originally adapted from Kraft

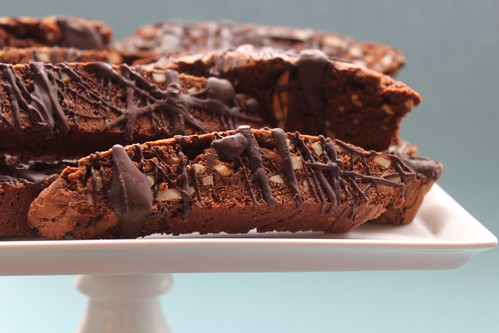
Chocolate Almond Biscotti
It’s Mother’s Day, and while I may be biased (aren’t we all), I think I have the best mom ever. She has taught me so much, and continues to inspire me, guide me, and encourage me through all of life’s twists and turns. I wish I could be with her today, but these pesky boards have me walled up in my apartment. (I actually wrote this post last week and saved it for today because I knew I’d be studying). Since I can’t be there to thank her in person for all she’s done for me, I really wanted to send her something in appreciation. I first started with the idea of chocolate-raspberry truffles, which I’m sure my mom would love but they need to be refrigerated and therefore are not mail friendly. Then I thought I’d make toffee, but I made this at Christmas and while it was delicious, it’s way to easy to eat all of it in one day (and then regret doing that). Then I thought about the fact that my mom, like me, is back in school. Speaking as a student myself, sometimes we just need a cup of coffee. I’m personally not a big coffee fan (diet coke is one of my guilty pleasures), but when I’m too tired to turn another page in my notes, coffee has been my friend.
I finally decided on these chocolate almond biscotti because they are perfect for a student, who can enjoy them with a cup of coffee during some late night studying. They also happen to be very mail friendly because they are sturdy and keep for a long time. If you’d like, you can pop them in the freezer and they will keep even longer. They are also delicious, but not so over the top that you will find yourself sneaking back to eat more and more – they are really best enjoyed dipped in coffee (although my mom loves chocolate, so I can’t really make any guarantees :-)). So thanks Mom for everything you have done for me, and for inspiring me with how hard you’re studying and how much your learning! I hope this biscotti make your late nights a little more enjoyable! Happy Mother’s Day to all the moms out there – you are truly appreciated!

Chocolate Almond Biscotti
– Makes about 32 biscotti
- 9 squares (9 oz) semi-sweet chocolate (or 1 1/2 cups chocolate chips)
- 2 1/2 cups flour
- 1 1/2 t. baking powder
- 1/4 t. salt
- 5 T. unsalted butter, softened
- 1/2 cup granulated sugar
- 1/2 cup brown sugar, packed
- 3 eggs
- 1 teaspoon vanilla
- 1 heaping cup slivered almonds
- 3 oz (1/2 cup) semi-sweet chocolate for drizzling (optional)
1. Preheat oven to 325°. In a small bowl, combine flour, baking powder and salt.
2. If using chocolate squares, coarsely chop them. Melt the chocolate in the microwave for 2 minutes, then stir to melt all the pieces.


3. Beat butter and both sugars together on high. Add the eggs and beat well. Then add the melted chocolate and vanilla. Slowly add the flour mixture, and mix thoroughly. Add the slivered almonds, as the last mix in.


4. Transfer dough to a floured surface and divide into 2 equal pieces. If the dough is too sticky, add a bit more flour. Roll each piece of dough into a log about 10 x 2 inches, and place on a baking sheet about 3 inches apart.
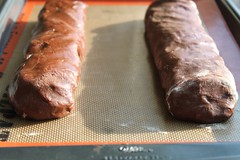
5. Flatten the rolls slightly by pressing down on them with a spatula. Bake at 325 for 40-45 minutes.
6. Remove rolls from oven and allow to cool for 15 minutes. Then transfer to a cutting board and cut each roll diagonally into about 16 pieces. (*A very sharp knife worked better than a serrated one for me).

7. Lay pieces back on the baking sheet, and bake (still at 325°) for an additional 20 minutes.

8. Finish by drizzling with melted chocolate if desired. Store in an airtight container for up to 2 weeks or freeze for future use.

Adapted from Baker’s Chocolate Squares
Toffee Bars

You know the saying, “When it rains, it pours”? Well that was my day yesterday. A multitude of factors (in addition to the cold rain outside my window) lead to a terrible, horrible, no good, very bad day. Okay, so actually it was only like a terrible, horrible, no good very bad 3 hours – but still upsetting. I’ll spare you the details, because I’m trying not to think about it, but in addition to a good dinner of commiserating with friends, I knew I had to come home and bake something. I had bought a giant sized bag of chocolate chips at Costco (they were on coupon special), with the intention of making all kinds of delicious treats with them. While I did make some delightful chocolate chip cookie dough cupcakes and chocolate chip cookies, for the most part I have been enjoying the chocolate chips by the handful, mixed with some almonds and raisins (that makes it healthy….right?). I really wanted to avoid making plain chocolate chip cookies for the billionth time, so I scoured the internet for something that would not require a trip to the store, and that would use up some of my chocolate chips.
When I found this recipe on Ree’s blog, it seemed to fit the bill. I was a little skeptical that these “bars” would end up tasting just like a chocolate chip cookie in a bar form since they pretty much have all the same common ingredients you find in a cookie. I even thought about making the real toffee I made for Christmas instead – but that requires a candy thermometer, which I don’t have here. Anyways, these bars actually taste like… wait for it…. that’s right….. TOFFEE (I know, hard to believe given the name and all). I think it’s the increased ratio of brown sugar to butter in this recipe that gives it something extra special. These were super easy to put together, and were delicious. I’m actually a little scared that I’ve found such a wonderful sweet treat that only requires ingredients I usually keep in the pantry, and that can be made from start to finish in less than 30 minutes – dangerous! Apparently these freeze well…but I doubt there will be any leftover to find out for myself.
Toffee Bars
– Makes about 24 squares
- 2 sticks butter
- 1 cup packed brown sugar
- 1 egg
- 2 teaspoons vanilla
- 2 cups flour
- 2 cups chocolate chips
- 1 cup (finely) chopped pecans
Preheat oven to 350°. Cream butter and sugar on high until fluffy. Add egg and vanilla and mix. Stir in flour until fully incorporated. Spread the mixture onto a cookie sheet, trying to create some resemblance of a square. Bake for 15-18 minutes, or unti golden brown.

Once baked, sprinkle the chocolate chips over the top, and bake for 2 minutes. Then spread the chocolate using a spatula. Finish by sprinkling with chopped pecans. Cut bars into squares, and then let cool for at least an hour to let the chocolate harden (this was definitely the hardest part).

Barely adapted from The Pioneer Woman
Lemon Bars

I have never really been a lemon bar lover. In fact, if I have to chose between a fruity dessert and a chocolate one – chocolate will win out every time. (Well, unless you count Twizzlers as fruity dessert :-)) That being said, our friend Lydia has made lemon bars for us a few times, and every time I try one, I am pleasantly surprised. With the weather being over 80 degrees on Sunday, I just had this craving to whip up a batch of lemon bars. The result was so summery that I now officially have spring fever! I actually really like the box mix of lemon bars, but I will tell you that these have a definite extra punch of lemon flavor. So be warned: True Lemon Lovers Only!
Lemon Bars
For the Crust
- 1 3/4 c. all purpose flour
- 2/3 c. powdered sugar
- 1/4 c. cornstarch
- 3/4 teaspoon salt
- 1 1/2 sticks (12 T.) butter, slightly softened, cut into 1 inch pieces
Preheat oven to 350 degrees. Line a 13×9 baking sheet with parchment paper, then line the pan again with parchment in the opposite direction to allow you to lift the bars out when finished. In a food processor, pulse the flour, powdered sugar, cornstarch and salt. Add the butter and pulse until mixture resembles course meal. Sprinkle mixture into the pan and press down evenly with fingers. Bake until slightly golden, about 20 minutes. In the meantime start on the filling…
For the Lemon Filling
- 4 large eggs, slightly beaten
- 1 1/3 c. granulated sugar
- 3 T. all purpose flour
- 1 teaspoon cornstarch
- 2 teaspoons grated lemon zest (about 2 lemons)
- 2/3 cup lemon juice, strained (about 4 lemons)
- 1/3 cup milk (I used skim, but whole would be better)
- 1/8 teaspoon salt
Whisk eggs, sugar and flour in a medium bowl. Add the lemon juice, lemon zest, milk and salt and blend. Once the crust is golden brown, reduce oven temperature to 325° and pour the lemon mixture into the warm crust. Bake for about 22 minutes, or until the filling feels firm.
Remove from the oven and cool to room temperature (at least 30 minutes). Remove the lemon bars from the pan by lifting up on the parchment (The bars may bend, but won’t break). Cut bars using sharp knife and cleaning the knife between cuts. Sift powdered sugar on top right before serving.
Slightly adapted from Cook’s Illustrated

