
And the award goes to…

I know this is another non-traditional post, but what can I say, my life has been a little non-traditional lately! Since our schedules have been laid back, with no major exams looming over our heads, John and I made a goal to see all of the Oscar nominees for best picture before the big event. (We love movies, and $5 movie night on Tuesdays is hard to pass up!) We got to 89% of our goal – seeing all but Amour before the awards began. Amour was a hard movie to track down, especially in a small place like Toledo, OH. I was kind of bummed about not batting a thousand; but after seeing how depressing it looked, I’m kind of glad that’s the one we missed. To honor our movie loving nature, and to have some extra fun on a Sunday night, we decided to have an Oscar’s Party – which I’m hoping is something we can make an annual event! I had a ton of fun planning the food, decorations, and watching the winners announced with my own ballot made it quite a nail biting experience! I would like to take credit for the decorations, but truthfully, when my mom heard about the party she sent me home with a box of ideas, and then a few days later I got a “red carpet” in the mail ;-).
My personal favorite was this centerpiece that included miniature movie posters for all 9 of the best picture nominees. I simply went onto ABC’s website and printed the pictures of each nominee on photo paper, as well as the Oscars logo.

Then of course there was the star of the show – The Oscars themselves. John can take complete credit for turning these mermaids from the dollar store into masterpieces. I’m quite sure you could buy some imitation Academy awards, but this was much more fun, and I’m sure less expensive. These also served as first, second and third place prizes for the winners. The mermaids were $1 each, and then we also bought some mini frisbees to serve as the bases. John pulled the hair off of them, tied their hands together (creepy, but necessary), and then hot glued the whole thing in place. He put 3 coats of a Rust-Oleum Metallic Brass Spray paint over the whole thing. In retrospect, you could see the glue much more than anticipated, but they still looked really awesome, and a lot funnier then store bought awards.

Here’s the process:


It’s amazing what a can of spray paint can do!

Then there was the red carpet, which was actually made of 3 red bath mats (found at Marc’s), taped together with some duct tape. We made sure to wash these before placing them on top of our carpet, since cheap bright red towels can bleed. Next time I really want to take pictures of people coming in on the carpet, but there is just so much going on at the start of a party.


I wanted to keep the menu classy (this is a red carpet affair after all), but also reasonable in price and manual labor. Appetizers for a big group can be very time intensive, so I tried to limit the number of things that had to be individually assembled. If you have questions about any specifics, feel free to ask.
- Tortellini with a creamy lemon and roasted garlic dipping sauce
- Crostini with goat cheese and roasted red peppers
- Spinach and artichoke dip with pumpernickel and crostini
- Mini phyllo cups filled with seafood salad
- Bacon wrapped pineapple and water chestnuts
- Assorted Cheeses
- Salami with crudites
- Cookies and Cream Cupcakes
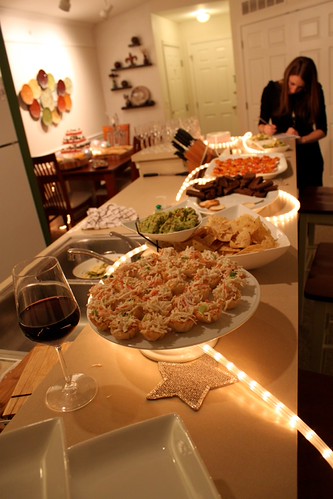
The cheese and dessert table. Rope lights are a really fun and easy way to make the whole event “sparkle”.

A few of the appetizers sitting out, and some serious ballot decisions in the background :-).
With last minute prep, welcoming people, and trying to have fun, I didn’t get to take any close up pictures of the appetizers in order to post recipes. I figured I’d just post about the party in general, because it would gives me something to improve upon for next time, and it’s a good way to remember where to start. Since I made the cupcakes especially for a friend’s birthday, I do have some pictures of those, which I will be posting, along with the recipe about shortly! Stay Tuned!

Overall, it was quite a hollywood affair :-)!

Star Spangled Apple Pie

Between pinterest, google reader, and an ever growing cookbook collection, I read a lot of recipes. Usually I file them away so that I can peruse my favorites when trying to plan a menu. But every once in a while a recipe is so memorable that it pops into your head a whole year later, while at the grocery store frantically trying to finalize the memorial day barbeque. This recipe would fall into that category.
Normally I wouldn’t think of apple pie as a traditional Fourth of July dessert, but a star spangled apple pie – well that’s entirely patriotic. It’s amazing what a few star cut outs can do for the “festive” level of a dessert. Served with ice cream, a possibly a slice of cheddar cheese, it’s perfect for summertime. And after all the saying does go, “As American as apple pie”.

The other thing I really liked about this recipe was how simple it was – most of the ingredients you probably already have in your pantry. But since the crust is really the “star” in this pie, I think a homemade one is almost imperative. I had a little bit of trouble with overbrowning, so next time I make this I plan to tent some foil over the top to help even cooking. As you may know, I’m somewhat partial to sugar, but I truly did think that the sugar crystals elevated the crust from good to great, and would probably add even more when I make this for the next patriotic holiday.
Star Spangled Apple Pie
Makes 1 9-inch pie
- Pie Crust
- 6 medium/large Granny Smith apples (about 2½ lbs.), peeled, cored and sliced
- 1/3 cup granulated sugar
- 3 tbsp. brown sugar
- 1 tbsp. all-purpose flour
- ¾ tsp. ground cinnamon
- ¼ tsp. grated nutmeg
- 2 tbsp. freshly squeezed lemon juice
- 2 tbsp. cold unsalted butter, cut into pieces
- 1 large egg beaten with 1 tablespoon cold water (for egg wash)
- Coarse sugar/Sugar sprinkles
On a lightly floured surface, roll out half of the pie dough into approximately a 12-inch round. (Keep the other half of the pie dough chilled for now.) Transfer the dough to a 9-inch pie plate, trimming the excess and crimping the edges. Cover with plastic wrap and freeze for 30 minutes in order to help the crust hold it’s shape while baking.
Preheat the oven to 400˚ F. In a large mixing bowl, combine the sliced apples, sugars, flour, spices and lemon juice. Toss well to combine. When the bottom crust is finished chilling, pour the apple mixture and accumulated juices into the bottom pie crust and use a spatula to even the top out slightly. Place thin slices of cold butter over the apples. Roll out the remaining pie dough on a floured work surface. Cut out numerous star shapes and use these to cover the top of the pie, using as much of the dough as possible. Brush the top and edges of the crust with the egg wash, then sprinkle with coarse sugar.
Place the pie on the upper rack and bake until the crust is golden brown and the juices are bubbling, about 50-60 minutes. Watch carefully and tent with foil for the 2nd half of baking if necessary to prevent overbrowning. Transfer to a wire rack and allow to cool for at least 30 minutes before slicing. Serve warm or at room temperature.
Slightly Adapted from Annie’s Eats

King Cake with Cream Cheese Filling & Happy Mardi Gras!

As I’ve mentioned on this blog before, I used to live in Louisiana. I’ve also mentioned how much I absolutely love it, but I’m just going to tell you again. It has got to be the most cultural place in America. It’s the kind of place where you go to take your trash out and end up spending the evening sharing a beer with your neighbor as you sit on the sidewalk. It’s also the kind of place where any excuse to celebrate is not taken for granted. Pretty sure there is no other place in America that gets a whole week off school in the middle of February. And most importantly, it’s the kind of place that seriously knows good food. King cake is no exception.
Now originally king cake was a rather plain cake filled with cinnamon and sugar, and the toppings were the really delicious part; but as we tend to do in America, we have made it more and more gluttonous over the years. Nowadays even the most famous bakeries like Gambino’s , serve cream cheese filled king cake as their “simple” selection. I’ve also heard that the bread has gotten much sweeter over the years, but I’m not complaining. This was a delicious and pretty simple recipe, even though I managed to mess it up a bit. There are quite a few steps, but each of them takes less than 20 minutes of hands on time. The problem I ran into was that I attempted to roll the dough into a huge rectangle, which made for a huge mess when I went to fill it with the cream cheese filling, but I have adapted the instructions below to make for an easier outcome. Other than that, this recipe really surprised me with how easy, and pretty much foolproof it was. I promise if you make it as soon as you get home from work, you will still be able to eat it for Fat Tuesday!
King Cake with Cream Cheese Filling
Makes 1 round king cake, about 10 servings
Dough
- 2 ½ tablespoons unsalted butter
- 8 ounces sour cream
- ¼ cup + 1 T. granulated sugar, divided
- Pinch of salt
- 1 package (2¼ teaspoons) active dry yeast
- ¼ cup warm milk (between 100 and 110 degrees)
- 1 egg
- 3 to 3½ cups all-purpose flour
- Oil for your hands and the bowl
Filling
- 8-ounce package cream cheese
- 1/2 cup (3 1/2 ounces) sugar
- 3 tablespoons All-Purpose Flour
- 1 large egg, lightly beaten
- 2 teaspoons vanilla
Icing
- 2 cups powdered sugar
- 1 teaspoon vanilla extract
- 1 tablespoon unsalted butter, melted
- 4 tablespoons whole milk
- Pinch of salt
Sprinkling Sugar
- 1 1/2 cups granulated sugar, separated into 3 bowls
- yellow, green, and purple (or blue + red) food coloring
- Bean/plastic baby for tradition
1. In a small saucepan over medium heat, add the butter, 1/4 c. of sugar and salt. Stir. Once butter has melted, add the sour cream and heat until lukewarm. Meanwhile, in a mixing bowl, add ¼ cup warm water, yeast, and 1 tablespoon of the sugar; stir. Allow the yeast to sit for about five minutes until it bubbles and becomes active.
2. Once the yeast is active, whisk in the warm butter/sour cream mixture, the egg, and 1 cup of the flour. Whisk until smooth. Using an oiled wooden spoon, being mixing in small amounts of the remaining flour until you form a soft dough. This will take about another 2 1/4 cups of flour. You want the dough to be tacky, but not sticky.
3. Using the dough hook of a mixing bowl, knead the dough until smooth and elastic, about 5-8 minutes, adding flour by the teaspoon if the dough is stickin to the sides of the bowl, more than itself.
4. Place the ball of dough into a large, well-oiled bowl, then flip the dough so all of the surface area of the dough is oiled. Cover the bowl with oiled plastic wrap, then set the bowl in a warm, draft-free area and allow the dough to rise until it has doubled in size, about 1 hour.
5. To make the filling: beat together the cream cheese, sugar and flour until smooth. Add the egg and vanilla and stir to combine.
6. Once the dough has doubled in size, turn it out onto a lightly floured surface. Lightly flour the dough and a rolling pin. Roll the dough into a rectangle about 24 inches long and 6 inches wide.
7. Dollop the filling down the center of the long strip of dough. Then fold each edge up and over the filling till they meet at the top; roll and pinch the edges together, to seal the filling inside as much as possible. Don’t worry about making the seal look perfect; it’ll eventually be hidden by the icing and sugar.
8. Place the log of dough seam side down or to the side onto a baking sheet covered with parchment paper. (A ring mold would be most helpful for this, but I didn’t have one). into the prepared ring mold, seam down or to the side (just not on top), or onto the baking sheet. The dough will be very extensible, i.e., it’ll stretch as you handle it. So pick it up and position it in the pan quickly and gently. Pinch the ends together to form a ring. Cover and let rise for about an hour, until it’s puffy. Preheat the oven to 350°F while the dough rises.
9. Once risen, bake at 350 for 25-30 minutes. Once golden, remove from oven and cool on a wire rack for 15 minutes.
10. While the cake is baking, make the sugar. (This can also be made far in advance). Combine 1/2 cup of sugar with a few drops of food coloring and stir continously until desired color is reached. *Gel colors will also work here, but you need to work the color into the sugar by pressing against the bottom of a spoon.
10. Once the cake is mildly cool, it is tradition to poke a small plastic baby, or a dried bean somewhere in the cake. Whoever gets this piece in their cake is supposed to buy/make the king cake for next year.
11. While the cake is cooling, make the icing. Combine all ingredients and whisk until smooth. Pour over the cooled cake. Before the icing has set (ie within 10-15 minutes), sprinkle sugar over the icing in 3 equal portions.
Cake Adapted from Brown Eyed Baker, Filling adapted from King Arthur Flour Company
Happy 2012
Wishing you and your families a wonderful new year!

I was really excited about this picture we took last night with sparklers and so wanted to share it.
This was our first attempt.

The models are doing the exact same thing in both pictures- writing 2012. You just need to make sure your flash is turned off and you have a long shutter speed to capture all the movement in one frame. I’m pretty sure we’ve found a new new years tradition! Hope you all had a wonderful new years eve!
Brown Sugar Spice Cookies for Fall

At first I was kind of bummed when I got assigned Neuro-Psych for my second rotation block – namely because I really wanted to get one of the very time intensive, 10 week long rotations out of the way earlier in the year. However, I’m learning that everything works out in the end because I have truly loved having some free time to enjoy the fall. (Remind me of this when I am waking up for surgery at 4:30 and driving through a snowstorm). Beyond the obvious fall cooking adventures, I have really enjoyed running in the park, which has been continuously blanketed with colorful leaves for several weeks now. Every time I enter Wildwood I think, ” I wish I could take my camera on runs” or “I really need to get John out here to see this before its gone”. (He gets a little reluctant to go running….well usually…..but especially when the weather drops below 70º ). I’ve managed to get him out a few times though and it has been truly gorgeous.
In celebration of the wonderful season, we had the pleasure of attending a bon fire and a halloween party. I really wanted to impress with my improving cookie decorating skills, but unfortunately I forgot how long it takes to work with royal icing. I managed to finish a few cookies to bring over, but if you really want to use royal icing, plan on making the cookies the night before. Nevertheless, I thought that these were a perfect autumn treat- just a hint of spice, but enough to remind you of fall. I’m hoping to make them again to take down for thanksgiving (especially because the 3 cookie cutter set I bought also came with a turkey!) Any icing will work for these, but if you plan on using royal icing check out my tutorial for instructions.
Brown Sugar and Spice Cookies
Makes about 40 cookies depending on the size of your cutouts
- 3 c unbleached, all-purpose flour
- 2 tsp baking powder
- 1/2 tsp cinnamon
- 1/4 tsp ginger
- 1/4 tsp pumpkin pie spice
- 1/8 tsp nutmeg (freshly grated, if possible)
- 1/8 tsp allspice
- 1/2 c granulated sugar (I use sugar that I’ve stored vanilla beans in)
- 1/2 c light brown sugar (packed)
- 2 sticks butter
- 1 egg
- 1 tsp pure vanilla extract
Preheat oven to 350.
Whisk the flour, baking powder and spices, set aside.
Cream the sugar and butter. Add the egg and extracts and mix until well-blended.
Gradually add the flour mixture and beat just until combined, scraping down the bowl, especially the bottom. (The dough will be quite thick…you may need to knead in stray bits of flour from the bottom of the bowl by hand.)
Roll dough to 1/4 inch thickness and cut into desired shapes.
Place on a cookie sheet lined with parchment paper or a silicon baking mat. Refrigerate or freeze tray for about 5 minutes if you want to insure that cookies will retain shape. Bake for 10-12 minutes
Let cool on cookie sheet for 1 minute. Then transfer to a cooling rack to cool completely.
Ice the cookies as desired.
Recipe barely adapted from Bake at 350°

On a side note, I was really excited about these containers. 40% off Hobby Lobby is the best…

Pumpkin Cupcakes with Cream Cheese Frosting

Based on my experience thus far in life, I can firmly say that you can never go wrong with pumpkin flavored anything and cream cheese frosting. I made a different version of these cupcakes last year, and there are a few things I liked about each recipe. Last year’s recipe was ridiculously moist, but almost to the point where the cupcakes stuck to the wrapper and couldn’t support the weight of the frosting when you went to take a bite. I liked this new recipe because the cupcakes are a little bit sturdier, and you don’t have to use part of a box of cake mix (what does one do with a left over 2/3 cup of cake mix? ). Plus, when I’m going to the trouble of making cupcakes from scratch I really prefer ones made with unique ingredients that wouldn’t be part of a box mix – like butter instead of oil and buttermilk for some extra moisture. I used to think that recipes that called for buttermilk were a bit annoying because you generally have to buy a whole quart, but I’ve found it lasts a lot longer than milk (like over a month) and I’ve found several other things to do with it in that time – like John’s birthday cake, ranch dressing, and then these cupcakes. But as I said before, you can’t go wrong with pumpkin and cream cheese so if your so inclined, try both recipes!
I actually made these for the children’s Halloween party that our medical school hosts every year. Now technically this party if for children with diabetes, and while you might think cupcakes wouldn’t be the best idea, the point of the party was to help the children learn how to balance their carbohydrates with their insulin. (And it is really hard to find low carbohydrate halloween desserts). So I made a double batch of these cupcakes, and calculated that each cupcake with frosting has 35 grams of carbohydrate. I got about 40 cupcakes from the double batch, and saved a few to take with us to Cincinnati for my now living in Ohio brother and sister -in-law. These went so fast that I’m pretty sure my father-in-law thought he wasn’t going to get one. Apparently they were also a big hit at the halloween party – but really what kid can resist sprinkles?

Pumpkin Cupcakes with Cream Cheese Frosting
Yield: 20-24 cupcakes with piped frosting
- 1/2 cup unsalted butter, room temperature
- 1 1/3 c brown sugar, lightly packed
- 2 eggs, room temperature
- 1/2 teaspoon vanilla
- 2 cups flour
- 1 1/2 teaspoons baking powder
- 1/2 teaspoon baking soda
- 1 teaspoon cinnamon
- 1/4 teaspoon nutmeg
- 1/4 teaspoon pumpkin pie spice
- 1/4 teaspoon salt
- 3/4 cup pumpkin puree
- 3/4 cup buttermilk
For the Icing:
- 8 oz cream cheese
- 1 stick butter (softened)
- 1/2 teaspoon vanilla
- 10 oz powdered sugar (about 3 cups), sifted
To Make the Cupcakes:
Line two muffin pans with cupcake liners; set aside.
Preheat the oven to 350˚F.
In the bowl of a stand mixer fitted with the paddle attachment, cream together the butter and brown sugar until light and fluffy. Beat in the eggs one at a time. Mix in the vanilla until fully incorporated.
In a separate mixing bowl, whisk together the flour, baking powder, baking soda, cinnamon, nutmeg and salt. In another small mixing bowl, combine the pumpkin and buttermilk until smooth.
Turn the stand mixer on to the lowest setting and alternately add the dry ingredients and the pumpkin mixtures to the creamed butter. Start and end with the dry ingredients. Mix until just combined.
Spoon the batter into the pans, filling about 2/3 full. Bake for 20 minutes, or until a toothpick inserted in center comes out clean. Allow to cool enough to handle and then move to a cooling rack. Store in airtight containers until frosted. Store frosted cupcakes in the refrigerator.
To Make the Icing:
Cream the butter, cream cheese and vanilla together on high speed. Add the powdered sugar, a small amount at a time and blend until smooth and creamy. To ice the cupcakes using a pastry bag, chill icing in the refrigerator or freezer for about 15 minutes in order to harden the icing enough to frost. Alternatively, frosting can be added immediately to cooled cupcakes using an offset spatula.

Cupcakes from Pennies on a Platter, Originally from My Kitchen Addiction
Icing inspired Ina Garten
Candy Corn Shortbread Cookies

Ina Garten’s Shortbread
- 3/4 pound unsalted butter, at room temperature
- 1 cup sugar, plus extra for sprinkling
- 1 teaspoon pure vanilla extract
- 3 1/2 cups all-purpose flour
- 1/4 teaspoon salt
Directions
1) In the bowl of an electric mixer fitted with a paddle attachment, mix together the butter and 1 cup of sugar until they are just combined. Add the vanilla. In a medium bowl, sift together the flour and salt, then add them to the butter-and-sugar mixture. Mix on low speed until the dough starts to come together. Divide the dough evenly into 3 separate bowls. Using gel food coloring color 1 bowl of dough orange, 1 bowl yellow and leave one uncolored. Mix until the colors are thoroughly incorporated.

2) Line a baking pan with plastic wrap (smaller pans work best if you have one).

3) Press the plain colored dough into the bottom of the pan, spreading to an even layer. I did not fill the entire length of the pan because I wanted slightly taller cookies. Continue with the orange and then the yellow layers.


4) Refrigerate the dough for 1 hour, or up to 3 days. You want the dough to be firm and easy to cut. Once chilled, remove from the pan and place on a cutting surface.

5) Slice the the dough into a 1/2 inch wide slice. You may also want to cut a straight line across the top yellow layer in order to get a more finished look. Then cut diagonally through the slice in order to get 5-6 pieces of candy corn. You may have some small, not perfectly shaped pieces at the edges, but that’s okay – they still bake up nicely and someone will eat them.

6) Preheat oven to 350º
7) If you have coarse sugar, you can sprinkle the piece with sugar. Place on a baking sheet and bake for 18-22 minutes. Do not over bake or they will become discolored from browning.

Recipe adapted from Barefoot Contessa, Idea from Our Best Bites
Strawberry, Cream Cheese, Pretzel Squares

This dessert is kind of hard to describe. When you hear “Strawberry-Pretzel” it sounds weird, and even slightly gross, and I get that. Let me just tell you that when I was describing it to my mom, before I could even finish telling her about the middle layer of the dessert, she said, “That is my all time favorite summer dessert!,” and then she was disappointed that she couldn’t partake in eating it. I’m pretty sure that at some point in your life, you have eaten this dessert, perhaps without ever knowing what went into making it so delicious. I made this for the 4th of July BBQ we had when we got back from our camping adventure and since I wanted it to be red white and blue, I added some blueberries to the cream cheese layer. Unfortunately, you could hardly see the blue, or taste the blueberries, which should only tell you that this dessert should not simply be relegated to the 4th of July – you should probably just eat it all summer, or all year for that matter.
I’m sorry I didn’t get to take pictures of all the steps, but I was in kind of a hurry because I started making this without first reading the instructions carefully. This is probably the type of thing you should make the day before, or at least the morning of an evening BBQ, because jello takes a long time to set! I cut down the chilling time significantly (because I needed it ready by 7 pm), and it still turned out fine, so I have indicated this change in the recipe below. However, other than the waiting time between each layer, this was much simpler to put together than I imagined. Each layer is super easy- just mix and pour into the pan. The only baking required is the 10 minutes to set the pretzel crust. I even took the liberty of “lightening” this dessert, and it didn’t taste any different than I remember as a kid. In fact, a lot of people call this “Strawberry, Pretzel Salad”, so I’m pretty sure that means that you can eat a lot of it without feeling guilty ;-).
Strawberry, Cream Cheese and Pretzel Squares
Hands on time: 20 minutes Total Time with Cooling: 3 1/2 hours
Makes 1-13×9 inch pan, about 15-20 servings
- 2 cups finely crushed pretzels (Pulse in the food processor)
- ½ cup sugar, divided
- 10 T. butter (1 stick + 2 T.), melted
- 1½ pkg. (10 oz. total) PHILADELPHIA 1/3 less fat Cream Cheese, softened
- 2 Tbsp. milk
- 1 cup thawed COOL WHIP Whipped Topping
- 2 cups boiling water
- 1 pkg. (4 servings) JELL-O Brand Strawberry Flavor Gelatin
- 1 pkg. (4 servings) Sugar Free JELL-O Brand Strawberry Flavor Gelatin
- 1½ cups ice cold water (ice cubes are fine)
- 1 qt. (4 cups) strawberries, sliced
- 1 cup blueberries, if desired
Pretzel Layer: Preheat oven to 350°F. Mix pretzel crumbs, 1/4 cup of the sugar and all the butter. Press into bottom of 13×9-inch baking pan. Bake 10 min. Cool.
Cream Cheese Layer: Beat cream cheese, remaining 1/4 cup sugar and the milk until well blended. Gently stir in whipped topping and blueberries (if using). Spread over cooled crust. Refrigerate until ready to use.
Strawberry Jello Layer: While the above layers are in the fridge, stir boiling water into dry gelatin mix in large bowl for at least 2 minutes, until completely dissolved. Stir in ice cold water (it is fine if ice cubes are still in the water, they will melt). Put bowl in the freezer for 20 minutes, then remove and stir in strawberries. Pour cool jello over the cream cheese layer, and allow to solidify in the fridge for about 3 hours. Slice in squares and serve with a fork.
Adapted from Brown Eyed Baker, originally adapted from Kraft

Bunnies, Chicks and Eggs, Oh my!

Decorating cookies for every holiday is starting to become a tradition, and I’m more than okay with that! I have my final test of pre-clinical medicine next Tuesday (hooray!), but that makes going home for Easter weekend a little tricky. So what did I do instead? I went home this past weekend, and celebrated Easter a little early. We had a great visit, and collectively decided that decorating cookies is WAY more fun than decorating eggs. John even joined in on the fun, and he may have actually won the award for best cookie decorator (yes, this was hard for me to admit :-)).
While I was ridiculously excited about this set of 4 Easter cookie cutters I found, I think next time I might just stick to making eggs. The chicks and bunnies were cute, but there wasn’t very much room for creativity with them – I ended up just wishing that I had some more eggs to try out all the ideas I had. My favorite thing to do was to drag a toothpick through lines on the cookies, and create fun designs.

I made a double batch of royal icing (using a full 2 pound bag), and it was more than enough! To get started just see the tutorial I posted earlier. We actually had a lot of icing left over, but I wanted to make sure I had plenty to make 6 different colors (white, green, aqua, pink, violet, and yellow).

FYI – Those are John’s fingers (not mine).
I made the sugar cookies dough one day, then rolled it out the next, and then the next day we decorated the cookies back at home. Spacing out the project really makes it a lot less of a project, and more of a fun family activity. So instead of dying boiled eggs – try decorating some egg cookies this year! Finishing with an iced cookie is a lot tastier than a hard boiled egg :-)!

Royal Icing – Recipe and Tutorial


So maybe St. Patrick’s day isn’t considered a major holiday for most people, but those people didn’t grow up in my family. In my (half) Irish family, St. Patty’s day is probably the next big holiday after Thanksgiving and Christmas. I had been wanting to decorate St. Patty’s day cookies pretty much since I finished the Valentine’s Day ones. It worked out perfectly, because my festive mother was here to help me decorate them! I mentioned earlier that I really wanted to try to get good enough at royal icing to post a “How to” – and I think I have just about reached that point. I’ve made it enough times now that I have it down to a science. It’s kind of addicting, so be careful. My mom and I are already planning next year’s St. Patty’s Day cookie decorating, and we were even brainstorming about Easter….
A lot of people wonder – “Why use royal icing?….Doesn’t buttercream taste better?”. And I’ll say, yes if you are eating icing by itself, buttercream is definitely the way to go – but with a buttery cookie underneath royal icing adds a perfect amount of sweetness without being too rich. Plus the royal icing seals in the moisture of the cookie, so your cookies can be made ahead of time, and will last a lot longer. More importantly, it’s just not possible to decorate with buttercream the way you can with royal icing. Ever wonder how professional cookies get that completely smooth surface with multiple colors and no “spread marks”? That’s right – they use royal icing.
So here’s the recipe, followed by a long tutorial. I tried to include as many pointers as possible, but for the most part you can figure out what to do looking at the pictures.
Royal Icing
- 4 cups Powdered Sugar (About 1 Pound)
- 2 Tablespoons Meringue Powder
- 5 Tablespoons Water (to start)
Combine all ingredients in the bowl of a stand mixer. Mix on low (Speed 2 or 4) for 7-10 minutes, or until the sheen has disappeared and the icing has a matte appearance. It will be too thick to use at this point so you will be adding more water later; however, getting it to this texture makes a difference in the final product.
How to Decorate with Royal Icing
- 1 -2 batches of Royal Icing and Sugar Cookies
- Small plastic containers with lids
- Pastry Bags (I like disposable so you don’t have to clean them)
- Couplers and Decorating Tips (I use size 3)
- Toothpicks
- Gel Food Coloring
- Miniature Squeeze bottle (optional)
First, start by planning out what colors you will want to use, and how much of each. For these cookies, I made 5 colors: Green, Light Green, Orange, Black, and White. According to color need, divide the white icing into the containers. Add about 1 additional teaspoon of water to each container. Stir to incorporate. You may need to add another teaspoon or 2 in order to get a good consistency for piping. The key is to get the icing thin enough that you can easily pipe a smooth line, but thick enough that the icing will still dry quickly.

Using toothpicks, add a little bit of gel food color and stir with a spoon. Continue adding color until you achieve the desired tint. For dark colors, like black or red, you will need a lot of gel.

Prepare your pastry bags by cutting about 3/4 of an inch from the tip. Place the coupler inside the bag, and secure the appropriate tip. I prefer size 3 for edging the cookies, but I used a mix of sizes 2-4, because that’s what I have. If you do not have pastry bags and tips , you can try using a ziploc bag and cutting the corner to make a VERY small hole. I only spent about $10 for all the couplers, tips and bags, but if you are only going to make these once, it might not be worth it.

Fold down the edges of the pastry bags, and using a spoon or knife, scoop the icing into the pastry bag. You only need a very small amount of icing to edge the cookies, but I think it’s easier to work with if you have a moderate amount of icing in the bag. Also, it’s easy to simply squeeze the left over icing back into the original container when you are finished.

Pipe the icing around the edges of each cookie to make an outline. To get the smoothest line possible you do not want the tip to be touching the cookie.


I think it’s better to work quickly and let the icing lie smoothy, than to try to get an absolutely perfect shape for the outline. If you look at these, some of the cookies have a smoother outline, and some are more squiggly.

Once the cookies are lined, squeeze unneeded icing back into the container. Now it’s time to thin the icing for flooding. Add 1 teaspoon water at a time to each icing, stirring after each addition. You want the icing to be thin enough that when a spoonful of it is poured back into the container, it takes about 4 seconds for it to disappear into the pool of icing. It is better to err on the side of too thick of icing than to thin. If you accidentally make the icing too thin, add a little bit of powdered sugar to get it back to a normal consistency.

You should now let the icing set for about 5 minutes in order to get the air bubbles to rise to the surface. The first time making this, I didn’t do this, and you end up with air bubbles on what was supposed to be your smooth surface cookie. Once the air bubbles have risen to the surface, gently stir the icing through once, just to pop them.

If you are using mini squeeze bottles, this would be the time to transfer the icing into the bottle. It’s easier to do if the icing is in a flexible plastic container, because you can bend the container to funnel the icing in. This was my first time using squeeze bottles, and it does make it a lot easier to flood the cookies, but it also makes one more thing to clean when finished.


Now flood the cookies. If you are using squeeze bottles, just squeeze it around the edges and move inward to fill the cookie in.


If you are not using squeeze bottles, spoon the icing onto the top of the cookie, and then spread it to the edges using a toothpick. 2 pointers: 1) If you spread the icing over just over the edge of the piping, it will help to blend the piping with the flooded icing. 2) It looks a lot better if you over-flood the cookies, so that the icing ends up creating a dome look on top of the cookie. If you under-fill them, the center will sink down and the outer edge piping will be very visible.


If you want to decorate the cookies with sprinkles, as I did with the pots of gold, it’s best to put this on while the icing is still wet. If you want to pipe a design on top of the cookies, it’s best to let the cookies dry for at least 45 minutes (or overnight). For the “plaid” effect on the cookies, I cleaned up while letting the cookies dry, and I just used the little bit of icing I had left in my pastry bags and piped perpendicular lines over several cookies in a row.

Let let the cookies dry for several hours or overnight before packing them up. The cookies should then be stored in an airtight container or cellophane bags. These cookies will last for at least a full week, and once the icing has dried, it is very sturdy. Therefore these cookies can be made in advance and are great for mailing.

Inspired by Annie’s Eats

