
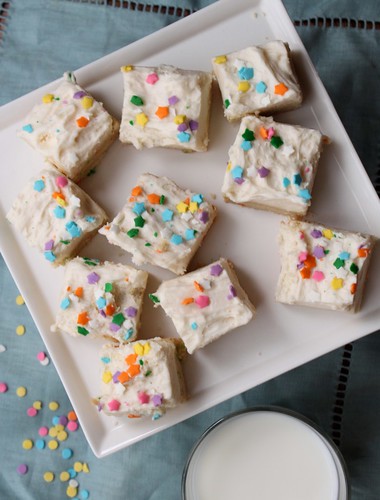
Funfetti Sugar Cookie Bars
In case you missed it, the super bowl was this weekend, and…it. was. amazing. While I will never give up hope of seeing a Browns super bowl in my lifetime, the caliber of the patriots vs. seahawks game really made appreciate ‘Merica. Also, can we please talk about that half time show? While I am by no means being unfaithful to my one true love (Taylor Swift), Katy Perry did a phenomenal job. The whole thing was American entertainment at its finest.
We had a small get together at our house, in the midst of a terrible snow storm. There may or may not have been multiple difficulties getting both in and out of the driveway, but everyone (amazingly and thankfully) made it both here and back safely. Thanks for braving the weather for us! There was lots of food, including my all time favorite pizza bites, and of course these cookie bars.
I picked these because they were relatively simple and can be made with ingredients you probably have lying around the house – butter, sugar and sprinkles -so they are perfect for a snow day. I actually used left over halloween sprinkles for the inside, and then some left over stars for the topping. What I like most about these bars is that they can so easily be adapted for any holiday depending on the sprinkles you choose. With valentine’s day around the corner, there may be another batch coming up shortly (I’m sure no one will protest). 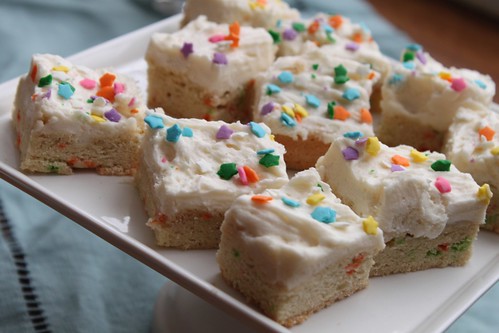
Funfetti Sugar Cookie Bars
adapted from Smells Like Home
Makes one 13×9 inch pan
- 2 1/2 cups all-purpose flour
- 1/2 tsp salt
- 1/4 tsp baking soda
- 1/2 cup (1 stick) unsalted butter, at room temperature
- 1 cups sugar
- 2 large eggs
- 1 tsp vanilla extract
- 3 Tbs sprinkles
Preheat oven to 350° F. Lightly grease a 9×13 inch baking dish and set aside.
Whipped Vanilla Frosting
- 1 cup (2 sticks) unsalted butter, at room temperature
- 2 cups confectioners’ sugar, sifted
- 2 tbsp heavy cream (substitute sour cream if unavailable)
- 1 tsp vanilla extract
Chocolate Covered Butter Toffee

I know Christmas is going to be hard for our family this year, but I have been trying to keep busy -both at school and in the kitchen. I have a habit of going a little cookie crazy this time of year. I realize that it would be much easier to make one or two kinds of cookies and to make a lot of them, but the problem is that everyone seems to have a favorite so I want to make them all. The hardest part about this is that I also happen to love trying new recipes, so every year seems to bring a new favorite that I just have to make again the following year. Hence how this toffee came into being. As a Skor bar lover (the better version of Health), I knew as soon as a saw this recipe that I had to try it. It has easily become my favorite dessert of all time, and if it weren’t for the fact that I could eat the whole tray in one sitting alone, I would most definitely make it other times than Christmas. It is great for so many reasons that I feel the only appropriate way to get my point across is to list them…
- It is so buttery that it melts in your mouth the way no other store bought toffee could ever hope too.
- You can make a double or triple batch without the extra effort it would normally require to make a double or triple batch of individual cookies.
- It is covered in chocolate….need I say more.
- It has simple ingredients that are all delicious – butter, sugar, vanilla, chocolate
- It’s easy enough that you could make it today (Christmas Eve), and still have it ready for Christmas.
- You can cover it in just about anything that you want including crushed peppermints, sea salt, or nuts. I have to mention that after my mom tried the sea salt covered toffee, she exclaimed “This might be the best thing I’ve ever eaten.” No biggie :-).

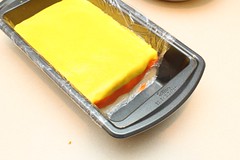
Now if your intimidated by making candy, I completely understand your point of view, but please don’t let that stop you. I would say to just be patient, watch the color of the candy (it starts off yellow, as below, but you want it toffee colored – not brown), and don’t try to rush the cooking process. If you make a big batch, it might take up to 30 minutes to heat this to 298°, but it is well worth the wait.

Chocolate Covered Butter Toffee
– Makes one standard baking sheet
- 1 pound Butter, Melted
- 1 pound granulated sugar (by weight)
- 3 oz fluid Water
- 1 teaspoon Salt
- 1 teaspoon pure vanilla Extract
- 18 oz weight of semisweet chocolate chips, melted*
- Chopped Topping: finely chopped nuts (1/2 lb), Candy Canes (1/2 lb), Sea Salt (sprinkle), Etc.
*If you want the chocolate to look really professional, use good quality, tempered chocolate. If you don’t mind if the chocolate looks a little dull (like mine), chocolate chips will work fine.
Combine butter, sugar, water, and salt in a saucepan. Bring to a boil, stirring constantly. It will heat slowly at first, but once all the water has evaporated the temperature increases quickly.
Cook over medium high heat, stirring gently, until candy thermometer registers 298 degrees, but no higher than 310°. Undercooked toffee is chewy and sticks to your teeth, but on the flip side it can burn if it gets to hot.
Once at ~300°, remove from heat and stir in vanilla until well combined.
Pour the mixture onto a silicone baking mat or good parchment paper, (last year I used tin foil because it was all I had, and it still worked). Use a heatproof rubber spatula or offset spatula to spread quickly before the toffee sets. Thinner is generally better.
Allow toffee to cool completely, at least 30 minutes (while you go wrap some presents). Blot with paper towel to remove excess oil from the surface. Coat surface with half of the melted chocolate and immediately sprinkle with topping.
When chocolate has totally set (you can place it somewhere cold to help the process), carefully flip over (your going to break it apart anyways, so it’s okay if this happens now). Then coat the other side with the rest of the chocolate and sprinkle on topping of your choice.
Allow to set, then break into bite-size pieces.
Store in an airtight container.
Recipe from Lia via The Pioneer Woman

Candy Corn Shortbread Cookies

Ina Garten’s Shortbread
- 3/4 pound unsalted butter, at room temperature
- 1 cup sugar, plus extra for sprinkling
- 1 teaspoon pure vanilla extract
- 3 1/2 cups all-purpose flour
- 1/4 teaspoon salt
Directions
1) In the bowl of an electric mixer fitted with a paddle attachment, mix together the butter and 1 cup of sugar until they are just combined. Add the vanilla. In a medium bowl, sift together the flour and salt, then add them to the butter-and-sugar mixture. Mix on low speed until the dough starts to come together. Divide the dough evenly into 3 separate bowls. Using gel food coloring color 1 bowl of dough orange, 1 bowl yellow and leave one uncolored. Mix until the colors are thoroughly incorporated.

2) Line a baking pan with plastic wrap (smaller pans work best if you have one).

3) Press the plain colored dough into the bottom of the pan, spreading to an even layer. I did not fill the entire length of the pan because I wanted slightly taller cookies. Continue with the orange and then the yellow layers.


4) Refrigerate the dough for 1 hour, or up to 3 days. You want the dough to be firm and easy to cut. Once chilled, remove from the pan and place on a cutting surface.

5) Slice the the dough into a 1/2 inch wide slice. You may also want to cut a straight line across the top yellow layer in order to get a more finished look. Then cut diagonally through the slice in order to get 5-6 pieces of candy corn. You may have some small, not perfectly shaped pieces at the edges, but that’s okay – they still bake up nicely and someone will eat them.

6) Preheat oven to 350º
7) If you have coarse sugar, you can sprinkle the piece with sugar. Place on a baking sheet and bake for 18-22 minutes. Do not over bake or they will become discolored from browning.

Recipe adapted from Barefoot Contessa, Idea from Our Best Bites
Raspberry Crumble Bars

I’m really sorry for constantly tempting you with all these sweet treats. I really want this blog to be an even ratio of sweet treats to healthy dinners – but it just seems that all our dinners lately have been fairly un-blog worthy. Plus the fact that sweet treats just look so much prettier in pictures. At least these have raspberries in them, right?
I love raspberries. They are hands down my favorite berry. I know it’s not technically raspberry season yet, but as soon as I saw these raspberry bars on Brown Eyed Baker, I had a craving for them. My mother-in-law had given us some similar raspberry bars for Christmas last year, and to be honest I think I finished off the entire tin myself- John may have gotten ahold of one :-). They are delicious. They kind of taste like a raspberry pie, in an easy to eat bar form. When I finally left my dungeon (slash study room) to get groceries, I had my list all planned out to make these, and then the grocery store was completely out of raspberries. Sad day. But never fear, my knight in shining armor picked some up for me at costco. (Now of course I have an over abundance. Not complaining).
He also managed to get me this container of oatmeal:

Yes, that says 10 pounds. 10 pounds of oatmeal. I made 2 full batches of granola and have still barely made a dent in it. I figured these raspberry bars would help use some more of it up – but a 1/2 a cup out of a 10 pound box is really child’s play. So don’t be surprised if you see some more oatmeal using recipes around here.
Raspberry Crumble Bars
- 2½ cups all-purpose flour
- 2/3 cup granulated sugar
- ½ teaspoon salt
- 1 cup plus 2 tablespoons unsalted butter, divided, cut into ½-inch pieces and at cool room temperature
- ¼ cup light brown sugar
- ½ cup old-fashioned rolled oats
- ½ cup pecans, chopped fine
- ¾ cup raspberry preserves
- 1 cup fresh raspberries (frozen can be substituted, just thaw first)
- squeeze of lemon juice
1. Preheat oven to 375°. Line a 13×9 inch pan with tin foil, overlapping on the edges and spray with cooking spray.
2. Combine flour, sugar and salt in a mixing bowl. Mix on low using a paddle attachment, then add 1 cup of butter, 1 piece at a time. Mix on low until the crust begins to crumble like sand.
3. Reserve 1 1/4 cups of crumb mixture (to be used for topping). Spread the remaining mixture into the bottom of the foil lined pan, and press down to form an even crust. Bake for 14-18 minutes.
4. In the meantime, combine the raspberry preserves, fresh raspberries and lemon juice in a small bowl. Mash with a fork, leaving bits of berries intact.
5. In a separate bowl, mix together oatmeal, brown sugar, crumb mixture and remaining 2 T. of butter. Using your fingers, pinch the mixture until the butter is fully incorporated.
6. Remove baked crust from oven and immediately spread preserve mixture on top. Then crumble the streusel mixture on top of the berries, covering the top.
7. Bake for an additional 25 minutes, or until bubbling. Let cool in pan for about an hour. Let cool completely before slicing.

Source: Brown Eyed Baker

