
Salted Brown Butter Chocolate Chip Cookies
Hi y’all. So it has been about 2 years …eeek. Sorry about that. There have been new jobs, new cities, new friends, lots of vacations, and 2 dog surgeries that have happened since then, but I have been cooking the whole time! I decided to start an instagram account (@spicenice), more for a personal way to keep a log of things I have made and liked; but I got a request for this chocolate chip cookie recipe and I figured, why not start blogging again!
I made these cookies for a very specific purpose – to give to the wonderful workers at Pet Palace, who saved our dear dog Houston’s life by recognizing immediately that something was wrong with our normally bubbly and light hearted pup, and got him to the vet ASAP. They really couldn’t have been more wonderful – between covering the initial diagnostic vet bill, to transporting him all the way across town to where he could have the needed emergency surgery done, to just generally loving our pup, we are really grateful. And so I figured they deserved a special cookie. Chocolate chip will forever be my favorite (and the most popular); but how can you make it even better….brown butter and flakey sea salt, that’s how. These were really good. I actually consider it a serious win on the new years resolutions that I managed to only eat 2. Enjoy, and hopefully you’ll be hearing from me again soon!

Salted Brown Butter Chocolate Chip Cookies
Ingredients
16 tablespoons (2 sticks) unsalted butter
2 and 1/4 cups flour
1 teaspoon salt
1 teaspoon baking soda
1/2 cup granulated sugar
1 cup light brown sugar
1 large egg
1 large egg yolk
2 tablespoons milk
1 and 1/2 teaspoons vanilla
One bag semisweet chocolate chip cookies
Fleur de Sel or flaky sea salt
Instructions
1. In a medium saucepan over medium heat, melt the butter and cook, swirling the pan occasionally, until it is frothy and browned, about 7-8 minutes or so (the browning process goes quickly once it starts so watch it carefully.)
2. Transfer the butter to a small bowl and let cool to room temperature, or place in fridge to help the process.
3. In a separate bowl, whisk together the flour, salt, and baking soda.
4. In the bowl of your standing mixer fitted with the paddle attachment, beat the browned butter and both types of sugar, until smooth and light, about 7 minutes. This will only work if you have let the butter cool completely.
5. Add in the whole egg, the egg yolk, milk, and the vanilla.
6. Decrease the mixer speed to low and add the dry ingredients.
7. Gently fold in the chocolate chips.
8. Cover the cookie dough tightly with plastic wrap and refrigerate overnight.
9. The next day, preheat the oven to 375 degrees and line two baking sheets with parchment paper or silicon mats.
10. Using a cookie dough scoop, place about 2-3 Tablespoons of dough onto the prepared baking sheets, spacing them about 2 inches apart. Sprinkle each cookie individual with flakey sea salt. For thinner cookies let the dough reach room temperature before baking.
11. Bake each cookie sheet until the cookies are golden brown on the bottom, about 12-14 minutes or so. Because of they previously browned butter they brown quickly so check yours accordingly.
Adapted from: The Curvy Carrot, Originally from Food and Wine magazine, June 2012 issue.
Funfetti Sugar Cookie Bars
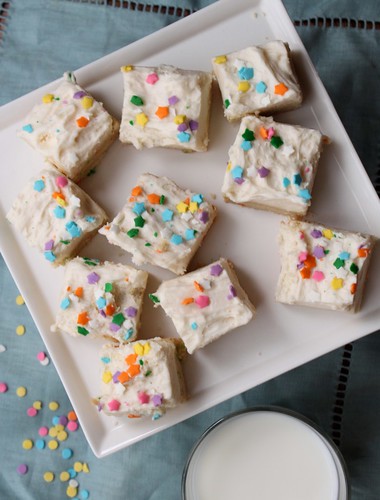
In case you missed it, the super bowl was this weekend, and…it. was. amazing. While I will never give up hope of seeing a Browns super bowl in my lifetime, the caliber of the patriots vs. seahawks game really made appreciate ‘Merica. Also, can we please talk about that half time show? While I am by no means being unfaithful to my one true love (Taylor Swift), Katy Perry did a phenomenal job. The whole thing was American entertainment at its finest.
We had a small get together at our house, in the midst of a terrible snow storm. There may or may not have been multiple difficulties getting both in and out of the driveway, but everyone (amazingly and thankfully) made it both here and back safely. Thanks for braving the weather for us! There was lots of food, including my all time favorite pizza bites, and of course these cookie bars.
I picked these because they were relatively simple and can be made with ingredients you probably have lying around the house – butter, sugar and sprinkles -so they are perfect for a snow day. I actually used left over halloween sprinkles for the inside, and then some left over stars for the topping. What I like most about these bars is that they can so easily be adapted for any holiday depending on the sprinkles you choose. With valentine’s day around the corner, there may be another batch coming up shortly (I’m sure no one will protest). 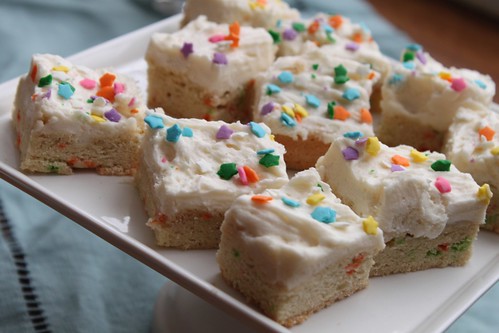
Funfetti Sugar Cookie Bars
adapted from Smells Like Home
Makes one 13×9 inch pan
- 2 1/2 cups all-purpose flour
- 1/2 tsp salt
- 1/4 tsp baking soda
- 1/2 cup (1 stick) unsalted butter, at room temperature
- 1 cups sugar
- 2 large eggs
- 1 tsp vanilla extract
- 3 Tbs sprinkles
Preheat oven to 350° F. Lightly grease a 9×13 inch baking dish and set aside.
Whipped Vanilla Frosting
- 1 cup (2 sticks) unsalted butter, at room temperature
- 2 cups confectioners’ sugar, sifted
- 2 tbsp heavy cream (substitute sour cream if unavailable)
- 1 tsp vanilla extract
Pumpkin Whoopie Pies

While it may be the end of October, it’s certainly not the end of fall inspired treats. I made these for a trip down to Lexington to see some of our best friends, and they were definitely a big hit. I knew Samiya in particular would like them because, well, because they’re cute and little and involve pumpkin! Moving to a new place, with new people, has really made me miss the awesome friends we had in med school. Following college, I moved to Louisiana with three crazy awesome roommates, and there was pretty much a constant source of entertainment and adventure at our house (and in Louisiana in general). Then in medical school, our apartment complex was basically like a grown-up college dorm, where study groups, dinner parties and watching people play video games was always only a step away. It’s a lot different now, living in a neighborhood, with friends scattered all over, and schedules that are completely different because of residency. But I guess that’s just part of growing up, and it’s not so bad.

Now these pumpkin whoopie pies were described as a pumpkin cupcake in a different form, and I’d say that’s pretty close to accurate! The batter is a bit more dense than a cupcake, but just as moist, and the filling is strikingly similar. Truthfully, can you go wrong with cream cheese frosting? I really liked these because they are visually appealing, and easy to eat…which turned out to be both a good and bad thing. Just glad I had people to help me finish them off :-).

Pumpkin Whoopie Pies
Makes approximately 36 sandwiches
For the pumpkin cookies:
- 3 cups all-purpose flour
- 1 tsp. salt
- 1 tsp. baking soda
- 1 tsp. baking powder
- 2 tbsp. cinnamon
- 1 tsp. ground ginger
- ½ tsp. ground nutmeg
- 1 cup granulated sugar
- 1 cup dark brown sugar, firmly packed
- 1 cup canola oil
- 3 cups chilled pumpkin puree
- 2 large eggs
- 1 tsp. vanilla extract
For the maple cream cheese filling:
- 3 cups powdered sugar, sifted
- ½ cup unsalted butter, at room temperature
- 8 oz. cream cheese, cold
- 2 tbsp. maple syrup
- 1 tsp. vanilla extract
To make the pumpkin cookies, preheat the oven to 350° F. Line two baking sheets with parchment paper or silicone baking mats. In a large bowl, whisk together the flour, salt, baking soda, baking powder and spices. Set aside. In a separate bowl, whisk sugars and oil together. Add the pumpkin puree and whisk to combine thoroughly. Add the eggs and vanilla and whisk until combined. Sprinkle the flour mixture over the pumpkin mixture and whisk until completely combined.
Transfer the cookie batter to a pastry bag fitted with a large plain round tip. Pipe small rounds of the batter onto the prepared baking sheets, about 1½-2 inches in diameter. If desired, smooth the top of cookies with a few drops of water and the bottom of a spoon.
Bake for 10-12 minutes, until the cookies are just starting to crack on top and a toothpick inserted into the center of a cookie comes out clean. Remove from the oven and let the cookies cool on the pan for about 10 minutes. Transfer to a wire rack to cool completely. Repeat with remaining batter.
To make the filling, combine the butter and cream cheese in the bowl of an electric mixer. Beat on medium-heat speed until smooth, about 1-2 minutes. Add the powdered sugar, maple syrup and vanilla and beat until smooth. Be careful not to overbeat the filling or it will lose structure, if this occurs refrigerate for 20 minutes. Transfer the filling to a pastry bag fitted with a plain tip.
To assemble, pair the cookies up by size. Pipe filling onto the flat side of one cookie of each pair, and sandwich together with the remaining cookie. Refrigerate for at least 30 minutes to firm before serving.
Adapated from Annie’s Eats
Chocolate Oatmeal Moon Pies

These babies have been on my “To Make” list for a long time, but they are the kind of cookie that you absolutely cannot make unless you have people to share them with (or have better will power than myself ). So when our friend planned a dinner party, , I immediately knew that I wanted to bring these. Everyone enjoyed them, but I think they are a new personal favorite of mine. The cookie itself is to die for. If you don’t want to go to the trouble of making the whole sandwich, just make the cookies- you won’t be sorry. They have chocolate chunks, pecans, dried cherries, oatmeal and brown sugar.

Then sandwiched between that goodness is a marshmallow frosting. If you really want to get fancy, you could try toasted marshmallow frosting instead. And if you aren’t drooling yet, on top of all that is a dark chocolate ganache. The only problem I had with these was that they are very messy if you try to eat them right after making them. For a more refined dessert, just place them in a fridge for at least an hour before serving. And since these taste so good cold, I think chocolate oatmeal ice cream sandwiches are in store for later this summer. Perhaps I will make some toasted marshmallow ice cream to go with them – because a cookie as fabulous as this can’t settle for plain old vanilla.

Chocolate Cherry Pecan Oatmeal Moon Pies
Makes about 20 large sandwich cookies
For the cookies:
- 1¼ cups all-purpose flour
- ¾ tsp. baking powder
- ½ tsp. baking soda
- ½ tsp. coarse salt
- 2¼ cups old-fashioned oats
- 1 cup dried tart cherries, chopped
- 1 cup pecans, chopped
- 4 oz. chocolate chunks
- 12 tbsp. unsalted butter, at room temperature
- 1½ cups packed brown sugar
- 1 large egg + 1 large egg yolk
- 2 tsp. vanilla extract
For the filling:
- 12 tbsp. unsalted butter, at room temperature
- 1½ cups confectioners’ sugar, sifted
- 6 oz. marshmallow fluff
- 1 tbsp. vanilla extract
For the drizzle:
- 4 oz. bittersweet chocolate, finely chopped
- ½ cup heavy cream
- 2 tbsp. unsalted butter
Preheat the oven to 325˚ F. Line baking sheets with silicone baking mats or parchment paper. Combine the flour, baking powder, baking soda, and salt in a medium bowl. Whisk to blend, and set aside. In a large bowl, combine the oats, cherries, pecans, and chocolate. In the bowl of an electric mixer, beat together the butter and sugar on medium-high speed until light and fluffy, about 2 minutes. Blend in the egg and vanilla. With the mixer on low speed, add in the flour mixture, beating just until incorporated. Fold in the oat mixture with a spatula until incorporated.
Use a scant ice cream scoop or a 1 oz cookie scoop to shape dough balls. Place the dough balls on the prepared baking sheets, spacing each 2-3 inches apart. Bake for 14-18 minutes, until cookies are light brown in color. Transfer to a wire rack and let cool completely.
To make the filling, place the butter in the bowl of a mixer fitted with the paddle attachment. Beat on medium-high speed until smooth, 1-2 minutes. Blend in the confectioners’ sugar until incorporated. Beat in the marshmallow fluff and vanilla until light and fluffy, 2-3 minutes.
Match the cookies up in pairs by size. Fill a pastry bag fitted with a large plain round tip with the marshmallow filling. Pipe a dollop of filling onto the flat side of one cookie of each pair, and sandwich the cookies together, pushing the filling to the edges.
To make the ganache, place the chopped chocolate in a medium bowl. In a small saucepan, bring the cream to a simmer over medium heat. Once simmering, remove from the heat and immediately pour over the chocolate. Let stand 1-2 minutes. Whisk in small circular motions until a smooth ganache has formed. Whisk in the butter until completely incorporated. Let the mixture stand at room temperature until slightly thickened, about 10 -20 minutes. Drizzle over the assembled cookies. Chill to set the ganache and stabilize the filling.
Adapted from Annie’s Eats
Lime Coconut White Chocolate Macadamia Nut Cookies

Phew, that was a long title. But these cookies deserve it. Now before you go clicking away because this recipe doesn’t include real chocolate, let it be known that I, a dark chocolate is aways better kind of gal, really love these cookies. I bookmarked them a few weeks ago because they sounded like an interesting variation to the monotony of chocolate chip, but when the weather reached 80 degrees in March (in Ohio!), I really had no choice but to make tropical cookies. I also reasoned that since I’m not a huge white chocolate-macadamia nut lover, these cookies would be safe to have around the house. Ha. I wish I could tell you that I didn’t eat 6 for breakfast one day.
After that incident, I was almost afraid to make them again, but I also felt guilty letting the left over macadamia nuts go to waste (they were the most expensive part of the cookie). So I decided to make a half batch the second time around. Well wouldn’t you know- when I went to toast the leftover macadamia nuts, I burnt them to a crisp. I swear, one moment they were white, and 20 seconds later they were black. What can I say, “I got it from my momma”. Toasting nuts just isn’t in our blood :-). But since I had all the other ingredients mixed together, I decided to improvise with some slivered almonds. The cookies still turned out pretty amazing so if you are trying to cut cost, try some slivered almonds as a substitute. Also don’t be afraid (like I was) about putting 2 tablespoon of lime zest, you need at least the entire rind from one lime just to get some lime flavor. If you can imagine what a lime pina colada would taste like, I think it would be these cookies. They will definitely be making a reappearance this summer – barbecues, pool parties, breakfasts, etc.

Lime Coconut White Chip Macadamia Nut Cookies
- 2 cups flour, spooned lightly into measuring cups and leveled with knife
- 1/2 teaspoons baking soda
- 1/2 teaspoon table salt
- 12 tablespoons unsalted butter melted and cooled until luke warm
- 1 cup brown sugar
- 1/2 cup granulated sugar
- 1 large egg + 1 egg yolk
- 2 teaspoons vanilla extract
- 1 cup chopped white chocolate or white chocolate chips
- 1 cup coconut (toasted or untoasted)
- 1 cup toasted macadamia nuts
- 1 1/2-2 tablespoons grated lime zest (1-2 limes)
Melt 10 tablespoons of the unsalted butter, then add the remaining two tablespoons and stir until smooth (This helps the butter return to room temperature quickly).
Heat oven to 325 degrees. Mix flour, salt, and baking soda together in medium bowl; set aside.
Either by hand or with electric mixer, mix butter and sugars until thoroughly blended. Mix in egg, yolk, and vanilla. Add dry ingredients; mix until combined.
Add white chocolate chips, coconut, macadamia nuts, and lime zest. Mix to distribute.
Scoop cookie dough into large balls and place on parchment lined baking sheets. Bake until cookies are set around outer edges, yet centers are still soft and puffy, and appear slightly under-baked, about 10-12 minutes. Cool cookies on cookie sheets for a few minutes and then transfer to a cooling rack.
Source: Our Best Bites
Chocolate Sugar Cookies for Valentines Day

Happy Valentine’s Day! Let this post be my contract that next year I will actually get these cookies made ahead of time so that 1) you can actually make them in time for Valentine’s day if you wish, 2) I won’t be writing this post at 11 pm when I have to get up at 4:30 for surgery tomorrow), and 3) so that I can actually get them in the mail to some people in time for the holiday. I had to laugh when I looked back at my Valentine’s post from last year and realized I stated almost the exact same thing (you’d think I’d learn to plan ahead….this is clearly a difficult concept for me).
I’ll admit that the multiple layers of royal icing that was required for these cookies was a little bit more than I had planned for, but the cookies themselves are quite easy and completely delicious. Besides, if you don’t want to go to the trouble of icing, try sprinkling powdered sugar or topping with Nutella + sprinkles. The mixture of a chocolate with a touch of cinnamon added a really nice layer of complexity to this cookie. I still think the conversation heart cookies are one of the most clever Valentine’s ideas, but you can really never have too many Valentine’s cookies, can you?

Chocolate Cutout Cookies
Makes about 18-20 large heart cut-outs
- 2-1/4 cups All-purpose Flour
- 1 teaspoon Baking Powder
- 1/4 teaspoon Salt
- 1/2 teaspoon Ground Cinnamon
- 1/4 cup Unsweetened Cocoa Powder (I used Dutch processed)*
- 1 cup Firmly Packed Brown Sugar
- 1 whole Large Egg
- 1-1/2 teaspoon Vanilla Extract
- 2 sticks (1 Cup) Unsalted Butter, Softened
- Icing, powdered sugar or Nutella for finishing
Preparation Instructions
Combine flour, baking powder, salt, cinnamon, and cocoa powder in a bowl. Whisk together and set aside.
In the bowl of an electric mixer, cream butter and brown sugar until fluffy. Add egg and vanilla and beat until combined. Add flour/cocoa mixture in two or three batches, mixing well after each addition.
Form dough into a disc, wrap in plastic wrap and refrigerate for at least 2 hours.
To make to cookies, preheat oven to 350 degrees. Remove dough from bag and place on a floured surface. You may need to let the dough warm up for several minutes to make rolling easier. Roll out to 1/4-inch thickness and cut with a heart cutter.
Place on a cookie sheet lined with parchment paper or a baking mat. Bake for 12 minutes, or until set (but not browning at all.) Remove from oven and allow to cool completely.
Ice as desired, using royal icing, sifted powdered sugar, or Nutella (yummm).
Snowball Cookies for Daddy-O
I thought about telling you all sooner, but I was too beside myself when I first found out to write something that would even come close to describing how I was feeling. In all honesty I still don’t know what to say. My dad passed away suddenly and unexpectedly on November 30, 2011. These past few weeks have been very difficult, but I want to thank everyone for your kind words, actions, thoughts and prayers. I have been so comforted by the love others have shown me and my family.
I used to talk to my Dad almost everyday on my way home from school. I had just been talking to him on about how excited I was to be starting my internal medicine rotation, because it was my dad’s specialty and I was really looking forward to being able to discuss it with him. Just on Monday he had explained the mechanism, symptoms, diagnostic tests and treatment of pleural effusions to me. I had told him to get excited for Christmas, and I had even mentioned how I was planning to make a bunch of cookies including his favorite – these snowballs. I have such found memories of my dad sneaking into the cookie tins in the kitchen to get just one more cookie. I can even remember John joking with him last Christmas, “Ahhh, now I see where Jacqueline gets her sweet tooth from,” as my dad was slyly removing yet another powdered sugar covered cookie and plopping the whole thing in his mouth. (Personally I always thought these were more like 2 bite cookies – but he seemed to think differently :-)).
So Daddy-O, these are for you…
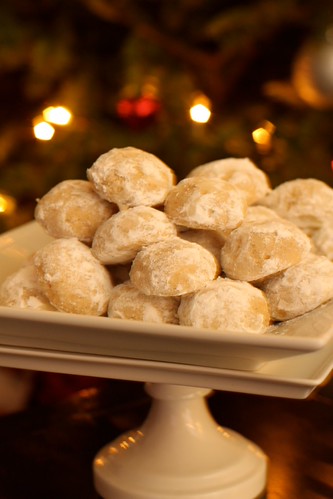
Snowball Cookies
Makes 8-9 dozen cookies
- 1 ½ cups butter, softened (3 sticks)
- 1/4 cup crisco
- 3/4 cup sugar
- 1 c. finely chopped nuts*
- 2 Tablespoons vanilla
- 4 cups flour
- Powdered sugar for rolling
*Pecans are my favorite, but walnuts work too
1. Cream butter, crisco and sugar. Add nuts, vanilla, flour.
3. Before baking, preheat oven to 300º.
4. Remove ball from refrigerator and allow dough to sit long enough until able to handle. Roll into smaller than walnut sized balls – small is better. Remember they will be slightly bigger once they are covered with powered sugar.
6. Place cookies about 1 inch apart on an un-greased cookie sheet.
7.Turn oven down to 275° and bake cookies for 30-35 minutes, or until very light in color. Cool for about 15 minutes then roll in powdered sugar to help sugar stick. They can be re-rolled in powered sugar before serving.
From my favorite Christmas cookbook: Christmas from Heart of the Home, by Susan Branch

Brown Sugar Spice Cookies for Fall

At first I was kind of bummed when I got assigned Neuro-Psych for my second rotation block – namely because I really wanted to get one of the very time intensive, 10 week long rotations out of the way earlier in the year. However, I’m learning that everything works out in the end because I have truly loved having some free time to enjoy the fall. (Remind me of this when I am waking up for surgery at 4:30 and driving through a snowstorm). Beyond the obvious fall cooking adventures, I have really enjoyed running in the park, which has been continuously blanketed with colorful leaves for several weeks now. Every time I enter Wildwood I think, ” I wish I could take my camera on runs” or “I really need to get John out here to see this before its gone”. (He gets a little reluctant to go running….well usually…..but especially when the weather drops below 70º ). I’ve managed to get him out a few times though and it has been truly gorgeous.
In celebration of the wonderful season, we had the pleasure of attending a bon fire and a halloween party. I really wanted to impress with my improving cookie decorating skills, but unfortunately I forgot how long it takes to work with royal icing. I managed to finish a few cookies to bring over, but if you really want to use royal icing, plan on making the cookies the night before. Nevertheless, I thought that these were a perfect autumn treat- just a hint of spice, but enough to remind you of fall. I’m hoping to make them again to take down for thanksgiving (especially because the 3 cookie cutter set I bought also came with a turkey!) Any icing will work for these, but if you plan on using royal icing check out my tutorial for instructions.
Brown Sugar and Spice Cookies
Makes about 40 cookies depending on the size of your cutouts
- 3 c unbleached, all-purpose flour
- 2 tsp baking powder
- 1/2 tsp cinnamon
- 1/4 tsp ginger
- 1/4 tsp pumpkin pie spice
- 1/8 tsp nutmeg (freshly grated, if possible)
- 1/8 tsp allspice
- 1/2 c granulated sugar (I use sugar that I’ve stored vanilla beans in)
- 1/2 c light brown sugar (packed)
- 2 sticks butter
- 1 egg
- 1 tsp pure vanilla extract
Preheat oven to 350.
Whisk the flour, baking powder and spices, set aside.
Cream the sugar and butter. Add the egg and extracts and mix until well-blended.
Gradually add the flour mixture and beat just until combined, scraping down the bowl, especially the bottom. (The dough will be quite thick…you may need to knead in stray bits of flour from the bottom of the bowl by hand.)
Roll dough to 1/4 inch thickness and cut into desired shapes.
Place on a cookie sheet lined with parchment paper or a silicon baking mat. Refrigerate or freeze tray for about 5 minutes if you want to insure that cookies will retain shape. Bake for 10-12 minutes
Let cool on cookie sheet for 1 minute. Then transfer to a cooling rack to cool completely.
Ice the cookies as desired.
Recipe barely adapted from Bake at 350°

On a side note, I was really excited about these containers. 40% off Hobby Lobby is the best…

Candy Corn Shortbread Cookies

Ina Garten’s Shortbread
- 3/4 pound unsalted butter, at room temperature
- 1 cup sugar, plus extra for sprinkling
- 1 teaspoon pure vanilla extract
- 3 1/2 cups all-purpose flour
- 1/4 teaspoon salt
Directions
1) In the bowl of an electric mixer fitted with a paddle attachment, mix together the butter and 1 cup of sugar until they are just combined. Add the vanilla. In a medium bowl, sift together the flour and salt, then add them to the butter-and-sugar mixture. Mix on low speed until the dough starts to come together. Divide the dough evenly into 3 separate bowls. Using gel food coloring color 1 bowl of dough orange, 1 bowl yellow and leave one uncolored. Mix until the colors are thoroughly incorporated.

2) Line a baking pan with plastic wrap (smaller pans work best if you have one).

3) Press the plain colored dough into the bottom of the pan, spreading to an even layer. I did not fill the entire length of the pan because I wanted slightly taller cookies. Continue with the orange and then the yellow layers.


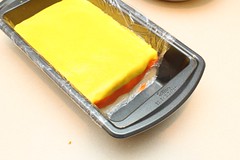
4) Refrigerate the dough for 1 hour, or up to 3 days. You want the dough to be firm and easy to cut. Once chilled, remove from the pan and place on a cutting surface.

5) Slice the the dough into a 1/2 inch wide slice. You may also want to cut a straight line across the top yellow layer in order to get a more finished look. Then cut diagonally through the slice in order to get 5-6 pieces of candy corn. You may have some small, not perfectly shaped pieces at the edges, but that’s okay – they still bake up nicely and someone will eat them.

6) Preheat oven to 350º
7) If you have coarse sugar, you can sprinkle the piece with sugar. Place on a baking sheet and bake for 18-22 minutes. Do not over bake or they will become discolored from browning.

Recipe adapted from Barefoot Contessa, Idea from Our Best Bites
Black and White Cookies

When I first started this blog, I remember thinking that a great first post would be black and white cookies. I had even started writing about how great they were and why I loved them, but then for some reason I never got around to actually making them. Then when I saw these cookies on 2 of my favorite blogger’s sites a few weeks ago, I decided that I absolutely had to make them.
I have a long history with the black and white cookie, which began at a coffee and bake shop near our college campus called Mad Hatters. I used to go to this place from time to time to get away from the usual drone of the library, and it became a favorite place to study one summer when I was taking organic chemistry. You might wonder why I would decide on a plain black and white cookie when there was an entire case full of delicious baked goods to chose from. Well that’s simple – as a poor college student an absolutely gigantic cookie (like small dinner plate size), complete with both chocolate and vanilla icing icing that cost less than $1.50 was pretty much too good to pass up. (In fact it might have actually been been too good to be true, because according to mad hatter’s website, it seems that they no longer offer this cookie. Sad.). Now in all honesty, when I first bought this, I definitely thought it was just a simple sugar cookie with icing on top. I think I might have been slightly disappointed when I first ate it and realized it was more cake like than the dense and buttery cookie I was expecting. However, it quickly became one of my favorite cookies of all time.
Unfortunately, I don’t have any pictures to show you of the steps getting up to the final product because I got slightly discouraged about halfway through making these. I was sure they were going to turn out terribly, but once I got to the final product, I ended up loving it and decided I definitely needed to share! A few hints so that you don’t get discouraged like I did: First the original recipe called for 20 minutes in the oven. I pulled them out a few minutes early and they were still slightly overdone, so I really think 15 minutes would be more than enough baking time. Secondly, I let the un-iced cookies cool slightly and then packaged them into a ziplock bag. When I took the cookies out the next morning they were stuck together, and when I pulled them apart it left an uneven surface on the cookies. Therefore, I would recommend not stacking the cookies, or using parchment paper between them. And finally, I ran out of icing and had to heat up some more about 3/4 of the way through. I adjusted the recipe below so that it should be more than enough icing to cover the cookies.
With those suggestions, I think that these are a fairly simple to make cookie that gives a delicious and stunning result. The slight lemon flavor is a perfect complement to both the vanilla and chocolate icing. It also makes a great study snack. It’s just dangerous having more than 1 of these easily available, so be sure to share.

Black and White Cookies
Yield: about 2 dozen large cookies
For the cookies:
- 4 cups (16 oz.) cake flour (found in a red box)
- ½ tsp. baking powder
- ½ tsp. salt
- 2 sticks butter, softened but still cool
- 1¾ cups (12¼ oz.) sugar
- 2 large eggs, at room temperature
- ½ tsp. vanilla extract
- 1/4 tsp. lemon extract
- 1 cup milk
For the glaze:
- 3 oz unsweetened chocolate, chopped fine
- 1/3 cup light corn syrup
- 1/2 cup water
- 7 ½ cups (30 oz) powdered sugar
- 1/2 tsp vanilla extract
- a few teaspoons of milk
To Make the Cookies:
1. Preheat the oven to 375˚ F. Line 2 large baking sheets with parchment paper or silicon baking mats.
2. In a large bowl combine the flour, baking powder and salt. Whisk to combine, and set aside.
3. In the bowl of an electric mixer, beat the butter on medium speed until smooth and creamy. With the mixer on medium-high add in the sugar gradually, beating until light and fluffy, about 3 minutes. Blend in the eggs, vanilla and lemon extracts at medium speed until combined, about 30 seconds.
4. With the mixer on low speed, gradually add the flour mixture and then the milk, alternating about 3 times until just combined. Batter will be thin.
5. Using a ¼-cup measuring cup or an ice cream scoop, place mounds of dough several inches apart on the baking sheet. I could only fit 6 per sheet. With moistened fingers, spread the mound of dough into a disk about 2½ inches wide and ¾ inch thick, it will spread more as it bakes.
6. Bake the cookies for about 15 minutes, until the edges just began to brown. Cool on a baking sheet, then transfer to a wire rack to cool completely.
To make the icing:
1. In a medium saucepan, combine the corn syrup and water and bring to a boil. Remove from the heat and whisk in the confectioners’ sugar and vanilla until combined.
2. Melt the chocolate in a medium bowl set over a saucepan of simmering water. Remove from the heat and set aside. Transfer 1 cup of the vanilla icing to the bowl with the melted chocolate and whisk to combine. Add a few teaspoons of milk to the chocolate icing and whisk until it is a similar consistency to the vanilla glaze.
3. Using an offset spatula, spread about 2 T. of vanilla icing over half of the cookie. Scrape the edge of the cookie to catch any excess icing. Place the cookies on a wire rack set over waxed paper and allow to harden for about 15 minutes before using the chocolate icing.
4. Repeat icing the opposite side of the cookie with chocolate. If either icing begins to harden, add a few more teaspoons of milk and whisk to combine.
5. Allow the glaze to set at least 1 hour before serving. The cookies can be stored in an airtight container layered between sheets of parchment paper for up to 3 days.

Source: Slightly adapted from The Curvy Carrot and Annie’s Eats, originally from Baking Illustrated
Pecan Tassies (or Mini Pecan Pies)

I had something entirely different to share with you today – it was going to be a meal of sustenance, instead of another dessert. However, after serving these little delicacies last night, I decided that I must get this recipe out ASAP so that you can make them ASAP. I’m pretty sure these made both the gator’s and the buckeye’s losses yesterday seem less painful (at least to the people who might be pained by that sort of thing).
These treats were the perfect way to start off October. They are sweet, nutty and flakey. As a true candy lover, I think part of the reason I like these is because the brown sugar becomes caramelized on top as it mixes with the pecans, creating an almost toffee like texture on the outside with a sweet and melted inside. Because I only had enough cupcake pans to make 24 of these at a time, I ended up running out of filling for the last tray. While you’d think that extra filling would always be a good thing, it seemed like most of that extra filling just spilled out onto the pan and made a mess. Therefore I would recommend measuring out half of the filling if you are making these in batches, so you have a better idea of how much to use.
Basically these are like a miniature pecan pies, with a slightly more solidified filling and an amazing crust. They also smell amazing while baking. And I’m pretty sure they would perfectly complement a nice big glass of apple cider. So go ahead and enjoy a few (or 10) for dessert, or for breakfast (like I did today). Happy Fall!

Pecan Tassies (Mini Pecan Pies)
– Makes 48 mini cupcake sized tassies
For the Dough:
- 1 cup (2 sticks) unsalted butter
- 6 oz cream cheese (I used 1/3 less fat because that’s what I had)
- 2 cups flour
For the Filling:
- 1½ cups light brown sugar, packed
- 1 heaping cup chopped pecans, plus more for sprinkling on top
- 2 eggs
- 2 tablespoons melted butter
- ½ teaspoon vanilla extract
1. To make the dough: beat butter and cream cheese together until combined. Add the flour and mix until incorporated. Roll the dough into 48 individual balls (each ball should be a little smaller than a quarter). Place the balls on a plate, cover with plastic wrap and refrigerate for about an hour.
2. To make the filling: combine all ingredients (brown sugar, pecans, eggs, butter, vanilla) in medium bowl and mix to combine. Divide this into even halves if you are making this in batches.
3. Preheat the oven to 350 and lightly grease mini muffin pans.
4. To assemble: Take a ball of dough and roll it out into a flat circle. Place inside a mini muffin cup and repeat with remaining dough. Alternatively you can simply press the dough ball inside of the mini muffin tin to create a cup. I was worried about the crust being uneven, which is why I chose to roll the balls out, but to save time you can use the other method.

5. Fill each cup with a heaping teaspoon of filling. Top each with a sprinkle of roughly chopped pecans. The filling puffs up while baking, so it is not necessary to fill to the brim of the cup, in fact this tends make a mess because the filling overflows.
6. Bake at 350 for 20-25 minutes. Let cool slightly in pans, then transfer to a cooling rack. Store at room temperature in an airtight container.
Source: Brown Eyed Baker, originally adapted from “old firehall ladies auxiliary cookbook”.

Soft “Store Bought” Sugar Cookies

There’s something about those store bought, frosted, cake-like sugar cookies that just makes you want to eat one. I actually remember the first time I tried one I thought to myself, “This might be the most artificial tasting cookie I have ever eaten”, yet for some reason I continued to eat them, with their chemical preservative taste and all. I think they must put something in them that just makes you fall in love, despite the fact that you are eating a “fresh” cookie with a shelf life of 3 months. Well, if you have become addicted to those cookies, consider this your saving substitute. These cookies taste like a better, preservative free version of the store bought cookies. Granted, there is still quite a bit of artificial dye in the frosting :-).
I made these to take in for my last day in the hospital on my family medicine rotation (sad to leave that place!). My motivation for making these was in part because I really did want to thank everyone who was so helpful on my rotation, and in part because I love having big groups of people to eat my baked goods! I enjoy the actual process of baking even if I don’t eat the end result, but with just the 2 of us here, baking becomes a dangerous habit. I chose blue and aqua for the colors because I wanted something summer-ish and these colors reminded me of the pool. With a heat index nearing 115°, I think we all have water on the mind.
You can really pick any mix-match of colors to dress these cookies up for just about any holiday, but I do have a few suggestions as far as the actual cookies are concerned. First, I substituted 2 oz of cream cheese for some of the butter, mostly because I don’t think you can ever go wrong with cream cheese; however, if you happen to only have butter, or you aren’t a cream cheese fan just use 3 full sticks of butter and leave the cream cheese out. Secondly, I was trying to plan ahead, so I made the cookie dough the night before and refrigerated it for about 24 hours. If you decide to make the dough ahead of time, just make sure to flatten the cookies out to the desired shape before baking because they will not spread on the pan if the dough is too cold. Finally, for some reason, I was worried that I wasn’t going to have enough icing… so I went kind of light on some of the cookies. Then I ended up throwing away a bunch of leftover icing. Don’t skimp like I did. After thinking back to the ones at the store, the icing should be almost as thick as the cookie.

Soft Frosted Sugar Cookies
Makes about 36 cookies
- 4 1/2 cups all-purpose flour
- 4 1/2 tsp. baking powder
- 3/4 tsp. salt
- 1 1/4 cups (2.5 sticks) butter, softened
- 2 oz cream cheese (about 1/4 cup) *Low-fat is fine
- 1 1/2 cups sugar
- 3 large eggs
- 5 tsp. vanilla extract
For the Icing:
- 5 cups (1 lb, 8 oz) powdered sugar, sifted
- 6 T. butter, melted (3/4 stick)
- 1 T. vanilla extract (use clear if you want white icing)
- 7-8 T. milk plus more if needed
- Food coloring, sprinkles (optional)
In the bowl of a stand mixer beat the butter, cream cheese and sugar until light and fluffy. Beat in eggs, one at a time. Then beat in vanilla. Slowly add the flour, baking soda and salt and mix until evenly incorporated. Chill dough for 30 minutes, or overnight.
To bake, preheat oven to 350˚ F. Line baking sheets with parchment paper or silicone baking mats. Spoon a heaping tablespoon of dough into your hand and roll into a ball, repeat. Place balls on a cookie sheet 2-3 inches apart. Using your hand or the bottom of a glass flatten each dough ball into a circle. (*Again depending on how chilled your dough is, the dough may or may not spread. If your dough is very chilled, you will need to flatten it into the shape you desire before baking). Bake for 10 minutes. (Cookies should not look brown). Let cool slightly on baking sheet and then move to a cooling rack.
Frosting: Place powdered sugar in a medium bowl, or the bowl of a stand mixer. Add the melted butter, vanilla, and milk to the bowl and whisk or stir on low until smooth. Add additional milk if necessary. Tint with gel food coloring if desired. Using a spatula, frost the cookies generously with the icing. While still wet, sprinkle with desired toppings. Icing will harden slightly to allow for easier storage. Keep in an airtight container.
Adapted from Annie’s Eats who adapted it from Hostess with the Mostess
Bunnies, Chicks and Eggs, Oh my!

Decorating cookies for every holiday is starting to become a tradition, and I’m more than okay with that! I have my final test of pre-clinical medicine next Tuesday (hooray!), but that makes going home for Easter weekend a little tricky. So what did I do instead? I went home this past weekend, and celebrated Easter a little early. We had a great visit, and collectively decided that decorating cookies is WAY more fun than decorating eggs. John even joined in on the fun, and he may have actually won the award for best cookie decorator (yes, this was hard for me to admit :-)).
While I was ridiculously excited about this set of 4 Easter cookie cutters I found, I think next time I might just stick to making eggs. The chicks and bunnies were cute, but there wasn’t very much room for creativity with them – I ended up just wishing that I had some more eggs to try out all the ideas I had. My favorite thing to do was to drag a toothpick through lines on the cookies, and create fun designs.

I made a double batch of royal icing (using a full 2 pound bag), and it was more than enough! To get started just see the tutorial I posted earlier. We actually had a lot of icing left over, but I wanted to make sure I had plenty to make 6 different colors (white, green, aqua, pink, violet, and yellow).

FYI – Those are John’s fingers (not mine).
I made the sugar cookies dough one day, then rolled it out the next, and then the next day we decorated the cookies back at home. Spacing out the project really makes it a lot less of a project, and more of a fun family activity. So instead of dying boiled eggs – try decorating some egg cookies this year! Finishing with an iced cookie is a lot tastier than a hard boiled egg :-)!

Royal Icing – Recipe and Tutorial


So maybe St. Patrick’s day isn’t considered a major holiday for most people, but those people didn’t grow up in my family. In my (half) Irish family, St. Patty’s day is probably the next big holiday after Thanksgiving and Christmas. I had been wanting to decorate St. Patty’s day cookies pretty much since I finished the Valentine’s Day ones. It worked out perfectly, because my festive mother was here to help me decorate them! I mentioned earlier that I really wanted to try to get good enough at royal icing to post a “How to” – and I think I have just about reached that point. I’ve made it enough times now that I have it down to a science. It’s kind of addicting, so be careful. My mom and I are already planning next year’s St. Patty’s Day cookie decorating, and we were even brainstorming about Easter….
A lot of people wonder – “Why use royal icing?….Doesn’t buttercream taste better?”. And I’ll say, yes if you are eating icing by itself, buttercream is definitely the way to go – but with a buttery cookie underneath royal icing adds a perfect amount of sweetness without being too rich. Plus the royal icing seals in the moisture of the cookie, so your cookies can be made ahead of time, and will last a lot longer. More importantly, it’s just not possible to decorate with buttercream the way you can with royal icing. Ever wonder how professional cookies get that completely smooth surface with multiple colors and no “spread marks”? That’s right – they use royal icing.
So here’s the recipe, followed by a long tutorial. I tried to include as many pointers as possible, but for the most part you can figure out what to do looking at the pictures.
Royal Icing
- 4 cups Powdered Sugar (About 1 Pound)
- 2 Tablespoons Meringue Powder
- 5 Tablespoons Water (to start)
Combine all ingredients in the bowl of a stand mixer. Mix on low (Speed 2 or 4) for 7-10 minutes, or until the sheen has disappeared and the icing has a matte appearance. It will be too thick to use at this point so you will be adding more water later; however, getting it to this texture makes a difference in the final product.
How to Decorate with Royal Icing
- 1 -2 batches of Royal Icing and Sugar Cookies
- Small plastic containers with lids
- Pastry Bags (I like disposable so you don’t have to clean them)
- Couplers and Decorating Tips (I use size 3)
- Toothpicks
- Gel Food Coloring
- Miniature Squeeze bottle (optional)
First, start by planning out what colors you will want to use, and how much of each. For these cookies, I made 5 colors: Green, Light Green, Orange, Black, and White. According to color need, divide the white icing into the containers. Add about 1 additional teaspoon of water to each container. Stir to incorporate. You may need to add another teaspoon or 2 in order to get a good consistency for piping. The key is to get the icing thin enough that you can easily pipe a smooth line, but thick enough that the icing will still dry quickly.

Using toothpicks, add a little bit of gel food color and stir with a spoon. Continue adding color until you achieve the desired tint. For dark colors, like black or red, you will need a lot of gel.

Prepare your pastry bags by cutting about 3/4 of an inch from the tip. Place the coupler inside the bag, and secure the appropriate tip. I prefer size 3 for edging the cookies, but I used a mix of sizes 2-4, because that’s what I have. If you do not have pastry bags and tips , you can try using a ziploc bag and cutting the corner to make a VERY small hole. I only spent about $10 for all the couplers, tips and bags, but if you are only going to make these once, it might not be worth it.

Fold down the edges of the pastry bags, and using a spoon or knife, scoop the icing into the pastry bag. You only need a very small amount of icing to edge the cookies, but I think it’s easier to work with if you have a moderate amount of icing in the bag. Also, it’s easy to simply squeeze the left over icing back into the original container when you are finished.

Pipe the icing around the edges of each cookie to make an outline. To get the smoothest line possible you do not want the tip to be touching the cookie.


I think it’s better to work quickly and let the icing lie smoothy, than to try to get an absolutely perfect shape for the outline. If you look at these, some of the cookies have a smoother outline, and some are more squiggly.

Once the cookies are lined, squeeze unneeded icing back into the container. Now it’s time to thin the icing for flooding. Add 1 teaspoon water at a time to each icing, stirring after each addition. You want the icing to be thin enough that when a spoonful of it is poured back into the container, it takes about 4 seconds for it to disappear into the pool of icing. It is better to err on the side of too thick of icing than to thin. If you accidentally make the icing too thin, add a little bit of powdered sugar to get it back to a normal consistency.

You should now let the icing set for about 5 minutes in order to get the air bubbles to rise to the surface. The first time making this, I didn’t do this, and you end up with air bubbles on what was supposed to be your smooth surface cookie. Once the air bubbles have risen to the surface, gently stir the icing through once, just to pop them.

If you are using mini squeeze bottles, this would be the time to transfer the icing into the bottle. It’s easier to do if the icing is in a flexible plastic container, because you can bend the container to funnel the icing in. This was my first time using squeeze bottles, and it does make it a lot easier to flood the cookies, but it also makes one more thing to clean when finished.


Now flood the cookies. If you are using squeeze bottles, just squeeze it around the edges and move inward to fill the cookie in.


If you are not using squeeze bottles, spoon the icing onto the top of the cookie, and then spread it to the edges using a toothpick. 2 pointers: 1) If you spread the icing over just over the edge of the piping, it will help to blend the piping with the flooded icing. 2) It looks a lot better if you over-flood the cookies, so that the icing ends up creating a dome look on top of the cookie. If you under-fill them, the center will sink down and the outer edge piping will be very visible.


If you want to decorate the cookies with sprinkles, as I did with the pots of gold, it’s best to put this on while the icing is still wet. If you want to pipe a design on top of the cookies, it’s best to let the cookies dry for at least 45 minutes (or overnight). For the “plaid” effect on the cookies, I cleaned up while letting the cookies dry, and I just used the little bit of icing I had left in my pastry bags and piped perpendicular lines over several cookies in a row.

Let let the cookies dry for several hours or overnight before packing them up. The cookies should then be stored in an airtight container or cellophane bags. These cookies will last for at least a full week, and once the icing has dried, it is very sturdy. Therefore these cookies can be made in advance and are great for mailing.

Inspired by Annie’s Eats
Pirouettes AKA Cigarettes Russes

So I finished my test (yeah!) and as it turns out, blogging actually helped my grade – so I think its safe to continue! Almost immediately after the test, we left for Taos, New Mexico. We had a great visit with my in-laws, ate and drank well, and even got some skiing and hiking in. Apparently we brought the bad weather with us, but it was still better than the cloudy skys we came back to in Ohio. I was planning on taking a break from cooking while on vacation – but of course I got the urge to bake after about 10 hours. Actually I’ve had the urge to bake these particular cookies for several weeks. I kept putting them off because they looked kind of complicated, but spring break seemed like the perfect time to try these out!
The reason I have been wanting to make these cookies for so long, is that you really can’t buy them anywhere! Sure, you can buy filled Pirouettes, but I like the plain and simple taste of just the wafer – without hazelnut, mint, or chocolate cream inside to ruin it. Pepperidge Farm does actually make the simple “Cigarettes Russes” (without the filling), but the only place I have ever seen them is inside of the entertaining pack of assorted cookies, and even then you only get like 2! So while I really did enjoy making these cookies, there was also a utilitarian reason for making them.
I actually tried making these twice. The first time they did not work out …at all. I’m going to blame it on the 7,500 altitude in Taos, NM, but honestly I think there were a bunch of factors that caused the initial demise of these cookies. The second time was much better, and now I know the specifics of how to make them perfect – and lucky for you, I’ll share that info with you :-)!
Cigarettes Russes
- 6 Tbs. (3/4 stick) softened butter
- 1 cup powdered sugar
- 4 egg whites at room temperature (the first time I took them straight from the fridge – which didn’t work)
- 2 tsp. vanilla extract
- 2/3 cup all-purpose flour
- 1/8 tsp. salt.
1. Preheat an oven to 425°F. Line 2 large baking sheets with silicone liners. (Do NOT use Parchment. If you don’t have silicon liners you could try a greased cookie sheet, but this didn’t work as well for me)
5. Add the vanilla and beat until blended.
6. Mix flour and salt together, and gradually add to buter mixture. Stir to combine.


Chocolate Dip
- 3 oz semisweet chocolate
- 1 tsp butter
- 1 tsp corn syrup (if you have it – I didn’t so I didn’t use it)
Adapted from Williams Sonoma
Conversation Heart Sugar Cookies


HAPPY VALENTINE’S DAY! I know that this is my second post related to Valentine’s….but I just love excuses to make cookies! I’m really lucky that my friends, Samiya and Sarah, also share in my love of cookie decorating – it makes it a great 10:30 at night study break :-). A while back, Sarah had the idea to make heart shaped cookies and decorate them like conversation hearts. It sounded so cute that I just knew we had to make them. This is our second time decorating cookies together, and I think we are getting a little better at it. (Still not ready to open our own cookie business….but maybe eventually.) I made a simple sugar cookie dough (seen below) and cut the cookies out. Then together we whipped up a batch of royal icing, and started decorating. To make these you need to make quite a few icing colors. We made, blue, green, white and pink, and then then took about 1/2 of the pink icing and died it a darker pink/red to do the writing with. The conversation hearts also come in purple, yellow and orange – so you can just pick your favorites.
As a helpful hint, we used gel food coloring, and even with globs of it we had trouble getting the icing to be “Red”. My advice would be to add color until it looks like hot pink, and then the icing will dry a little bit darker. Also, in retrospect, you really need very little icing to “write with”, and it would be easier to darkly dye a smaller amount of icing.
I don’t feel that I’m near good enough (yet), to make my own tutorial on how to ice with royal icing, but if you are interested here are a few sites that seem to have it down pat: Brown Eyed Baker, Annie’s Eats, Sweetopia. One day, (probably over spring break), you will be seeing a royal icing tutorial from me. However, I think that these cookies are a simple enough design that a plain “dip” icing, or buttercream would also work fine. Royal icing just gives the cookies that professional looking sheen.
Please take note of the “P.L.T.” cookie. We were inspired by this week’s episode of Glee, and the Micheal Jackson song, “Pretty Little Thing”…Which we realized after was actually called “Pretty Young Thing”…whoops.

And then of course, you have to have the classic phrase, “That’s what she said”. Which was kind of inspired by my favorite blogger, Annie, and by the fact that this phrase is awesome…

We also tried our hand at some other languages, with cookies like “Te Amo”, “Ich Liebe Diche”, “Je t’aime” & “Mi Amore.”
Janice’s Sugar Cookies
– I made half of this recipe, and it made about 30 large heart shaped cookies.
- One lb. butter (4sticks), softened
- 1 cup Sugar
- 2 eggs
- 2 Tablespoons vanilla
- 1 teaspoon baking soda
- 5-6 cups flour
Linzer Heart Cookies


With Valentine’s day right around the corner, it seemed like the perfect excuse to bake some cookies! In my opinion, these are the quintessential Valentine’s day cookie. They are just so adorable, and the raspberry jam peaking through the center of the heart is just the perfect for the holiday. My mom used to make these for Valentine’s day, and I can remember her sending me some in a cute little Valentine’s care package. I remember this so well because my mom isn’t really much of a baker, and I was so impressed that she made this complicated cookie, AND managed to get it in the mail before Valentine’s day. I really wanted to send her some of these, but of course – It’s saturday, Valentine’s day is on Monday, and I don’t think express shipping for cookies is really warranted. Maybe next year….
These cookies are really unique. They are so airy and light, and almost melt in your mouth when you eat them. If you’ve ever had those little ball shaped cookies, covered in powdered sugar at Christmas time – these cookies are somewhat similar (but more delicious). But such qualities in a cookie don’t come easy. I’ve made these for 3 or 4 years now, and I think I have learned something new about how to make them better, and prettier each year. Here’s a few tips that I’ve learned from my mistakes:
- These cookies are very fragile. They are actually probably one of the hardest cookies to send in the mail (mine were bubble wrapped !) So don’t be afraid to make the dough a little bit thicker than 1/4 inch (and definitely no thinner). It will help keep them in one piece.
- The dough has to be VERY cold when you are rolling out the cookies. I usually divide the dough into 3 batches, so that I can roll out 1, while the other 2 are still as cold as possible in the fridge.
- I’ve found that it works best if you roll out the dough between 2 floured pieces of wax paper. The flour helps when you go to lift the cookie onto the cookie sheet. Another thing I’ve done is to roll out the dough and then refrigerate the flat sheet before cutting out, this also works well and if you do this you don’t have to re-refrigerate after cutting them out.
- The step that says “Chill the cutout cookies for 45 minutes before baking”, was actually included in the recipe for a reason (other than annoying an inpatient person like myself). If you don’t chill the cookies before baking, they lose their shape quickly in the oven. They still taste good, but it makes it hard to find cookies that match up nicely to sandwich together. And they just don’t look nearly as beautiful.
- You cannot eat just “a piece” of this cookie. Inevitably, you end up finishing the whole thing…

Linzer Cookies
- 3 sticks (3/4 lb) butter, softened
- 1 1/4 cups powdered sugar + more for dusting
- 1 egg
- 2 cups unbleached all-purpose flour, sifted
- 1 cup cornstartch
- 2 cups shelled walnuts or pecans, finely ground***
- 3/4 cup red raspberry preserves
***Grind the walnuts in a food processor by pulsing 5-15 times. Be careful not to overgrind because the walnuts will actually start to turn into paste, like peanut butter. To help prevent this you can try adding a little bit of the powdered sugar to the nuts while grinding them.
Cream butter and 1 1/4 cup of the sugar until light and fluffy. Add egg and mix well. Sift together flour and cornstarch together, and add to butter mixture. Add walnuts and mix thoroughly.
Gather dough in ball and wrap in plastic wrap or wax paper. Chill for 4-6 hours, or overnight, or a day, or 2.
Sandwich the dough between 2 pieces wax paper. Roll dough out to 1/4-inch thickness. 
Using a large heart-shaped cookie cutter, cut out 1 cookie and place on an ungreased cookie sheet (preferably lined with a silicone baking mat). Then cut out the same size heart, and using a smaller heart, cut a heart shaped hole out of the middle, also place on the cookie sheet. Place about an inch apart on cookie sheet (Mine in the picture were a little too close together!) Then chill for 45 minutes.


Preheat oven to 325°F. Bake cookies for 10-15 minutes, or until they are only slightly browned. Remove and cool on wire rack.
While they are still slightly warm, spread half of the cookies with raspberry preserves, 1/2 teaspoon of jam on each cookie. Top each with one of the remaining cookies. Press together carefully, this is when it is very easy to break the cookies!
Once fully cooled, sift the remaining powdered sugar over the cookies. Turn cookies over and sift onto the other side. I like to sift a little powdered sugar on them again before serving.
Makes about 25 “sandwiches”.
Passed on to me by my Mom, and originally from The Silver Palate Cookbook
Peanut Butter and Chocolate French Macarons


I’ve always been in love with things related to France – French language, French food, French wine and French cities. When I started seeing French macarons around the blogging world, I knew I had to make them. Luckily, we found out that we are going to have a SNOW DAY, so it seemed like the perfect time to try these rather complicated French delicacy. After eating several of them, I can honestly say that these little treats are divine.
I really wasn’t sure what to expect because a no flour, egg white base sounded a lot like meringue cookies to me, which I happen to dislike. But these treats are crispy on the outside and almost like cotton candy on the inside. I even liked the plain cookie without the filling.
I learned pretty much everything I needed to know in this tutorial, which I found via Annie’s Eats. But I have a few comments.
- You really need to have a food scale to make these (which gave me a good excuse to use some gift cards to go buy one)
- The egg whites quickly go from soft peaks to stiff peaks (so don’t walk away from the mixer while you’re beating them …like I did)
- I found I liked a lot less filling then the original recipe called for, but if you think you’d like more filling, the original recipe called for 6 oz chocolate and 3/4 cup cream (and I had more than 1/2 of it left over)
- Also the original recipe called for blanched, unsalted peanuts, but I accidentally bought roasted, salted and they worked fine.
- I used 2 silicone baking mats to bake these on (which my brother John introduced me to for my birthday). They are awesome for anything baked in the oven and I would definitely recommend buying one!
Peanut Macarons
55 grams slivered almonds
55 grams peanuts (I used roasted, salted)
200 grams powdered sugar
100 grams egg whites (aged at room temperature for 12-24 hours)
50 grams granulated sugar
Chopped peanuts for garnish
Weigh all ingredients. Combine almonds, peanuts and powdered sugar in a food processor and process until smooth. In large bowl beat aged egg whites on medium-high until foamy. Slowly add the granulated sugar to the eggs and beat on high until stiff peaks form. Be careful not to overbeat. Then carefully fold in the almond/peanut/powdered sugar mixture until the mixture seems consistent throughout.
Line 2 baking sheets with silicone baking mats, (or parchment paper if you don’t have silicone mats). Spoon the batter into a pastry bag or Ziploc. Cut the edge of the bag to leave an opening of about 1/2 inch. Pipe the batter into small rounds about 1-2 inches wide on the baking sheet. Leave about 1 inch in-between cookies, although they generally do not spread. Now quickly sprinkle with chopped peanuts. Then let the cookies sit for about an hour at room temperature.
Once a cookies have started to develop a hard shell, preheat the oven to 300 degrees. Bake the cookies for 11-14 minutes. Remove from oven and let cool on pans. Place in an airtight container until you want to fill them.
Chocolate-Peanut Butter Filling
4 oz semi-sweet chocolate, chopped
1/2 c. heavy cream
1 Tablespoon butter
1/2 c. peanut butter
Place the chocolate in a heat proof bowl. Heat heavy cream and butter in a small saucepan over medium heat until it begins to simmer. Pour over chocolate and then stir until the mixture becomes smooth. Let the ganache cool until easy to handle. Transfer to a pastry bag fitted with a medium tip.
Add peanut butter to another pastry bag also fitted with a medium tip.
Match up cookies so that they match as best is possible in size. Pipe a layer of chocolate onto the flat side of the cookie and top with a dollop of peanut butter. Sandwich cookies together and push down lightly. Store in an air tight container until ready to eat. (But I’ll have to say – at the rate they disappear, you might not need to store them :-))
Recipe from Annie’s Eats

