
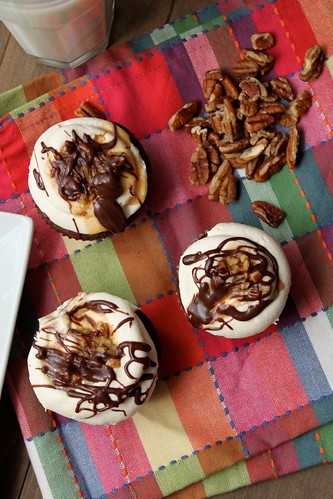
Turtle Cupcakes
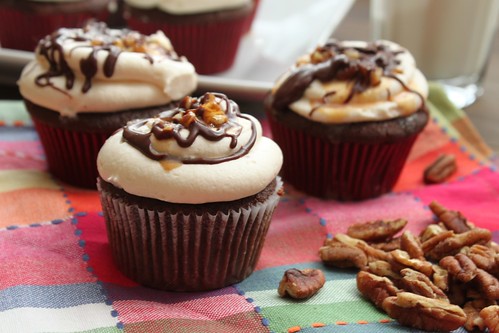
Being in the position I’m in can be very stressful, with lots of uncertainty in the future and I’m not the best at dealing with it. That’s why I’m so grateful for wonderful co-workers who help keep me grounded, make me laugh and always know how to calm me down. They are the best; and while terrible at our short lived diet plans, I still love them. Eating healthy is hard when you work in a dermatology office that seems to have an endless supply of girl scout cookies and leftover cake. So when it was my funniest friend’s birthday, I obviously had to make cupcakes, to contribute to the problem.
I toyed with a few flavor ideas, but ultimately decided on turtle because, 1) I had all the ingredients and 2) who doesn’t love a turtle sundae. It’s basically a super moist, yet sturdy, cupcake base, topped with a caramel cream cheese frosting, ganache and a caramel pecan filling. “Some people” were a little worried about how nuts would taste on a cupcake, but I assure you, you have nothing to fear. It was delicious. If I had to make them again, I would probably double the caramel and pipe some caramel filling, or scoop some caramel pecan filling, into the center. I also used low fat sour cream (because it’s what I had), but no one complained :-)!
TURTLE CUPCAKES
Makes 2 dozen
INGREDIENTS
For the cupcakes:
½ cup plus 1 tablespoon Dutch-process cocoa powder
½ cup plus 1 tablespoon hot water
2¼ cups all-purpose flour
¾ tsp. baking soda
¾ tsp. baking powder
½ tsp. salt
2 sticks plus 1 tablespoon unsalted butter, at room temperature
1 2/3 cups sugar
3 large eggs, at room temperature
1 tbsp. vanilla extract
¾ cup sour cream
For the caramel and filling:
½ cup sugar
½ cups heavy cream, warmed
1 vanilla bean, split lengthwise (optional)
¼ tsp. coarse salt
½ tsp. vanilla extract
½ cup chopped pecans
For the frosting:
12 oz. cream cheese, cold
12 tbsp. (6 oz.) unsalted butter, at room temperature
6 tbsp. caramel sauce (recipe above)
2¼ cups confectioners’ sugar, sifted
Pinch of coarse salt
For the chocolate ganache:
2 oz chopped bittersweet (60% cacao) chocolate
1/4 cup heavy cream
1 T. butter
DIRECTIONS
- Preheat the oven to 350˚ F. Line cupcake pans with paper liners. In a small bowl, combine the cocoa powder and hot water and whisk until smooth. In another medium bowl combine the flour, baking soda, baking powder, and salt, and whisk to blend.
- Combine the butter and sugar in a medium saucepan set over medium heat. Cook, stirring occasionally, until the mixture is smooth and the butter is completely melted. Transfer the mixture to the bowl of an electric mixer and beat on medium-low speed until the mixture is cool, about 4-5 minutes. Add the eggs one at a time, mixing well after each addition and scraping down the sides of the bowl as needed. Blend in the vanilla and then the cocoa mixture until smooth. With the mixer on low speed, add the flour mixture in three additions alternating with the sour cream, beginning and ending with the dry ingredients and mixing each addition just until incorporated.
-
Divide the batter evenly between the prepared liners. Bake until a toothpick inserted in the center comes out clean, about 18-20 minutes, rotating the pans halfway through baking. Let cool in the pan about 5-10 minutes, then transfer to a wire rack to cool completely.
- To make the caramel, spread the sugar in an even layer over the bottom of a large, heavy-bottomed saucepan. Place over medium-low heat, watching carefully. When the sugar begins to liquefy around the edges, use a heatproof spatula to gently stir it towards the center. Continue stirring very gently until all the sugar is melted, taking care not to over stir. Measure out the heavy cream in a liquid measuring cup and scrape the seeds from the vanilla bean into the cream. Set aside. Once the caramel reaches a deep amber color, immediately remove the sauce pan from the heat. (To test the color, spoon a drop onto a white plate or bowl.) Carefully pour half of the heavy cream into the saucepan in a steady stream down the edge of the pan, whisking constantly. The mixture will steam and bubble violently. Stir until the cream is well incorporated, then whisk in the remaining cream. Stir in the salt and the vanilla. If any sugar has seized or hardened, place the saucepan over low heat and whisk until smooth. Transfer to a bowl and let cool to room temperature. If you desired, double the recipe and pipe a small dollop of caramel into the center of each cupcake at this time.
- To make the frosting, combine the cream cheese, butter, and caramel sauce in the bowl of an electric mixer. Beat on medium-high speed until smooth and creamy, about 2 minutes. Mix in the confectioners’ sugar and salt at medium speed until light and fluffy, about 2 minutes more. Transfer the frosting to a pastry bag with a large round tip. Pipe a heavy swirl of frosting over the top of each cupcake. Use the tip of a small offset spatula or a small spoon to scoop an indentation out of the center of the frosting.
- To make the chocolate ganache, chop chocolate and place in a small bowl. Heat heavy cream in a saucepan or carefully in the microwave until hot. Pour over chocolate. Let sit for 1-2 minutes, then stir until smooth. Stir in 1 T butter. Let sit at room temperature until desired consistency.
- In a small bowl, mix together of the caramel sauce and the chopped pecans. Fill the indentations in the frosting with a small spoonful of the caramel-pecan mixture. Drizzle the cupcakes with additional caramel sauce, chocolate ganache, and sprinkle with additional chopped pecans, if desired.
Recipe from Annie’s Eats
Chocolate Oatmeal Moon Pies

These babies have been on my “To Make” list for a long time, but they are the kind of cookie that you absolutely cannot make unless you have people to share them with (or have better will power than myself ). So when our friend planned a dinner party, , I immediately knew that I wanted to bring these. Everyone enjoyed them, but I think they are a new personal favorite of mine. The cookie itself is to die for. If you don’t want to go to the trouble of making the whole sandwich, just make the cookies- you won’t be sorry. They have chocolate chunks, pecans, dried cherries, oatmeal and brown sugar.

Then sandwiched between that goodness is a marshmallow frosting. If you really want to get fancy, you could try toasted marshmallow frosting instead. And if you aren’t drooling yet, on top of all that is a dark chocolate ganache. The only problem I had with these was that they are very messy if you try to eat them right after making them. For a more refined dessert, just place them in a fridge for at least an hour before serving. And since these taste so good cold, I think chocolate oatmeal ice cream sandwiches are in store for later this summer. Perhaps I will make some toasted marshmallow ice cream to go with them – because a cookie as fabulous as this can’t settle for plain old vanilla.

Chocolate Cherry Pecan Oatmeal Moon Pies
Makes about 20 large sandwich cookies
For the cookies:
- 1¼ cups all-purpose flour
- ¾ tsp. baking powder
- ½ tsp. baking soda
- ½ tsp. coarse salt
- 2¼ cups old-fashioned oats
- 1 cup dried tart cherries, chopped
- 1 cup pecans, chopped
- 4 oz. chocolate chunks
- 12 tbsp. unsalted butter, at room temperature
- 1½ cups packed brown sugar
- 1 large egg + 1 large egg yolk
- 2 tsp. vanilla extract
For the filling:
- 12 tbsp. unsalted butter, at room temperature
- 1½ cups confectioners’ sugar, sifted
- 6 oz. marshmallow fluff
- 1 tbsp. vanilla extract
For the drizzle:
- 4 oz. bittersweet chocolate, finely chopped
- ½ cup heavy cream
- 2 tbsp. unsalted butter
Preheat the oven to 325˚ F. Line baking sheets with silicone baking mats or parchment paper. Combine the flour, baking powder, baking soda, and salt in a medium bowl. Whisk to blend, and set aside. In a large bowl, combine the oats, cherries, pecans, and chocolate. In the bowl of an electric mixer, beat together the butter and sugar on medium-high speed until light and fluffy, about 2 minutes. Blend in the egg and vanilla. With the mixer on low speed, add in the flour mixture, beating just until incorporated. Fold in the oat mixture with a spatula until incorporated.
Use a scant ice cream scoop or a 1 oz cookie scoop to shape dough balls. Place the dough balls on the prepared baking sheets, spacing each 2-3 inches apart. Bake for 14-18 minutes, until cookies are light brown in color. Transfer to a wire rack and let cool completely.
To make the filling, place the butter in the bowl of a mixer fitted with the paddle attachment. Beat on medium-high speed until smooth, 1-2 minutes. Blend in the confectioners’ sugar until incorporated. Beat in the marshmallow fluff and vanilla until light and fluffy, 2-3 minutes.
Match the cookies up in pairs by size. Fill a pastry bag fitted with a large plain round tip with the marshmallow filling. Pipe a dollop of filling onto the flat side of one cookie of each pair, and sandwich the cookies together, pushing the filling to the edges.
To make the ganache, place the chopped chocolate in a medium bowl. In a small saucepan, bring the cream to a simmer over medium heat. Once simmering, remove from the heat and immediately pour over the chocolate. Let stand 1-2 minutes. Whisk in small circular motions until a smooth ganache has formed. Whisk in the butter until completely incorporated. Let the mixture stand at room temperature until slightly thickened, about 10 -20 minutes. Drizzle over the assembled cookies. Chill to set the ganache and stabilize the filling.
Adapted from Annie’s Eats
Turtle Cheesecake

Sometimes I take for granted that certain things are not common knowledge. Now I’m not talking about fancy medical terms, chemistry or physics here, I’m just talking about day-to-day life stuff that you can’t actually put a finger on when, or how you learned it – you just know it and therefore assume that others must too. Well turtle sundaes were an example of such knowledge. I mean I literally have no idea when I discovered a turtle sundae, but I definetely just assumed it was common knowledge that they consist of pecans, hot fudge and caramel. Well let me tell you folks, this is not the case.
The first time I suggested that John get a turtle sundae – he didn’t know what it was! Blasphemy! After he ordered it and thought it was amazing, he was shocked to discover that almost every major ice cream shop in America makes some type of turtle sundae! How did he go so long without discovering this? Well I’m guessing it’s because he only recently started frequenting ice cream shops on a regular basis (perhaps because his wife has an unhealthy obsession with ice cream.) Imagine that :-).

When I was trying to figure out what type of birthday cake I wanted to make for John’s brother, the only request I got was “cheesecake”. Well the list of cheesecake possibilities was quite overwhelming, but I decided on this one because I was hoping that the love of turtle sundaes would run in the family. I was really looking for something that incorporated all parts of the turtle sundae into the cheesecake (not just as toppings), and I couldn’t really find one, so instead I put together a few of the things I liked best about different recipes. The results were well worth it. The crust is to-die-for and I think it would probably work well in a variety of recipes. After eating a slice of this, my sister-in-law who is from Turkey exclaimed that cheesecake may be America’s greatest invention :-). Be fairly warned, it is really hard to eat more than a sliver of this because it’s quite rich, but if you find yourself with leftovers, I think this would freeze wonderfully.
P.S. Sorry I’ve been MIA from the blog lately. Surgery clerkship has gotten the best of me. It’s true what they say – you really do work 14 hour days, but for the most part I’ve really been enjoying it. Future surgeon? We shall see….

Turtle Cheesecake
– Make 1- 9 inch round
For the Crust:
- 1 ¼ cups graham cracker crumbs
- 2/3 cup finely ground pecans
- 3 T. packed brown sugar
- 6 T. melted butter
For the Filling:
- 4 packages (8 oz each) cream cheese, softened (I used 2 regular, 2- 1/3 less fat)
- 1 cup sugar
- 1/3 cup packed brown sugar
- 1/4 cup PLUS 1 teaspoon flour, divided
- 2 T. heavy whipping cream
- 1- ½ teaspoons vanilla extract
- 4 eggs, lightly beaten
- ½ cup milk chocolate chips, melted and cooled
- 1/3 cup ice cream caramel sauce (Will be posting a homemade and easy recipe soon)
- 1/2 cup coarsely chopped pecans
For the Topping:
- 1/2 cup milk chocolate chips
- 1/4 cup heavy whipping cream PLUS 1-2 tablespoons depending on preference
- Pecan halves and additional caramel topping for garnish
To Make the Crust:
- Pre heat oven to 400 F. Wrap 9-inch spring foam pan with heavy duty foil or parchment-foil paper (this is all I had and it worked wonderfully). Be sure to wrap both sides of the pan because you don’t want any water seeping through the cracks when you bake it in a water bath.
- Mix all crust ingredients until combined. Press into 9 inch pan, pressing firmly and evenly. Bake at 400° for 15-18 minutes. Let cool completely before filling.
To Make the Filling:
- In a large bowl beat cream cheese and sugars until well combined. Then beat in 1/4 cup of flour, vanilla, and eggs until well combined.
- Remove a heaping cup of cream cheese mixture and combine with melted chocolate. Pour mixture over cooled crust.

- Combine pecans, caramel sauce and flour (not pictured here because I forgot it, but add it to stop caramel from leaking). Drop pecan mixture over chocolate layer.

- Pour remaining plain cream cheese mixture over top and spread evenly. Place spring foam pan in a large, deep pan and add about 1 inch of water to larger pan to create a water bath.

- TURN OVEN DOWN to 325º and bake for about 1 hour 20 minutes, or until the top appears dull. Carefully remove springfoam pan from water bath, and cool for 10 minutes. Refrigerate for several hours or overnight.
To Make the Topping
- Place chocolate chips in a heat-proof measuring cup. Bring cream to a boil over medium heat. Pour hot cream over chocolate chips and stir to combine. Pour ganache over cooled cheesecake and spread evenly. *NOTE: if you would like the ganache to drip down the sides, like the effect in this cake, add another tablespoon or 2 of cream to the mixture and make sure it is still very warm when you pour it over the cake.
- Top ganache with pecans, and drizzle caramel sauce before serving.
Inspired by Taste of Home
Coffee Ice Cream with Chocolate Chunks

I have been wanting an ice cream maker all summer (or maybe even all my life), but I faithfully waited until my birthday hoping to get one. I did get some really wonderful presents, but an ice cream maker wasn’t one of them. I may or may not have had a slight freak out about this incident which may or may not have precipitated an emergency run to the store on my birthday to pick one up. Basically you don’t want to mess with me and ice cream. Needless to say, now I have an ice cream maker ;-).
My first order of business with my new toy was a raspberry ice cream with large chocolate chunks. While the recipe stated that it made about one quart, about 5 minutes into churning there was ice cream pouring out of the top of the 1 1/2 quart machine. It really didn’t freeze and while it didn’t taste awful, I ended up having to throw it out.
However once we got back from vacation I was determined to tackle the infamous French ice cream. I poured through “The Perfect Scoop”, looking for the perfect ice cream, an I finally decided on coffee ice cream because it’s John’s favorite and I liked that it would perfectly complement some large chocolate chunks. I will warn you in advance that this ice cream is VERY coffee flavored. This is in part due to the fact that I ended up steeping the coffee beans with the milk for several hours while I was running errands, so if you want a milder flavor, steep the beans for a shorter period of time. With the chocolate chunks, I was trying to replicate the famous Grater’s ice cream, but I found that they were slightly more hard than I would’ve liked. If you are brave enough you can add extra oil to the chocolate, which will keep it softer in the ice cream. You could also try making truffles and adding them to the ice cream, but I was trying to keep it simple.
Coffee Ice Cream with Chocolate Chunks
– Makes about 1 quart
- 1 -1/2 cups whole milk
- 3/4 cup sugar
- 1 -1/2 cups whole coffee beans
- Pinch of salt
- 1- 1/2 cups heavy cream
- 5 large egg yolks
- 1/4 teaspoon vanilla extract
- 1/4 teaspoon ground coffee
For the Chocolate chunks
- 4 oz dark chocolate (60% cacoa)
- 1 T. vegetable oil
1. Begin by warming milk, sugar, coffee beans, salt and 1/2 cup of heavy cream in a saucepan. Once warmed through, cover, remove from heat and let steep at room temperature for about 1 hour. If you’d like a stronger flavor, continue to steep in the refrigerator for 2-4 more hours.

2. Rewarm the coffee bean-milk mixture. Pour the remaining 1 cup of heavy cream in a large bowl and set a large fine mess sieve over top.

3. In a separate medium bowl, whisk together the egg yolks. 
4. Slowly pour the warm coffee bean-milk mixture into the egg yolks, whisking constantly in order to temper the yolks. Then scrape the warmed egg yolk mixture with coffee beans back into the saucepan.


5. Stir the mixture constantly over medium heat with a heatproof spatula, scraping the bottom as you stir. The mixture should thicken and coat the spatula. If you have a reliable thermometer, the temperature should be 170-175° when the custard is done.

6. Once the custard is thick, pour it through the strainer into the cream and stir. Press on the coffee beans to extract as much flavor as possible, then you can discard the beans. Mix in vanilla and finely ground coffee and stir until cool. To cool the ice cream more quickly, you can place the bowl in an ice bath in the sink and continue to stir.


7. To make the chocolate chunks, melt chocolate and oil in the microwave. Stir to mix and then poor mixture onto a rimmed plate. Cool in the freezer until hard. Break the chocolate into chunks and keep cold until ready to use in the ice cream.
8. Chill the milk mixture in the refrigerator and then freeze according to your ice cream maker’s instructions. When there are about 5 minutes left of freezing time, add the cold chocolate chunks and allow them to mix in. Make sure to chill the bowl adequately before churning the ice cream (most machines required 20+ hours of chilling time). Store ice cream in an air tight container in the freezer.

Adapted from The Perfect Scoop by David Lebovitz
S’more Nachos
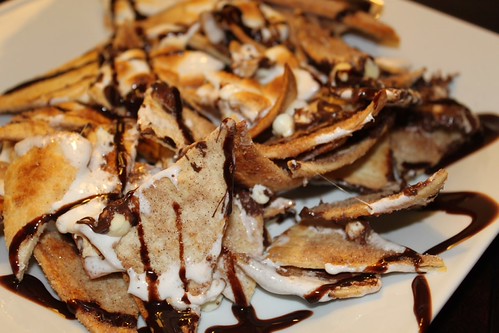
When John and I took a trip out to New Mexico over spring break, in addition to skiing, hiking and visiting with my in-laws, we got to try this great restaurant called Graham’s Grill. (Side Note: it’s pretty nice to have parents-in-law that both happen to live in vacation spots :-)). The restaurant combines the traditional flavors of the southwest but puts it’s own unique spin on them. The chef, Lesley B. Fay recently came out with a cookbook called Straight From the Heart, and my mother-in-law was nice enough to surprise me at the end of the meal with my very own copy. I have looked through the cookbook so many times trying to decide what to make but I finally decided that I couldn’t pass up a recipe combining 2 of America’s greatest inventions – S’mores and Nachos. (Another side note: I used to think nachos were from Mexico – then I went there in college and searched every restaurant menu for them only to find out that they don’t actually serve nachos in Mexico… definitely an American creation.)
The original recipe called for deep frying tortillas, but after my recent frying disaster, I chose to make them in the oven instead . It was actually a good reinforcement that never again do I need to fry anything, because the “chips” still came out crisp and delicious without having to mess with hot oil. In fact, I think cinnamon-sugar chips would be a pretty great snack on their own – so next time I will likely make a double batch. The recipe itself is pretty self-explanatory, but I’ll have to say Lesley must be some kind of genius for thinking up the idea of “S’more nachos” in the first place! If you really want to go crazy, you could try using ice cream as a dip for these nachos. I’m sure this would be fabulous – warm cinnamon chips against cool ice cream – but you might have to skip dinner all together if you want to try that. So if you don’t have the pleasure of a campfire this Fourth of July, make this instead….It’s definitely easier than building a fire ;-).
S’more Nachos
Serves 3-4
For the chips:
- 6-8 small (6 inch) flour tortillas
- 3 T. melted butter
- 1/2 cup sugar
- 1 T. cinnamon
For the Topping:
- 1/2 cup chocolate chips
- 1/4 cup white chocolate chips
- 1 1/2 cups miniature marshmallows
- chocolate syrup for drizzling (optional)
Preheat oven to 350°. Mix cinnamon and sugar together in a dish. Using a pastry brush, spread melted butter onto both sides of the tortillas. Sprinkle 1 side of each tortilla with a covering of cinnamon-sugar mixture. Using a kitchen scissors (or knife), cut each tortilla into 8-10 triangles. Without overlapping, place triangles sugar side up on a large baking sheet and bake for 10-15 minutes or until the edges turn up.

Remove chips from oven and combine into a pile on a small baking sheet or oven-proof dish. Sprinkle with chocolate chips, white chocolate chips and marshmallows. Turn the oven on broil, and place the baking sheet on the middle rack (too close to the heat will catch your marshmallows on fire). Watch carefully until the marshmallows are browned, about 5 minutes. Remove from the oven, transfer to a serving dish and drizzle chocolate syrup over the chips. Serve warm.
Before:

And the Aftermath:

– Nachos Adapted from from Straight From the Heart by Lesley B. Fay.
– Cinnamon Chips adapted from Our Best Bites
Samoas Cupcakes

After 2 weeks of “summer vacation”, it’s back to the (harsh) reality of 3rd year – but don’t worry about me, because these cupcakes made life better. The last day of break happened to fall on our friends Kat’s and Griffin’s birthday, which obviously called for celebration. I decided to make these cupcakes because both of them happen to love samoas. I’m a thin mint/tagalong girl myself, but I have the unique ability to see the good in just about any cookie :-). I thought these cupcakes turned out delicious, but I think if you are really trying to perfectly replicate a samoas you might want to add try making a filled cupcake with toasted coconut and caramel.
These cupcakes turned out to be much simpler to make than my endeavor of chocolate chip cookie dough cupcakes, but I still found it helpful to make the cupcakes one day and then to ice them the next. I didn’t want to make them too far in advance for fear of dryness, but I shouldn’t have been worried because these are unbelievably moist. The only qualm I had was that the cupcake itself isn’t particularly sturdy for the heaviness of a caramel icing. I later found out that putting them in the fridge before serving really helped the overall texture. The only other change I would make in the future is to use 2 cupcake liners for each cupcake, because the batter is very thin, so tends to wash out the colors of the cupcake liner. I think baking these using 2 liners would really give it a perfect finish.

For the Cupcakes
- 2 cups sugar
- 1-3/4 cup flour
- 3/4 cup Cocoa (I used Hershey’s special dark)
- 1-1/2 teaspoons baking powder
- 1-1/2 teaspoons baking soda
- 1 teaspoon salt
- 2 eggs
- 1 cup milk
- 1/2 cup vegetable oil
- 1 teaspoon vanilla
- 2 teaspoons coconut flavoring
- 1 cup coconut, packed
- 1 (scant) cup boiling water
1. Preheat oven to 350° and line 24 muffin tins with cupcake liners.
2. In a large bowl, combine sugar, flour, cocoa, baking soda, baking powder and salt.
3. Add in eggs, milk, oil, vanilla, and coconut flavoring. Mix well.
4. Fold in coconut, then add boiling water. (Batter will be very thin)
5. Pour batter into muffin tins, filling each cup no more than 3/4 full. Bake at 350° for 22-25 minutes or until a toothpick inserted in the center comes out clean. Let cool for several minutes, but then remove cupcakes from tins on cool on a wire rack.
For the Salted Caramel Buttercream
- 2 sticks butter, softened
- 2 teaspoons vanilla extract
- 1/2 cup caramel topping, plus more for drizzling (I used butterscotch caramel)
- 1 pound powdered sugar (about 4 cups)
- 1 teaspoon salt
1. Cream butter until fluffy.
2. Add in vanilla extract and caramel topping. Add powdered sugar and salt and mix until smooth. If icing is still too thin add a bit more powdered sugar (the consistency differs based on the type of caramel topping you use)
3. Wait until cupcakes are completely cool, and use a pastry bag with a 1M tip to ice the cupcakes.
For the Homemade Chocolate Syrup
- 1/4 cup cocoa powder (I used Hershey’s special dark)
- 1/4 cup granulated sugar
- 1/4 cup cold water
- pinch of salt
- 1/2 teaspoon vanilla extract
1. Combine all ingredients except vanilla extract in a small saucepan over medium-heat, and whisk until smooth.
2. Bring sauce to a boil and continue to whisk until sauce becomes thick. Remove from heat, let cool slightly and drizzle over cupcakes or store in an airtight container in the fridge until needed.
To Finish: Top cupcakes with toasted coconut and using small squeeze bottles (or simply a spoon) drizzle with chocolate sauce and remaining caramel sauce.
Slightly adapted from The Novice Chef


