
King Cake with Cream Cheese Filling & Happy Mardi Gras!

As I’ve mentioned on this blog before, I used to live in Louisiana. I’ve also mentioned how much I absolutely love it, but I’m just going to tell you again. It has got to be the most cultural place in America. It’s the kind of place where you go to take your trash out and end up spending the evening sharing a beer with your neighbor as you sit on the sidewalk. It’s also the kind of place where any excuse to celebrate is not taken for granted. Pretty sure there is no other place in America that gets a whole week off school in the middle of February. And most importantly, it’s the kind of place that seriously knows good food. King cake is no exception.
Now originally king cake was a rather plain cake filled with cinnamon and sugar, and the toppings were the really delicious part; but as we tend to do in America, we have made it more and more gluttonous over the years. Nowadays even the most famous bakeries like Gambino’s , serve cream cheese filled king cake as their “simple” selection. I’ve also heard that the bread has gotten much sweeter over the years, but I’m not complaining. This was a delicious and pretty simple recipe, even though I managed to mess it up a bit. There are quite a few steps, but each of them takes less than 20 minutes of hands on time. The problem I ran into was that I attempted to roll the dough into a huge rectangle, which made for a huge mess when I went to fill it with the cream cheese filling, but I have adapted the instructions below to make for an easier outcome. Other than that, this recipe really surprised me with how easy, and pretty much foolproof it was. I promise if you make it as soon as you get home from work, you will still be able to eat it for Fat Tuesday!
King Cake with Cream Cheese Filling
Makes 1 round king cake, about 10 servings
Dough
- 2 ½ tablespoons unsalted butter
- 8 ounces sour cream
- ¼ cup + 1 T. granulated sugar, divided
- Pinch of salt
- 1 package (2¼ teaspoons) active dry yeast
- ¼ cup warm milk (between 100 and 110 degrees)
- 1 egg
- 3 to 3½ cups all-purpose flour
- Oil for your hands and the bowl
Filling
- 8-ounce package cream cheese
- 1/2 cup (3 1/2 ounces) sugar
- 3 tablespoons All-Purpose Flour
- 1 large egg, lightly beaten
- 2 teaspoons vanilla
Icing
- 2 cups powdered sugar
- 1 teaspoon vanilla extract
- 1 tablespoon unsalted butter, melted
- 4 tablespoons whole milk
- Pinch of salt
Sprinkling Sugar
- 1 1/2 cups granulated sugar, separated into 3 bowls
- yellow, green, and purple (or blue + red) food coloring
- Bean/plastic baby for tradition
1. In a small saucepan over medium heat, add the butter, 1/4 c. of sugar and salt. Stir. Once butter has melted, add the sour cream and heat until lukewarm. Meanwhile, in a mixing bowl, add ¼ cup warm water, yeast, and 1 tablespoon of the sugar; stir. Allow the yeast to sit for about five minutes until it bubbles and becomes active.
2. Once the yeast is active, whisk in the warm butter/sour cream mixture, the egg, and 1 cup of the flour. Whisk until smooth. Using an oiled wooden spoon, being mixing in small amounts of the remaining flour until you form a soft dough. This will take about another 2 1/4 cups of flour. You want the dough to be tacky, but not sticky.
3. Using the dough hook of a mixing bowl, knead the dough until smooth and elastic, about 5-8 minutes, adding flour by the teaspoon if the dough is stickin to the sides of the bowl, more than itself.
4. Place the ball of dough into a large, well-oiled bowl, then flip the dough so all of the surface area of the dough is oiled. Cover the bowl with oiled plastic wrap, then set the bowl in a warm, draft-free area and allow the dough to rise until it has doubled in size, about 1 hour.
5. To make the filling: beat together the cream cheese, sugar and flour until smooth. Add the egg and vanilla and stir to combine.
6. Once the dough has doubled in size, turn it out onto a lightly floured surface. Lightly flour the dough and a rolling pin. Roll the dough into a rectangle about 24 inches long and 6 inches wide.
7. Dollop the filling down the center of the long strip of dough. Then fold each edge up and over the filling till they meet at the top; roll and pinch the edges together, to seal the filling inside as much as possible. Don’t worry about making the seal look perfect; it’ll eventually be hidden by the icing and sugar.
8. Place the log of dough seam side down or to the side onto a baking sheet covered with parchment paper. (A ring mold would be most helpful for this, but I didn’t have one). into the prepared ring mold, seam down or to the side (just not on top), or onto the baking sheet. The dough will be very extensible, i.e., it’ll stretch as you handle it. So pick it up and position it in the pan quickly and gently. Pinch the ends together to form a ring. Cover and let rise for about an hour, until it’s puffy. Preheat the oven to 350°F while the dough rises.
9. Once risen, bake at 350 for 25-30 minutes. Once golden, remove from oven and cool on a wire rack for 15 minutes.
10. While the cake is baking, make the sugar. (This can also be made far in advance). Combine 1/2 cup of sugar with a few drops of food coloring and stir continously until desired color is reached. *Gel colors will also work here, but you need to work the color into the sugar by pressing against the bottom of a spoon.
10. Once the cake is mildly cool, it is tradition to poke a small plastic baby, or a dried bean somewhere in the cake. Whoever gets this piece in their cake is supposed to buy/make the king cake for next year.
11. While the cake is cooling, make the icing. Combine all ingredients and whisk until smooth. Pour over the cooled cake. Before the icing has set (ie within 10-15 minutes), sprinkle sugar over the icing in 3 equal portions.
Cake Adapted from Brown Eyed Baker, Filling adapted from King Arthur Flour Company
Chocolate Sugar Cookies for Valentines Day

Happy Valentine’s Day! Let this post be my contract that next year I will actually get these cookies made ahead of time so that 1) you can actually make them in time for Valentine’s day if you wish, 2) I won’t be writing this post at 11 pm when I have to get up at 4:30 for surgery tomorrow), and 3) so that I can actually get them in the mail to some people in time for the holiday. I had to laugh when I looked back at my Valentine’s post from last year and realized I stated almost the exact same thing (you’d think I’d learn to plan ahead….this is clearly a difficult concept for me).
I’ll admit that the multiple layers of royal icing that was required for these cookies was a little bit more than I had planned for, but the cookies themselves are quite easy and completely delicious. Besides, if you don’t want to go to the trouble of icing, try sprinkling powdered sugar or topping with Nutella + sprinkles. The mixture of a chocolate with a touch of cinnamon added a really nice layer of complexity to this cookie. I still think the conversation heart cookies are one of the most clever Valentine’s ideas, but you can really never have too many Valentine’s cookies, can you?

Chocolate Cutout Cookies
Makes about 18-20 large heart cut-outs
- 2-1/4 cups All-purpose Flour
- 1 teaspoon Baking Powder
- 1/4 teaspoon Salt
- 1/2 teaspoon Ground Cinnamon
- 1/4 cup Unsweetened Cocoa Powder (I used Dutch processed)*
- 1 cup Firmly Packed Brown Sugar
- 1 whole Large Egg
- 1-1/2 teaspoon Vanilla Extract
- 2 sticks (1 Cup) Unsalted Butter, Softened
- Icing, powdered sugar or Nutella for finishing
Preparation Instructions
Combine flour, baking powder, salt, cinnamon, and cocoa powder in a bowl. Whisk together and set aside.
In the bowl of an electric mixer, cream butter and brown sugar until fluffy. Add egg and vanilla and beat until combined. Add flour/cocoa mixture in two or three batches, mixing well after each addition.
Form dough into a disc, wrap in plastic wrap and refrigerate for at least 2 hours.
To make to cookies, preheat oven to 350 degrees. Remove dough from bag and place on a floured surface. You may need to let the dough warm up for several minutes to make rolling easier. Roll out to 1/4-inch thickness and cut with a heart cutter.
Place on a cookie sheet lined with parchment paper or a baking mat. Bake for 12 minutes, or until set (but not browning at all.) Remove from oven and allow to cool completely.
Ice as desired, using royal icing, sifted powdered sugar, or Nutella (yummm).
French Croissants

Before you go running away by the long list of seemingly complicated steps that are involved in this recipe, let me tell you a story. I actually did the same thing when I saw Annie‘s post about homemade croissants. I thought to myself, seriously, who has the time (or desire) to do all that! And yet here I am, telling you about homemade croissants. See, a funny thing happened. It was called Christmas vacation. After I saw that homemade croissants made the list of one of Annie’s favorite things from her entire year of hundreds of recipes, I started to think of them in a different light. Then came a whole week of free time and a house full of people to feed on New Years morning, and croissants suddenly started to seem like a good idea. And it turned out to be such a good idea that I felt the need to make them again last weekend. Do they take more time then buying them at the store? Yes. But do they taste like no other baked good you’ve ever made before? Yes.
About half way through making this recipe, I feared the croissants would turn out like those crescent rolls that come in a tube. Then something magical happened in the baking process, and flakey, buttery, French goodness arose. I was so excited watching these puff up and golden in the oven, and I think our guests were even more excited about the final result. Everyone loved these. I can’t wait to make them again in the future. They are best eaten shortly after they come out of the oven, but they are still wonderful the next day (they’d probably last a few more days – if you don’t eat them immediately). While I didn’t include instructions for freezing, I believe the best times to attempt freezing would be after the second lamination of the dough, or after the final shaping of the croissants. If you try this, I would love to know how freezing turned out!

French Croissants
Makes 12 large croissants
For the dough:
- 3 cups (15 oz) all purpose flour, plus more for dusting
- 1 tablespoon instant yeast
- 1/4 cup sugar
- 1¼ tsp. salt
- 1¼ cups whole milk, cold (or use 1 cup skim with 1/4 cup whipping cream)
- 2 tablespoons unsalted butter
For the butter square:
- 24 T. (3 sticks) unsalted butter, cut into 1-tablespoon pieces and kept cold
- 2 T. all purpose flour
Egg wash:
- 1 large egg, lightly beaten
To make the butter square, toss flour and butter together. Using the blade of a large knife or a bench scraper work the butter back and forth until it is smooth and homogenous. It will be sticky. Wrap in plastic wrap, flatten the butter into a 7×7 inch square. Refrigerate for at least 30 minutes.

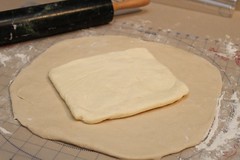
Once the dough has chilled, remove it from the fridge and roll out on a floured work surface into an 11 by 11 inch square. (It may seem small but it will complement the butter square perfectly).

Place the chilled butter square diagonally on the 11-inch dough square.
Fold the edges of the dough up around the butter so that they meet in the middle.

Pinch the dough seems to seal.

Tap the center of the dough square with a rolling pin in order to soften the butter, and roll the dough into a 14 inch square. Make sure to flour the surface as you go so the dough doesn’t stick.

Fold the dough into thirds to form a long rectangle.

Then starting at the short ends, fold the dough again into thirds.

At this point wrap the dough in plastic wrap and refrigerate for 2 hours, or longer.
Repeat this process again- roll dough into a 14 inch square, fold into thirds, then fold into thirds again. Rewrap in plastic wrap and refrigerate for another 2 hours, or longer. (I usually do the above steps the day before, and save the steps below for the morning in which the croissants will be served. I believe you could stop at this point and freeze the dough, or half of the dough, but I have not tried this myself.)
Remove the folded dough from the fridge and divide in half. (You could also roll the dough into one very large 20×20 inch rectangle but I found half of the dough more manageable)

Roll one of the 2 dough pieces into a 10×20 inch rectangle.

Then cut the 10×20 inch rectangle into thirds, so that each section is just shy of 7 inches. Then cut each rectangle in half diagonally.

Take one triangle, and stretch the dough slightly so that each long side of the triangle is about equal in length. Cut a 1-inch slit in the bottom of the triangle and roll until the tip of the triangle.

Place croissants on a baking sheet lined with parchment or a silicon baking mat, and fold the edges of the dough next to each other to create a crescent. Repeat with remaining dough. Cover with plastic wrap and let rise until puffy, about 45 minutes. At this point preheat the oven to 400°.

Brush croissants with egg wash bake in a preheated oven until the golden brown, about 18-22 minutes, rotating pans half way through baking.

Allow to cool on a wire rack for several minutes. Store airtight at room temperature for up to 2 days or wrap well and freeze. Reheat in a 300˚ F oven for 5-10 minutes.

Source: Annie’s Eats, as adapted from Baking Illustrated
Pecan Bars

Eeek. I can’t believe I’m already done with more than half of my third year of medical school. Seriously! When patients ask me how much time I have left, I have started saying, “About a year” because it just seems easier than saying 16 months. To mark the end of my internal medicine rotation, and the end of a very good 3 weeks working in Lima, I decided to make these pecan bars to bring into the office. I have to admit that when I started this rotation, I was a little bummed about having to leave our brand new puppy for 3 weeks, but it has really worked out for the best. I’ve gotten to come home quite a bit, the gym in Lima is really nice, and being somewhere unfamiliar with no real television has a way of making you get a lot done. Plus, the doctor I’m working with is a great teacher, and now I can actually read an EKG confidently! He has also reminded me that being stressed out at your job is really your choice- it doesn’t get the job done any better, or faster, and it makes me feel like crap.
So about these pecan bars. Everyone at the office (including myself), loved these, and a few people even asked me for the recipe. (Of course, I was immediately excited to be able give them the “Spice is Nice” business cards I got for Christmas… it’s the little things.) I was between this recipe and one from Barefoot Contessa. I went with one because the Ina version called for over a pound of butter (granted it made a larger pan…but still!) I’m certainly glad I did because there is really nothing I would change about this recipe. I accidentally forgot to drizzle chocolate over the top, but in retrospect I’m kind of glad I left it off. These were plenty rich on their own, but if you are a true chocolate lover, feel free to make this into a chocolate and pecan dessert.

Pecan Bars
Makes about 16 bars
- 1 cup unbleached all-purpose flour
- 1/4 teaspoon baking powder
- 1 teaspoon salt
- 1/3 cup packed light brown sugar
- 1/4 cup pecans, toasted and chopped coarse
- 6 tablespoons (3/4 stick) cold unsalted butter, cut into small pieces
- 4 tablespoons (1/2 stick) unsalted butter, melted
- 1/2 cup packed light brown sugar
- 1/2 cup light corn syrup
- 2 teaspoons vanilla extract
- 1 tablespoon bourbon
- 1/2 teaspoon salt
- 1 large egg, lightly beaten
- 1 and 3/4 cups pecans, toasted and chopped coarse
- 1/3 cup semisweet chocolate
- For the crust: Preheat oven to 350º.
- To prepare the pan, spray a 9-inch square baking pan with nonstick cooking spray. Fold two 16-inch pieces of foil or parchment paper perpendicular to one another in the baking pan so that there is overhang around all the edges. Overlap is important to ensure filling doesn’t leak below one layer. Spray the sheets with nonstick cooking spray.
- Place the flour, baking powder, salt, brown sugar, and 1/4 cup pecans in a food processor.
- Process the mixture until it resembles coarse cornmeal, about 5 one-second pulses.
- Add the butter and pulse until the mixture resembles sand, about 10 one-second pulses.
- Pat the mixture evenly into the prepared pan and bake until the crust is light brown, about 20 minutes.
- For the filling: While the crust is in the oven, whisk together the melted butter, brown sugar, corn syrup, vanilla, bourbon, and salt and egg, in a medium bowl until just combined.
- Pour the filling on top of the hot crust and sprinkle the 1 & 3/4 cups pecans evenly over the top.
- Bake until the top is brown and cracks start to form across the surface, 22 to 25 minutes.
- Cool on a wire rack for about 1 hour.
- For the drizzle: Melt the bittersweet chocolate, if using, in the microwave for about 30 seconds, stirring frequently. Drizzle the chocolate evenly over the cooled bars.Let sit until room temperature, about 1 hour.
- Remove the bars from the pan using the foil or parchment paper “handles” and transfer to a cutting board; cut into desired sizes.
Source: The Curvy Carrot, originally from Baking Illustrated

