
French Croissants

Before you go running away by the long list of seemingly complicated steps that are involved in this recipe, let me tell you a story. I actually did the same thing when I saw Annie‘s post about homemade croissants. I thought to myself, seriously, who has the time (or desire) to do all that! And yet here I am, telling you about homemade croissants. See, a funny thing happened. It was called Christmas vacation. After I saw that homemade croissants made the list of one of Annie’s favorite things from her entire year of hundreds of recipes, I started to think of them in a different light. Then came a whole week of free time and a house full of people to feed on New Years morning, and croissants suddenly started to seem like a good idea. And it turned out to be such a good idea that I felt the need to make them again last weekend. Do they take more time then buying them at the store? Yes. But do they taste like no other baked good you’ve ever made before? Yes.
About half way through making this recipe, I feared the croissants would turn out like those crescent rolls that come in a tube. Then something magical happened in the baking process, and flakey, buttery, French goodness arose. I was so excited watching these puff up and golden in the oven, and I think our guests were even more excited about the final result. Everyone loved these. I can’t wait to make them again in the future. They are best eaten shortly after they come out of the oven, but they are still wonderful the next day (they’d probably last a few more days – if you don’t eat them immediately). While I didn’t include instructions for freezing, I believe the best times to attempt freezing would be after the second lamination of the dough, or after the final shaping of the croissants. If you try this, I would love to know how freezing turned out!

French Croissants
Makes 12 large croissants
For the dough:
- 3 cups (15 oz) all purpose flour, plus more for dusting
- 1 tablespoon instant yeast
- 1/4 cup sugar
- 1¼ tsp. salt
- 1¼ cups whole milk, cold (or use 1 cup skim with 1/4 cup whipping cream)
- 2 tablespoons unsalted butter
For the butter square:
- 24 T. (3 sticks) unsalted butter, cut into 1-tablespoon pieces and kept cold
- 2 T. all purpose flour
Egg wash:
- 1 large egg, lightly beaten
To make the butter square, toss flour and butter together. Using the blade of a large knife or a bench scraper work the butter back and forth until it is smooth and homogenous. It will be sticky. Wrap in plastic wrap, flatten the butter into a 7×7 inch square. Refrigerate for at least 30 minutes.

Once the dough has chilled, remove it from the fridge and roll out on a floured work surface into an 11 by 11 inch square. (It may seem small but it will complement the butter square perfectly).

Place the chilled butter square diagonally on the 11-inch dough square.
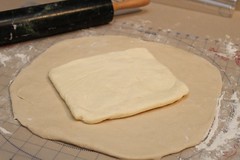
Fold the edges of the dough up around the butter so that they meet in the middle.

Pinch the dough seems to seal.

Tap the center of the dough square with a rolling pin in order to soften the butter, and roll the dough into a 14 inch square. Make sure to flour the surface as you go so the dough doesn’t stick.

Fold the dough into thirds to form a long rectangle.

Then starting at the short ends, fold the dough again into thirds.

At this point wrap the dough in plastic wrap and refrigerate for 2 hours, or longer.
Repeat this process again- roll dough into a 14 inch square, fold into thirds, then fold into thirds again. Rewrap in plastic wrap and refrigerate for another 2 hours, or longer. (I usually do the above steps the day before, and save the steps below for the morning in which the croissants will be served. I believe you could stop at this point and freeze the dough, or half of the dough, but I have not tried this myself.)
Remove the folded dough from the fridge and divide in half. (You could also roll the dough into one very large 20×20 inch rectangle but I found half of the dough more manageable)

Roll one of the 2 dough pieces into a 10×20 inch rectangle.

Then cut the 10×20 inch rectangle into thirds, so that each section is just shy of 7 inches. Then cut each rectangle in half diagonally.

Take one triangle, and stretch the dough slightly so that each long side of the triangle is about equal in length. Cut a 1-inch slit in the bottom of the triangle and roll until the tip of the triangle.

Place croissants on a baking sheet lined with parchment or a silicon baking mat, and fold the edges of the dough next to each other to create a crescent. Repeat with remaining dough. Cover with plastic wrap and let rise until puffy, about 45 minutes. At this point preheat the oven to 400°.

Brush croissants with egg wash bake in a preheated oven until the golden brown, about 18-22 minutes, rotating pans half way through baking.

Allow to cool on a wire rack for several minutes. Store airtight at room temperature for up to 2 days or wrap well and freeze. Reheat in a 300˚ F oven for 5-10 minutes.

Source: Annie’s Eats, as adapted from Baking Illustrated
Blueberry Scones

Believe it or not, I used to order scones from coffee shops because I thought they were a healthy option. In my defense, they always tasted so dry that I figured they must be healthy. After making these scones, I realized that they don’t exactly get the title of “healthy” but at the same time, they are way tastier than their coffee shop counterparts. Plus making them gives you the right to talk in a fake British accent and pretend you’re Kate Middleton for the day.
While these scones might you feel like British Royalty, they are great for another reason – you can freeze them unbaked, and then bake them from a frozen state. This is a great option if you want to impress some overnight guests without having to wake up at 4 am. Just flash freeze them individually on a baking sheet,wrap, and store in a freezer bag until ready to use.
The only tricky thing with making these is that the dough is a little sticky. I found that forming the dough into a rough square, and cooling it in the freezer for 10 minutes really helped the consistency. I also added quite a bit of flour, but try not to add too much or you might run into the dreaded dryness of a coffee shop scone. This recipe, as shown only makes 8 scones, so I think next time I will double it, and bake one batch to eat, while keeping the others un-baked in the freezer for a later date.

Blueberry Scones
Makes 8 scones
- 8 tbsp. (1 stick) unsalted butter, frozen whole
- 1½ cups fresh blueberries (slightly less than 1 pint container)
- ½ cup whole milk (or see my post tomorrow on good substitues for whole milk)
- ½ cup sour cream
- 2 cups (10 oz.) all-purpose flour, plus more for dusting the work surface
- ½ cup sugar
- 2 tsp. baking powder
- ¼ tsp. baking soda
- ½ tsp. salt
- zest of half a lemon (or 1 heaping teaspoon)
- For Topping: 2 T. butter, melted and Sugar for sprinling
If you plan on baking the scones immediately, preheat oven to 425˚ F. Wash and dry the blueberries and place in the freezer until needed.
Grate the frozen butter on the holes of a large box grater. In a small bowl, whisk together the milk and sour cream; refrigerate until needed.

In a larger bowl, combine flour, ½ cup sugar, baking powder, baking soda, salt and lemon zest. Whisk to combine. Add the grated butter to the flour mixture and toss with fingers until thoroughly coated.

Add the milk mixture to the dry ingredients and fold with a spatula just until combined. Transfer the dough to a generously floured work surface. Dust the top of the dough with flour, and knead with well floured hands, 6-8 times, just until the dough holds together in a ragged ball. Form the dough into a rough square, and place on a floured plate to chill in the freezer for 5-10 minutes.
Return the dough to the floured work surface and roll into an approximately 12-inch square. Sprinkle the blueberries evenly over the surface of the dough, and gently press down so that they are slightly embedded in the dough surface. Roll the dough up to form a tight log, so that the blueberries are in the center. Lay the log seam side down and press the the log into a 12 by 4-inch rectangle. Using a sharp knife, cut the rectangle crosswise into 4 equal rectangles. If your knife gets sticky, try flouring it. Cut each rectangle diagonally to form 2 triangles. Transfer to a parchment or silpat lined baking sheet.


If you are going to freeze these, flash freeze on a baking sheet for 20 minutes, then wrap individually and store in a freezer bag until needed. To bake, brush the tops of the scones with melted butter and sprinkle with sugar. Bake for 18-25 minutes (slightly longer if baking from a frozen state). Let cool on a wire rack before serving.

Slightly adapted from Annie’s Eats, Originally from Cook’s Illustrated Entertaining
Peanut Butter Banana Bread

Studying all day can get a little old – so I really needed a change in my routine. I figured something new for breakfast would be a start. I secretly bought more bananas then we could eat, hoping some would end up “banana bread worthy” by the end of the week. And after avoiding the bananas all week, there were 4 bananas left on their last leg by Friday. Since I plan on eating this bread for breakfast, I figured what would be better than adding a little peanut butter to boost the protein, and the flavor. I found this recipe on Joy’s blog, which also happened to call for ground flax seed – more protein, more fiber – good stuff. After finishing off the raspberry bars in a ridiculously short time, I decided I needed to make a snack with a little more sustenance.

Then of course I had to go and ruin a perfectly healthy morning breakfast by adding chocolate chips to the batter. They were calling my name from the pantry, and I just couldn’t resist. I didn’t add too many. Promise. But really you could eat it for dessert if you so desire. You could also try adding butterscotch chips, or peanuts, or walnuts – or whatever happens to be calling your name from your pantry. I think next time I’m going to put both chocolate chips AND chopped peanuts – because I really love that peanut flavor. That’s one of the reasons this recipe calls for natural peanut butter – it has a much stronger peanut flavor than Jif.
This is a quick bread, and rightly named. It doesn’t take much time to make, and you don’t even need to get the mixer out. It’s pretty much just through all the ingredients in a bowl, mix, and bake. It’s moist and flavorful enough to eat just plain, but of course John likes to add butter to his.
Peanut Butter Banana Bread (with Chocolate Chips)
- 1 1/2 cups mashed ripe bananas (about 4)
- 1/3 cup plain or vanilla fat free yogurt
- 1/3 cup creamy all-natural peanut butter
- 3 tablespoons butter, melted
- 2 large eggs
- 1/2 cup granulated sugar
- 1/2 cup brown sugar
- 1 1/2 cups all purpose flour (or 1 cup whole wheat flour + 1/2 cup all purpose)
- 1/4 cup ground flaxseed meal
- 3/4 teaspoon baking soda
- 1/2 teaspoon salt
- 1 scant teaspoon cinnamon
- pinch of allspice
- 1/2 cup chocolate chips, or chopped peanuts
Preheat oven to 350°. Grease a 9×5 loaf pan.
In a large bowl, combine all the wet ingredients – bananans, yogurt, peanut butter, melted butter, and eggs. Mix with a wisk. Then add the brown and granulated sugar and stir.
Then add the flour, flaxseed, baking soda, salt, cinnamon and allspice to the wet ingredients. (You could also mix the dry ingredients separately in another bowl to start, but I don’t think it’s necessary).
Mix until no lumps remain and then stir in chocolate chips, or your mix-in of choice.
Bake at 350° for 55-65 minutes or until a toothpick inserted in the center come out clean. Let cool slightly in the pan, and then remove from pan and cool on a wire rack. Removing the bread from the pan lets the air circulate, so moisture doesn’t condense in the crust – which can make the bread tough.

Check out those chocolate chips – yummmm.
Adapted from Joy the Baker, Originally adapted from Cooking Light
Cinnamon Sugar Pull Apart Bread

Have you ever made homemade cinnamon rolls? After receiving some delicious ones as a gift, we decided to give them a whorl ourselves this past Christmas. Yes, they were absolutely delicious – but they happen to be something that I’m not sure I can imagine myself making again. Just a little too much. Something I personally would prefer as a dessert , and with SO many wonderful options for dessert out there, cinnamon rolls wouldn’t be my first choice. It also probably had something to do with the fact that I think I ate 4 of them on Christmas morning and then felt like a dying sloth the rest of the day. So moral of the story, 4 cinnamon rolls = too much for me. But homemade cinnamon sugar pull apart bread = perfect.
This bread is really divine. It’s easier to make than cinnamon rolls, it’s unique and it uses ingredients I had around the house. I adapted it slightly from Joy’s original recipe, only because I almost never buy whole milk, and I hate buying it for the 1/2 cup that a lot of recipes call for. I know a lot of people just substitute skim – but I think of baking as a science, and I don’t like to mess with science. When you really think about it, skim milk even looks a lot different than whole milk. No milk mustache with skim. So I figured, what could I combine with skim milk to give me a milk mustache? Yogurt! The recipe came out great, even with fat free yogurt – but if you happen to have whole milk, just use 1/3 cup of it instead of the 1/4 cup milk and 2 T. yogurt.
Cinnamon Sugar Pull Apart Bread
- 2 3/4 cup flour + more for rolling
- 1 packet (2 1/4 teaspoons) quick rise yeast
- 1/4 cup sugar
- 1/2 teaspoon salt
- 4 T. butter (1/2 stick)
- 1/4 cup skim milk
- 2 T. plain fat free yogurt
- 1/4 c. water
- 1 teaspoon vanilla
- 2 eggs, slightly beaten
- 4 T. butter, melted and browned in a frying pan (about 5 minutes on medium)
- 1 cup sugar
- 2 teaspoons cinnamon
- 1/2 teaspoon nutmeg
In a large bowl, stir together flour, yeast, sugar and salt.

In a small saucepan over medium-low heat, warm butter, milk and yogurt, until butter is just melted. Remove from heat, add water and vanilla and let cool for 3 minutes.

Using a spatula, stir the milk mixture into the flour mixture. Then add the eggs, and continue to stir with the spatula. Dough will be very sticky, but avoid trying to knead it with your fingers like I did.

If you must, add a little bit of flour. Just so that you can form the dough into some resemblance of a ball. This dough should be sticky so try not to overdo it on the flour.
Once formed into ball, place in a well greased bowl. Cover with plastic wrap and let rise in a warm place for 1 hour.
Once about doubled in size, place dough ball onto a lightly floured surface, and roll into a rectangular shape, about 22 x 14. ***Alternatively, you could refrigerate the dough ball at this point, and do the remaining steps the next day. (A good plan if you want this for breakfast).

Mix the sugar, cinnamon and nutmeg in a small bowl. Spread the browned butter over the surface with a brush, then sprinkle sugar mixture all over the dough. (It seems like a lot of sugar – but it’s worth it).

Cut the rectangle into 6 equal strips.
Then lay the strips on top of each other, and cut again into 6 pieces.

Place the pieces in a well greased 9×5 loaf pan. Cover and let rise for 30 minutes more.

Bake at 350 for 30-35 minutes. You might need to cover the top with tin foil to keep it from overbrowning. Remove pan from the oven, let rest for 20 minutes, then slide a knife around the edges to loosen the loaf. Remove from pan and serve warm.

Slightly adapted from Joy the Baker
Adaptable Focaccia


There are a lot of recipes for focaccia out there, but I wanted one that had simple ingredients, simple instructions and a short rising time. I knew I wanted to make focaccia to go with the strawberry goat cheese salad we were having for dinner, but of course I didn’t start looking for a specific recipe until about 5 pm the day I wanted to eat it. This bread it perfect because it didn’t require multiple rises, can be ready in a little over an hour – and still came out wonderfully. Then again, how wrong can you really go with fresh bread? To make sure I still got an airy focaccia, I actually preheated the oven for a few minutes, then turned it off, and then put the bread inside the oven to rise. It wasn’t hot by any means, but it was definitely warmer than the ambient air, and this helped the bread rise a little faster.
I thought about halving this recipe, because I was wondering what just the two of us were going to do with so much bread, but I figured, its only flour and water so I might as well make the whole thing and then freeze what we don’t use. Well of course I should know by now that bread will never go to waste in this house! John actually cut the focaccia down the middle and made a wonderful looking sandwich for lunch. I included a variety of ideas for topping this bread, because it is very adaptable. I went with a few caramelized onions, fresh minced garlic, salt, pepper and Herbes de Provence, but I think next time I would up the caramelized onion to a full small onion, because I barely noticed the flavor. As soon as the weather gets nicer I can’t wait to use some fresh rosemary from my porch garden, mixed with some lemon zest to the mix to give it a summery feel. I don’t really think you can go wrong with whatever you put on this bread – so have fun!
Adaptable Focaccia
Prep time: 15 minutes + 5 minutes Rise time: 45 minutes + 15 minutes Bake Time: 20 minutes
- 2 1/4 teaspoons rapid rise yeast or 1 packet
- 1 cup warm water + 2 Tablespoons
- 2 Tablespoons sugar
- 3 1/2 cups flour plus more as needed
- 1 Tablespoon salt
- 1/4 cup olive oil + some to brush on top
Topping Ideas
- Fresh rosemary and lemon zest
- Caramelized onion and garlic with shredded parmesan
- Kalamata olives and feta cheese with scallions
- Herbes de Provence, salt, pepper and parmesan
- Any combination of the above
1. Warm the 1 c. water to about 110º. Add the yeast and sugar to the water, and let sit for a few minutes. (This proofs the yeast to make sure you get a airy, and quick rise)
2. In the bowl of a stand mixer, fitted with the dough hook attachment, add the water/yeast/sugar mixture. Slowly add the flour with the mixer on a low speed.
3. Mix the salt with about 2 T. water (just to start the dissolving) and then add to the mixer.
4. Add the 1/4 cup olive oil, and turn the mixer up to medium (2-4 on a Kitchen Aid).
5. Knead the dough for 7-8 minutes, until smooth. If the dough is sticking to the sides of the bowl, and not forming a nice ball, add a little bit more flour and continue to knead. *At this point I also preheated the oven to 350, only for a few minutes.
6. Remove the dough from the mixer, and place in a well oiled bowl. Turn the dough over to slightly coat in oil, and cover with plastic wrap. (The oil prevents the dough from forming a “crusty skin”, which is more common if you are having the dough rise in an extra warm place).
7. With the oven now turned OFF, place the bowl of dough in the oven or in another warm place, and let rise for 45 minutes.
8. Once doubled in size, remove the dough from the oven, and using your hands, flatten the dough about a 10×12 inch rectangle. It should be around 1/2 inch thick.
9. Place the dough rectangle on a greased cookie sheet, cover with plastic wrap or a towel and let rest/rise for at least 15 minutes (longer is fine).
10. In the meantime, preheat the oven to 400 degrees, and you can get your toppings together. If you are caramelizing onions, this would be the time to do it. Or chop up your rosemary, shred your parmesan, or zest your lemon.
12. Brush the top of the bread with olive oil, sprinkle with a little bit of salt. Using your finger, press down on the top of the bread 10-20 times to create dimples. Top with toppings of choice.
13. Bake in the 400° oven for 18-20 minutes or until golden brown.
Recipe adapted from Tyler Florence, with some insight from Pink Parsley.

Cinnamon Raisin Swirl Bread

I really love baking. It probably has something to do with the fact that I really love sweets, and sweets are generally baked. It also has something to do with the fact that baking requires measuring and exactness – which oddly enough makes it a nice relaxing break from our everyday chaotic lives. I like the idea that I can relax while at the same time doing something productive- and I have something to show for it when I’m done! The only problem with this is that one can only desserts so much. If you would like to bake something, but fear (like me) that brownies will disappear in an embarrassingly short time, this bread would be the perfect choice. This bread is perfect for slicing for breakfast and running out the door with. I like it just plain, but John (of course) likes to add butter to it.
Like any yeast bread, it requires a lot of waiting around for the dough to rise – but each step actually takes very little time. It’s really perfect to make on a day you were going to spend at home anyways. It can make a nice break from something monotonous (like studying) because after each step, you have to wait around for 40 minutes to an hour anyways. I included step by step pictures, but only because they are fun, not to make this seem like it’s a really difficult recipe! Each step is very simple. The trickiest part is making sure to completely seal the loaf before baking – so that no cinnamon sugar mixture leaks out and burns on the sides of the pan. This recipe makes 2 loaves, so you have one to give to a friend or freeze – but if you only want one, it can easily be halved. When freezing this bread, I wrap it in aluminum foil, and then place it in a freezer bag, and it freezes wonderfully.
Cinnamon Raisin Swirl Bread
Makes 2 standard (9×5) loaves
For the dough:
- 2 1/4 tsp. instant yeast (or 1 packet)
- 2 cups warm milk (~105-110˚ F)
- 34 oz (6 1/2 cups) all-purpose flour plus more for dusting
- 8 Tbsp. unsalted butter, softened
- 1/2 cup sugar
- 2 large eggs
- 3 tsp. coarse salt
- 3 tsp. ground cinnamon
- 1 cup raisins
- Cooking spray
For the filling:
- 1 1/2 cups sugar
- 2 Tbsp. ground cinnamon
- 1/4 cup water
- 1 egg, lightly beaten
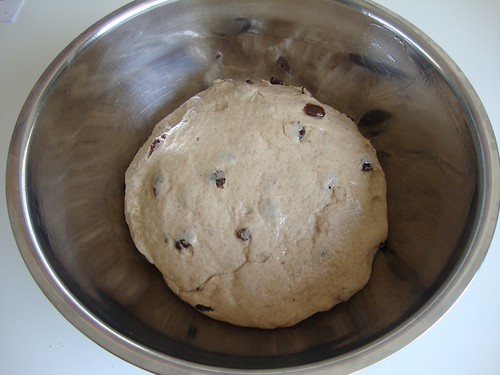
Start by combining milk and yeast in the bottom of a stand mixer fitted with the dough hook attachment. Add the flour, softened butter, sugar, eggs, salt, & cinnamon. Turn the mixer on low speed (2), and knead the dough for 3-4 minutes. Add the raisins and continue to knead for 3-4 more minutes. The dough should be smooth and clear the sides of the bowl. If it is too sticky to handle, add a little bit more flour and knead for a few more minutes.
Remove the dough from the mixing bowl, and place in a large bowl coated with cooking spray. Turn the dough over to lightly coat the outsides with oil. Cover with plastic wrap or a kitchen towel. Place in a warm, draft free place and let the dough rise for about 1 hour, or until doubled. I like to put mine inside a turned-off oven.
Take the dough out and divide into 2 equal pieces. I weighed mine using a food scale, but if you don’t have one you can just eye ball it.

Working with one piece of dough, flatten it into a circle using your palms.

Then fold the dough into thirds, like a letter.

Then fold again into thirds, the opposite direction. The purpose of this is 2 fold. First of all, it basically serves as a very gentle kneading, which releases any gas built up in the dough, and gives the yeast access to new nutrients. But do not “knead” the dough, or over-handle it -because this will destroy the gluten strands that give the bread it’s airy and light weight texture. Secondly, this method helps to shape the dough into a rectangle, which is helpful in the next step.

Once each loaf is folded, place them seam side down in an bowl coated with cooking spray. (Each loaf should get it’s own bowl at this point.) Cover with plastic wrap or a towel, and allow the dough to rise for an additional 45 minutes.

Once the dough has risen for the second time, roll out one ball of dough into a 15×11 inch rectangle.

In a small bowl combine the sugar, water and cinnamon. Brush the rectangle of dough with the slightly beaten egg, and then spread about half of the cinnamon sugar mixture over the rectangle, leaving a small border at the edges. (If you want to be very exact, you can mix 3/4 c. sugar, 1 T. cinnamon, and 2 T. water for the first loaf, and then do this again for the second loaf.) *Note: if you add too much water to the cinnamon sugar mixture (which I have done before), it will seep out of the loaf, and create a burned sugar crust to your bread. So while mixing together the sugar-err on the side off too little water. The amount in this picture is a little too liquidly.

Fold in about one inch of the edges of the dough, in order to seal the cinnamon-sugar mixture in.

Starting with the unfolded edge of the dough, roll dough into tight log. Press gently as you roll to ensure the dough is sticking to itself – this will help prevent the cinnamon sugar mixture from seeping out.

Once the dough is rolled, pinch the edges of dough together tightly. Use some water to make sure the dough adheres.

Place dough seam side down in a heavily greased 9×5 inch baking loaf, and repeat with remaining roll.
Cover each loaf pan with a towel or plastic wrap, and let rise again for 40 minutes so that the dough just rises above the edge of the pan.
Preheat oven to 425 degrees. Brush the remaining egg over the top of each loaf in order to give it a shiny, finished appearance (I didn’t do this for this loaf, hence the less than perfect surface). Loosely tent a piece of aluminum foil over the top of each pan, to prevent the top from over browning.
Place loaves in the oven and bake for 45 minutes. 20 minutes into baking, remove the foil “tent” to allow the surface to brown. Remove from the oven, allow to cool slightly and then remove from pan and cool on a cooling rack.

Recipe found at Annie’s Eats, and originally from Martha Stewart’s Baking Handbook
Pizza Dough
I swear to you, I would not lie to you, this pizza dough is so easy and cheap to make that you will become addicted to it! I love it so much because you can make a big batch (which hardly takes anytime), and then freeze the dough into separate Ziploc bags to take out and use for an easy weeknight meal. Plus, it’s way better than the canned kind. I have been known to start a batch of this pizza dough at very odd times, like at the start of a movie, or after a movie, or in the middle of listening to a lecture (I love muli-tasking). But I find this to be the beauty of this dough – you can make it WHENEVER you want, and it will still taste great later!
This pizza dough is what I use with my Spinach and Ricotta Pizza that I posted about a week ago.
One thing I’d like to mention, GET A PIZZA STONE! I can’t tell you what a difference a pizza stone makes in homemade pizza! They are not that expensive, but if you don’t want to buy one, I’ve heard of people using clay tiles from a gardener’s shop as a cheap alternative. The pizza stone is crucial because as it preheats in the oven, it holds the oven’s heat. Then when you transfer your pizza onto the stone using parchment paper, the bottom of your crust gets cooked directly. This causes the crust to come out firm and crispy, even if you have a lot of watery, or heavy toppings (like vegetables).
Pizza Dough
– Makes enough for 2 pizzas (about 13 inches each)
- 1/2 Cup warm water + 1 1/4 cups room temperature water
- 1 Packet Yeast or 2 1/4 teaspoons (I use quick rise but I’m sure any would work)
- 4 cups (22 ounces) Flour* (Again, food scales are great for flour!)
- 1 1/2 teaspoons salt
- 2 Tablespoons Olive Oil
- Cooking Spray
*Bread flour is best for this recipe because it made from a high-gluten flour with barley added, which is specifically formulated to allow the yeast to work effectively. It gives a loftier texture and a certain softness. However, I often substitute all-purpose flour if that is what I happen to have on hand.
1. Combine the 1/2 cup warm water with the yeast in a 2 cup measuring cup and let sit for 5 minutes. You should see the yeast dissolving as it becomes activated.

2. Add the remaining 1 1/4 cups room temperature water to the yeast (I usually just add water from the faucet until the measuring cup reads a total of 1 3/4 cup). Also add the 2 Tablespoons of olive oil to the water.
3. Place the flour and salt in the bowl of a mixer fitted with the paddle attachement. With the mixer on low add the water mixture and stir until the flour has become moist. Then switch to the dough hook attachment.
4. Knead the dough on low (kitchen aid setting 2 or 4) until smooth and elastic, about 5-10 minutes.

5. Oil a large bowl using cooking spray. Remove the dough from the mixing bowl and place in the oiled bowl. Cover with plastic wrap.

6. Let the dough rise in a warm place for about 90 minutes or until doubled in size (I usually put mine on top of the stove, but depending on how warm your kitchen is it could take a little over 90 minutes).
7. Punch the dough down and then either…
- Freeze it: It is really important that you double wrap the dough with plastic wrap, and then put it in a Ziploc bag. The dough continues to rise even after you put it in the freezer – so if you don’t double wrap it, dough ends up leaking out of the plastic and gets exposed to the cold. When you want to use the frozen dough, put it in the fridge up to a day before, or put it out on the counter for few hours before you are ready to start cooking.
- Use it several hours or a day later: I recommend still wrapping it and putting it in the freezer. The yeast is really active in this dough and if you put it in the fridge it doesn’t slow the yeast down enough, so your dough continues to rise, and rise, and rise! The colder temperature of the freezer is enough to “hibernate” the yeast, and then after it has cooled sufficiently you can put it back into the fridge.
- Use it immediately: All you have to do is flour your work surface and roll it out into a circle. I do this on parchment paper so that it is easy to transfer to the oven. I will show you my rolling method when I make a pizza soon!

8. To Cook it: Preheat the oven with your pizza stone to 475 degrees for 30 minutes. Top your pizza as desired. Brush the outer crust with a little olive oil in order to help it brown. Bake for 10-15 minutes.
Recipe found at Annie’s Eats, and originally from the book Baking Illustrated (which is a cookbook I’m hoping to add to my collection soon!)
Homemade (and easier than you’d think) Pita Bread

 For some reason, I have a problem with leftovers. I’m not really sure when it started, but it seems that every time I make something for dinner, I never eat the leftovers. John told me he was really surprised one day when I heated up Mexican pizza to eat the next day, and that’s when I started to realize – there are 3 foods that I actually like as leftovers: 1) pizza, 2) Thanksgiving, & 3)chicken parm. However, the fact that I don’t like leftovers doesn’t mean that I NEVER eat them. In fact, last night I made some delicious chicken gyros with homemade tzatziki sauce (one of John’s new favorite meals), and there is so much left over that I would really feel pretty guilty letting them all go to waste. In order to make the leftovers taste a little better, I thought – I’ll make something new to go with them! And so began the adventure of making homemade pita bread.
For my first time making pita, it tasted great!, but it wasn’t the prettiest thing I’d ever seen….. It definitely didn’t look like store bought, and I’m not sure you could really call it a “pocket”, but it was delicious fresh out of the oven! Hopefully you can learn from my mistakes….
One of the things I find the most difficult about making bread, is all the “wait 10 minutes, let rise for 20 minutes…etc”. So I wrote out the time estimates for each step. Also, the steps that require you to ACTIVELY be doing something are denoted with a * (as opposed to the steps where you can, if you’d like, stare at the dough while the yeast works its magic).
Recipe for Pita Bread
3 cups plus 1/4 cup unbleached all-purpose flour (454 grams (food scales are great for flour!))
2 teaspoons salt
2 teaspoons instant yeast
2 tablespoons olive oil
1 tablespoon honey
1 1/4 cups water, at room temperature
*STEP 1: 10 minutes: Using a spatula, mix ALL ingredients together in the bowl of a mixer (Yep, all at one time – you don’t have to put the yeast in the water and let it sit, and all that jazz). Using the dough hook attachment, knead the dough for about 10 minutes (speed 4 on the Kitchen aid), or you can work up a sweat and knead it by hand.
It should go from looking like this:

To looking like this:

STEP 2: 8 hrs – 3 days OR 90 minutes: Once the dough looks smooth, place it in a bowl sprayed with oil, and then spray a little oil on top of the dough. Cover and let sit in the fridge for 8 hrs -3 days OR in a warm, draft free place for 90 minutes. (I love this step because the recipe actually says, “for best flavor development, mix the dough up to 3 days ahead” – Yeah for making things ahead of time!)
*STEP 3: 3 minutes: Divide the risen dough into 8 equal pieces and roll each piece into a ball.

STEP 4: 20 minutes: Cover the dough with a damp towel and let it sit for 20 minutes. This step allows the dough the relax before you start shaping it – if at any point you have trouble shaping the dough, just let it relax for a few minutes, and it should be easier to shape.

*STEP 5: 15 minutes: On a lightly floured surface, take each piece of dough and shape it into a circle using your hands and/or a rolling pin. This is the step that gave me some trouble. In retrospect, I was trying to make the pita too large, and therefore the dough became very uneven in thickness. The next time I make these, I will try to roll them to about 6 inches wide, 1/4 inch in thickness.

Above – See how uneven they are? Don’t try to roll them as thin as I did. The most important thing is to keep them even.
STEP 6: 30-40 minutes: Place the rounds on an oiled baking sheet and cover with oiled plastic wrap. Let rise for 30-40.
STEP 7: While the rounds are rising preheat the oven to 475 degrees. If you have a baking stone, place it in the oven and preheat it as well. If you don’t have a baking stone, turn a baking sheet upside down and preheat it in the oven.
*STEP 8: 9 minutes: Place as many rounds as you can fit on your baking stone at a time in the oven (I put 3 at a time). Bake each for 3-5 minutes, and then continue with the remaining rounds, cooking each for 3-5 minutes.

The second time I made them, I made sure they were very smooth and even before baking them and look how nice they puffed up:


(Updated 2/15/11)
Recipe Adapted from the Smitten Kitchen

