
Chocolate Covered Butter Toffee

I know Christmas is going to be hard for our family this year, but I have been trying to keep busy -both at school and in the kitchen. I have a habit of going a little cookie crazy this time of year. I realize that it would be much easier to make one or two kinds of cookies and to make a lot of them, but the problem is that everyone seems to have a favorite so I want to make them all. The hardest part about this is that I also happen to love trying new recipes, so every year seems to bring a new favorite that I just have to make again the following year. Hence how this toffee came into being. As a Skor bar lover (the better version of Health), I knew as soon as a saw this recipe that I had to try it. It has easily become my favorite dessert of all time, and if it weren’t for the fact that I could eat the whole tray in one sitting alone, I would most definitely make it other times than Christmas. It is great for so many reasons that I feel the only appropriate way to get my point across is to list them…
- It is so buttery that it melts in your mouth the way no other store bought toffee could ever hope too.
- You can make a double or triple batch without the extra effort it would normally require to make a double or triple batch of individual cookies.
- It is covered in chocolate….need I say more.
- It has simple ingredients that are all delicious – butter, sugar, vanilla, chocolate
- It’s easy enough that you could make it today (Christmas Eve), and still have it ready for Christmas.
- You can cover it in just about anything that you want including crushed peppermints, sea salt, or nuts. I have to mention that after my mom tried the sea salt covered toffee, she exclaimed “This might be the best thing I’ve ever eaten.” No biggie :-).

Now if your intimidated by making candy, I completely understand your point of view, but please don’t let that stop you. I would say to just be patient, watch the color of the candy (it starts off yellow, as below, but you want it toffee colored – not brown), and don’t try to rush the cooking process. If you make a big batch, it might take up to 30 minutes to heat this to 298°, but it is well worth the wait.

Chocolate Covered Butter Toffee
– Makes one standard baking sheet
- 1 pound Butter, Melted
- 1 pound granulated sugar (by weight)
- 3 oz fluid Water
- 1 teaspoon Salt
- 1 teaspoon pure vanilla Extract
- 18 oz weight of semisweet chocolate chips, melted*
- Chopped Topping: finely chopped nuts (1/2 lb), Candy Canes (1/2 lb), Sea Salt (sprinkle), Etc.
*If you want the chocolate to look really professional, use good quality, tempered chocolate. If you don’t mind if the chocolate looks a little dull (like mine), chocolate chips will work fine.
Combine butter, sugar, water, and salt in a saucepan. Bring to a boil, stirring constantly. It will heat slowly at first, but once all the water has evaporated the temperature increases quickly.
Cook over medium high heat, stirring gently, until candy thermometer registers 298 degrees, but no higher than 310°. Undercooked toffee is chewy and sticks to your teeth, but on the flip side it can burn if it gets to hot.
Once at ~300°, remove from heat and stir in vanilla until well combined.
Pour the mixture onto a silicone baking mat or good parchment paper, (last year I used tin foil because it was all I had, and it still worked). Use a heatproof rubber spatula or offset spatula to spread quickly before the toffee sets. Thinner is generally better.
Allow toffee to cool completely, at least 30 minutes (while you go wrap some presents). Blot with paper towel to remove excess oil from the surface. Coat surface with half of the melted chocolate and immediately sprinkle with topping.
When chocolate has totally set (you can place it somewhere cold to help the process), carefully flip over (your going to break it apart anyways, so it’s okay if this happens now). Then coat the other side with the rest of the chocolate and sprinkle on topping of your choice.
Allow to set, then break into bite-size pieces.
Store in an airtight container.
Recipe from Lia via The Pioneer Woman

Snowball Cookies for Daddy-O
I thought about telling you all sooner, but I was too beside myself when I first found out to write something that would even come close to describing how I was feeling. In all honesty I still don’t know what to say. My dad passed away suddenly and unexpectedly on November 30, 2011. These past few weeks have been very difficult, but I want to thank everyone for your kind words, actions, thoughts and prayers. I have been so comforted by the love others have shown me and my family.
I used to talk to my Dad almost everyday on my way home from school. I had just been talking to him on about how excited I was to be starting my internal medicine rotation, because it was my dad’s specialty and I was really looking forward to being able to discuss it with him. Just on Monday he had explained the mechanism, symptoms, diagnostic tests and treatment of pleural effusions to me. I had told him to get excited for Christmas, and I had even mentioned how I was planning to make a bunch of cookies including his favorite – these snowballs. I have such found memories of my dad sneaking into the cookie tins in the kitchen to get just one more cookie. I can even remember John joking with him last Christmas, “Ahhh, now I see where Jacqueline gets her sweet tooth from,” as my dad was slyly removing yet another powdered sugar covered cookie and plopping the whole thing in his mouth. (Personally I always thought these were more like 2 bite cookies – but he seemed to think differently :-)).
So Daddy-O, these are for you…
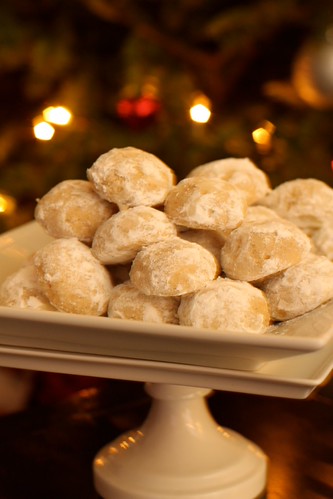
Snowball Cookies
Makes 8-9 dozen cookies
- 1 ½ cups butter, softened (3 sticks)
- 1/4 cup crisco
- 3/4 cup sugar
- 1 c. finely chopped nuts*
- 2 Tablespoons vanilla
- 4 cups flour
- Powdered sugar for rolling
*Pecans are my favorite, but walnuts work too
1. Cream butter, crisco and sugar. Add nuts, vanilla, flour.
3. Before baking, preheat oven to 300º.
4. Remove ball from refrigerator and allow dough to sit long enough until able to handle. Roll into smaller than walnut sized balls – small is better. Remember they will be slightly bigger once they are covered with powered sugar.
6. Place cookies about 1 inch apart on an un-greased cookie sheet.
7.Turn oven down to 275° and bake cookies for 30-35 minutes, or until very light in color. Cool for about 15 minutes then roll in powdered sugar to help sugar stick. They can be re-rolled in powered sugar before serving.
From my favorite Christmas cookbook: Christmas from Heart of the Home, by Susan Branch


