
Samoas Cupcakes

After 2 weeks of “summer vacation”, it’s back to the (harsh) reality of 3rd year – but don’t worry about me, because these cupcakes made life better. The last day of break happened to fall on our friends Kat’s and Griffin’s birthday, which obviously called for celebration. I decided to make these cupcakes because both of them happen to love samoas. I’m a thin mint/tagalong girl myself, but I have the unique ability to see the good in just about any cookie :-). I thought these cupcakes turned out delicious, but I think if you are really trying to perfectly replicate a samoas you might want to add try making a filled cupcake with toasted coconut and caramel.
These cupcakes turned out to be much simpler to make than my endeavor of chocolate chip cookie dough cupcakes, but I still found it helpful to make the cupcakes one day and then to ice them the next. I didn’t want to make them too far in advance for fear of dryness, but I shouldn’t have been worried because these are unbelievably moist. The only qualm I had was that the cupcake itself isn’t particularly sturdy for the heaviness of a caramel icing. I later found out that putting them in the fridge before serving really helped the overall texture. The only other change I would make in the future is to use 2 cupcake liners for each cupcake, because the batter is very thin, so tends to wash out the colors of the cupcake liner. I think baking these using 2 liners would really give it a perfect finish.

For the Cupcakes
- 2 cups sugar
- 1-3/4 cup flour
- 3/4 cup Cocoa (I used Hershey’s special dark)
- 1-1/2 teaspoons baking powder
- 1-1/2 teaspoons baking soda
- 1 teaspoon salt
- 2 eggs
- 1 cup milk
- 1/2 cup vegetable oil
- 1 teaspoon vanilla
- 2 teaspoons coconut flavoring
- 1 cup coconut, packed
- 1 (scant) cup boiling water
1. Preheat oven to 350° and line 24 muffin tins with cupcake liners.
2. In a large bowl, combine sugar, flour, cocoa, baking soda, baking powder and salt.
3. Add in eggs, milk, oil, vanilla, and coconut flavoring. Mix well.
4. Fold in coconut, then add boiling water. (Batter will be very thin)
5. Pour batter into muffin tins, filling each cup no more than 3/4 full. Bake at 350° for 22-25 minutes or until a toothpick inserted in the center comes out clean. Let cool for several minutes, but then remove cupcakes from tins on cool on a wire rack.
For the Salted Caramel Buttercream
- 2 sticks butter, softened
- 2 teaspoons vanilla extract
- 1/2 cup caramel topping, plus more for drizzling (I used butterscotch caramel)
- 1 pound powdered sugar (about 4 cups)
- 1 teaspoon salt
1. Cream butter until fluffy.
2. Add in vanilla extract and caramel topping. Add powdered sugar and salt and mix until smooth. If icing is still too thin add a bit more powdered sugar (the consistency differs based on the type of caramel topping you use)
3. Wait until cupcakes are completely cool, and use a pastry bag with a 1M tip to ice the cupcakes.
For the Homemade Chocolate Syrup
- 1/4 cup cocoa powder (I used Hershey’s special dark)
- 1/4 cup granulated sugar
- 1/4 cup cold water
- pinch of salt
- 1/2 teaspoon vanilla extract
1. Combine all ingredients except vanilla extract in a small saucepan over medium-heat, and whisk until smooth.
2. Bring sauce to a boil and continue to whisk until sauce becomes thick. Remove from heat, let cool slightly and drizzle over cupcakes or store in an airtight container in the fridge until needed.
To Finish: Top cupcakes with toasted coconut and using small squeeze bottles (or simply a spoon) drizzle with chocolate sauce and remaining caramel sauce.
Slightly adapted from The Novice Chef

Greek-Style Panzanella

When I put this on our (new) menu board for the week, John had no idea what it was. I described it to him as crouton salad, partially because it’s true, and partially because John loves bread and I knew a salad made of it would intrigue him. I really liked this dinner because it was easy, fresh, and included more than a full serving of vegetables, but the really great thing about it was the John loved it as well. He even said, “Wow, this was a lot more filling than I expected.” I served this as a meal on its own, but I think it would also be great as a side dish for a summer picnic.
In terms of cooking, don’t be tempted (as I was) to turn the heat up on the croutons in order to make them brown faster – this actually only makes them burn faster. You do have to watch the croutons while cooking, which is why I think cooking them on the stove is better than the oven. Just be sure to use a large pan, and to toss the croutons every few minutes. Also, this makes a lot of salad (way more than John and I could finish), and unfortunately the leftovers aren’t good because the bread gets soggy. To avoid this, cook the bread and cut the vegetables, but only combine the ingredients you will actually use that day. Then you can make the salad again the next day for lunch!
Greek Panzanella
Serves 4-6
- 6 cups rustic bread (about 3/4 loaf), sliced into 1-inch cubes
- 1/4 cup olive oil
- 1 teaspoon salt
- 2 cucumbers, peeled, seeded and sliced (or 1 hothouse cucumber – no need to peel)
- 1 Red pepper, sliced into 1/2 inch pieces
- 1 Yellow pepper, sliced into 1/2 inch pieces
- 1 Green pepper, sliced into 1/2 inch pieces
- 1 pint cherry tomatoes, sliced in half
- 1/2 of a Red onion, sliced into thin strips
- 1/2 cup kalamata olives, pitted
- 8 oz feta, sliced into 1/2 inch cubes
For the Dressing:
- 1/4 cup olive oil
- 1/4 cup red wine vinegar
- 2 cloves garlic, minced
- Juice of 1/2 a lemon
- 1 teaspoon dried, crushed oregano
- 1/2 teaspoon dijon mustard
- salt and pepper to taste (about 1 teaspoon combined)
1. In a large frying pan heat 1/4 cup olive oil on medium- high heat. Once hot, add bread and reduce heat to medium-low. Salt the bread with 1 teaspoon salt. Toss the bread for about 10 minutes until crisp and slightly browned.
2. Chop vegetables, and in a large bowl combine all vegetables, feta cheese, and olives.
3. In a small bowl combine all ingredients for the dressing and whisk until combined.
4. Pour dressing over vegetables and toss. Add in the crisp bread and toss until evenly coated.
5. Clean up the kitchen while waiting for the flavors to meld. Add salt and pepper as needed and serve.

Slightly adapted from The Curvy Carrot, Originally from How Easy is That? by Ina Garten
Baked Creamy Chicken Taquitos

Sometimes I miss college. Well, let me rephrase. Sometimes I miss certain parts about college. Like the part where you can walk up and down the halls of the dorm and always find someone with their door open to hang out with. And the part where the most important thing on a weekend was figuring out what costume would be perfect for the theme of the next party (okay, so sometimes I still do this). But the thing I was missing this week was Torero’s – the signature Mexican restaurant in our college town. Because our meal plan was ridiculous, you could get Torero’s delivered to your dorm room anytime you wanted, on meal plan points. I had tried a variety of things from the menu, but one time someone ordered Taquitos, I tried one, and I fell in love. I’m pretty sure every time after that, I ordered chicken taquitos myself. Somehow I happened to never actually read the menu to realize they were deep fried, and although they clearly looked deep fried, I chose to ignore this little fact.
I don’t think I’ve had a taquito since college, but when I saw these baked chicken taquitos on Pink Parsley, I knew I would have to try them. Not only are they a baked version of my favorite college Mexican treat, but they also use my favorite salsa – Salsa Verde. (The same salsa I use in Chicken Enchiladas Verdes). Don’t be intimidated by the long list of ingredients, because these really don’t take that long to put together – in fact I think these are easier to make than the enchiladas. If I was a little more organized, I would’ve planned grilled chicken for dinner one night, and made sure to cook enough to have leftovers for these the next. Perhaps one of the greatest things about these taquitos is that you can freeze them (unbaked) and then bake them whenever needed. Actually, the ones in the picture were baked from a frozen state. I originally planned to post this the first time I made them – but we ate up all the taquitos so quickly that I didn’t get to snap a picture. I’ll have to say, they taste just as good from the freezer as they did the first time. This would also be a great meal for a big group dinner, because once you have the filling made it’s really simple to put together, and have you ever met a person who doesn’t like food they can eat with their fingers?

Baked Chicken Taquitos
– Recipe indicated is for 20-24 taquitos, which will serve 6-8 people
- 3 -4 chicken breasts (~4-5 cups shredded)
- 1 block (8 oz) low-fat cream cheese, softened
- 3/4 cup salsa verde (tomatilla salsa)
- Juice from 1 lime
- 2 tsp chile powder
- 1 tsp ground cumin
- pinch cayenne pepper
- 1 tsp onion powder
- 6 cloves garlic, minced
- 1/2 cup chopped fresh cilantro
- 1/2 cup chopped scallion
- 1 cup shredded extra sharp cheddar cheese
- 3/4 cup shredded Pepperjack cheese
- salt and freshly ground black pepper
- 20-24 small (6-inch) flour tortillas
- cooking spray
Bring a large saucepan filled with water to a boil over high heat. Add chicken breasts to the water, reduce heat, and simmer for about 20 minutes, or until chicken is no longer pink when cut into. Remove chicken from water, let cool slightly and then shred. (You could also use leftover chicken, or roast the chicken in the oven)
Preheat the oven to 425 degrees, and lay a wire cooling rack over a large cookie sheet.
In a large bowl, combine the cream cheese with the salsa, lime juice, cumin, chile powder, cayenne, onion powder, garlic, cilantro, scallions, and a pinch of salt & pepper. (Everything but the chicken, cheese, and tortillas). Once mixed, fold in the chicken and shredded cheeses.
Spoon 3-4 tablespoons of filling onto the lower third of each tortilla, and roll tightly. In order to help the tortilla stay closed, you may want to spray some cooking spray on the seam. Place seam side-down on the wire rack. Repeat with remaining tortillas and filling.
Spray the taquitos with cooking spray, then place the wire rack on top of a baking pan (otherwise the cooking spray creates a sticky residue when baked on the cookie sheet.) Bake 15-20 minutes, or until the tortillas are crisp and golden-brown. Serve with dipping sauces such as salsa, sour cream, and guacamole. I think sour cream mixed with salsa would also be delicious.
*To Freeze the taquitos, roll them up as usual but do not bake. Place on a baking sheet in the freezer in order to “flash” freeze them individually. Wrap in plastic wrap, then aluminum foil and freeze in a freezer bag. To bake, remove from oven, and bake un-thawed for 20-25 minutes at 425 degrees.
Slightly adapted from Pink Parsley Catering, via Pennies on a Platter, Originally from Our Best Bites
Homemade Ranch Dressing

Yesterday was full of kitchen disasters. You see our friend Adam is on a whorl wind cross-country tour, and stopped by our place for a visit. Since I am on vacation for another 5 days, I figured what better way to spend my time than to make a dinner completely from scratch. I had the menu all planned out, which consisted of homemade hamburger buns, black bean burgers (for which I even cooked my own black beans), home-fried potato chips, homemade ranch dressing, DIY oreos, and pina coladas – none of which I had ever made from scratch before. Despite the best intentions, while we were sitting outside because our apartment was too filled with smoke to breathe, I firmly decided that never again will I make an entire menu that I have never tried before when we have house guests :-). I also decided that on the rare occasion that we do fry something – John is going to be soley responsible (hot oil and I are not friends).
About halfway through the disaster, I wanted to scrap it all and go out to eat, but I’m actually really glad we didn’t because the dinner was salvageable and I got 2 keeper recipes out of it- the best ranch dressing you’ve ever tasted and out-of-this-world pina coladas. Plus, it made for some funny memories (picture John running through the house wearing chemistry goggles so that his eyes wouldn’t burn from the smoke). I really wish I would’ve taken pictures of all the mishaps that occurred, but I think I was too traumatized by the billows of smoke around me to remember. Here’s John and Adam recovering by playing super mario brothers:

Despite the fact that I slightly burned my hand, and that we all suffered from some smoke inhalation, this ranch dressing really made it all worth it… it’s that good! It’s the kind of thing that will literally make you eat every last vegetable you have in your fridge, and then some. I tend to have this habit of buying veggies with the best intentions of eating them for snacks, but then somehow I forget about them and then eventually they look unappetizing. With this ranch dressing around I’m pretty sure no vegetable will ever go bad in this house again.
It is the perfect summer treat – cool, refreshing, and goes great on just about anything. While I normally think of ranch with vegetables, I actually made this dressing to go with the homemade chips (that John ended up cooking). It’s coolness was the perfect complement to the warm, greasy, crispness of a potato chip. I also think it would be great for dipping pizza crust (if that’s your thing), or pizza bites , or you could use it as regular old salad dressing (but believe me, no salad will ever taste the same).
I know dressings get a really bad rap for being unhealthy, and I’m not trying to pretend that you should drink this dressing by the cupful – but it’s quite a bit better for you than the store bought kind. It also tastes worlds better than bottled “low-fat” dressing, despite the fact that it is made with low fat ingredients. Depending on your taste, you can alter the amount of parsley, chives and dill you want to put into this. I happened to add a lot, and it really gave the dressing that cool, summery flavor I was looking for. I probably added a full cup of greens (parsley, chives & dill), but I will mention that the dill flavor came through strongly, so if you add it, tred lightly. If you add any more than what I did, you will get something closer to a green goddess dressing – but nothing wrong with that, it will still taste amazing. So make this, no picnic will ever be the same.

Homemade Ranch Dressing
Makes about 2 cups. Stays good for 2+ weeks (but good luck making it last that long :-))
- 3/4 cup light sour cream
- 3/4 cup light mayonnaise
- 1 T. Olive Oil
- 1 T. Lemon Juice (or juice from 1/2 a lemon)
- 1 cup buttermilk (but you can use less if you like a very thick dip)
- 1 clove of garlic, chopped
- small bunch chives
- small handful parsley
- 2-3 dill springs (optional)
- pinch of salt and pepper
Combine all ingredients except for 1/2 cup buttermilk in a food processor or blender, and blend until smooth (no need to pre-chop anything). Check the consistency, and add remaining buttermilk until your desired consistency is reached.
Adapated from Confections of a Foodie Bride

Blueberry Scones

Believe it or not, I used to order scones from coffee shops because I thought they were a healthy option. In my defense, they always tasted so dry that I figured they must be healthy. After making these scones, I realized that they don’t exactly get the title of “healthy” but at the same time, they are way tastier than their coffee shop counterparts. Plus making them gives you the right to talk in a fake British accent and pretend you’re Kate Middleton for the day.
While these scones might you feel like British Royalty, they are great for another reason – you can freeze them unbaked, and then bake them from a frozen state. This is a great option if you want to impress some overnight guests without having to wake up at 4 am. Just flash freeze them individually on a baking sheet,wrap, and store in a freezer bag until ready to use.
The only tricky thing with making these is that the dough is a little sticky. I found that forming the dough into a rough square, and cooling it in the freezer for 10 minutes really helped the consistency. I also added quite a bit of flour, but try not to add too much or you might run into the dreaded dryness of a coffee shop scone. This recipe, as shown only makes 8 scones, so I think next time I will double it, and bake one batch to eat, while keeping the others un-baked in the freezer for a later date.

Blueberry Scones
Makes 8 scones
- 8 tbsp. (1 stick) unsalted butter, frozen whole
- 1½ cups fresh blueberries (slightly less than 1 pint container)
- ½ cup whole milk (or see my post tomorrow on good substitues for whole milk)
- ½ cup sour cream
- 2 cups (10 oz.) all-purpose flour, plus more for dusting the work surface
- ½ cup sugar
- 2 tsp. baking powder
- ¼ tsp. baking soda
- ½ tsp. salt
- zest of half a lemon (or 1 heaping teaspoon)
- For Topping: 2 T. butter, melted and Sugar for sprinling
If you plan on baking the scones immediately, preheat oven to 425˚ F. Wash and dry the blueberries and place in the freezer until needed.
Grate the frozen butter on the holes of a large box grater. In a small bowl, whisk together the milk and sour cream; refrigerate until needed.

In a larger bowl, combine flour, ½ cup sugar, baking powder, baking soda, salt and lemon zest. Whisk to combine. Add the grated butter to the flour mixture and toss with fingers until thoroughly coated.

Add the milk mixture to the dry ingredients and fold with a spatula just until combined. Transfer the dough to a generously floured work surface. Dust the top of the dough with flour, and knead with well floured hands, 6-8 times, just until the dough holds together in a ragged ball. Form the dough into a rough square, and place on a floured plate to chill in the freezer for 5-10 minutes.
Return the dough to the floured work surface and roll into an approximately 12-inch square. Sprinkle the blueberries evenly over the surface of the dough, and gently press down so that they are slightly embedded in the dough surface. Roll the dough up to form a tight log, so that the blueberries are in the center. Lay the log seam side down and press the the log into a 12 by 4-inch rectangle. Using a sharp knife, cut the rectangle crosswise into 4 equal rectangles. If your knife gets sticky, try flouring it. Cut each rectangle diagonally to form 2 triangles. Transfer to a parchment or silpat lined baking sheet.


If you are going to freeze these, flash freeze on a baking sheet for 20 minutes, then wrap individually and store in a freezer bag until needed. To bake, brush the tops of the scones with melted butter and sprinkle with sugar. Bake for 18-25 minutes (slightly longer if baking from a frozen state). Let cool on a wire rack before serving.

Slightly adapted from Annie’s Eats, Originally from Cook’s Illustrated Entertaining
Grilled Vegetable and Sun Dried Tomato Sandwiches

I first made this last year when my mom came to visit me in Toledo for pre-wedding preparation, and I remember her loving them so much that I wanted to make it again. Since John isn’t visiting with me this time (he has summer school), I thought I would try to eat some of the foods that normally he would turn his nose up at – this way I can get my fill, without having to torture him :-). While he’s never tried these sandwiches, he’s not a big eggplant fan, and it also seems that he normally prefers meals if there is some meat included. So these sandwiches seemed like a perfect lunch/dinner option for my solo visit home. However, after enjoying them so much – I might have to try to convert him.
This is a pretty simple recipe, and it becomes a lot simpler if you don’t worry about measuring everything exactly. The basic gist is to make a thick marinade with a 2:1 ratio of sun dried tomatos and basil, which becomes the base for the whole sandwich. You use this marinade to flavor the vegetables, and then you put some of the marinade on the sandwich itself. I chose to use sun dried tomatoes in oil, because I like to use the flavored olive oil in the recipe – it has a very strong flavor, which can be good or bad depending on your taste. If you prefer, dry packed sun dried tomatoes can also be used, but you will have to add a little bit more olive oil to the marinade. Whatever you use, know that the marinade is really what makes this sandwich.
Another great thing about this summery delight is the variety of summer vegetables it works with. I personally love roasted red peppers and eggplant, but I think zucchini, portobello mushrooms, yellow squash, or any other summer vegetables would be great. In addition, I used ciabatta bread here, but a french baguette would also be excellent. By chopping the roasted vegetables you could even serve this as an open faced appetizer – endless possibilities
Grilled Vegetable and Sun Dried Tomato Sandwiches
Make 4 sandwiches
- 1 cup sun dried tomatoes, chopped
- 1/2 cup loosely packed basil, chopped
- 2 garlic cloves, minced
- 3-4 T. olive oil
- pinch of salt and pepper
- 3 red peppers, cleaned and sliced into 2 -3 inch slices
- 2 small eggplants, sliced 1/4 inch thick
- 4 ciabatta rolls
- 6 oz goat cheese
- spinach leaves for topping (optional)
1. Combine the chopped sun dried tomatoes, basil, garlic, olive oil and salt and pepper in a small dish.

2. In a large bowl, place the chopped eggplant and red pepper and toss with 2-3 T. of the sun dried tomato mixture.

3. Heat the grill to medium-high, and begin by grilling the peppers – I put them directly on the grate, but you could also use a grill basket if you prefer. The peppers will take longer to cook than the eggplant, so cook them for about 5 minutes and then add the eggplant. Continue to grill all the vegetables for 8-10 additional minutes, flipping half way through.

4. While the vegetables are grilling, slice the ciabatta rolls in half lengthwise and warm on the grill until slightly crisped. Top each with a generous tablespoon of goat cheese, followed by a tablespoon of remaining sun dried tomato mixture. Feel free to put goat cheese on both sides of the bread (if you are a goat cheese lover like me).


5. Top each sandwich with 3-4 slices of eggplant and 2 slices of roasted red pepper. Finish with spinach, if desired.
 Inspired by Giada’s Recipe from the Food Network
Salmon Cakes with Lemon Yogurt Sauce
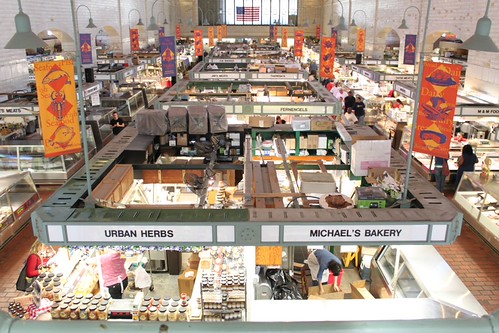
After 6 long weeks of studying (plus 2 years of med school), I finally finished that huge exam. Honestly, I will have no idea how it went until I get my score in about a month- but for now, I’m just celebrating being done! I spent the evening after my test in Toledo hanging out with friends, and then left the next day for a “vacation” to Brecksville with my Mom. While I put vacation in quotes, it really has been a vacation. Between a lot of wine and a lot of fun family time, we managed to make a trip down to the West Side Market. Of course, I had a blog menu all planned out – and my mom was really excited to take part in something that was going to go on the internet :-).

If you’re from Cleveland, or ever visiting, I highly recommend a trip downtown to see it. It’s a really unique atmosphere, with every other stand trying to sell you their best produce (or at least the produce they have too much of).

You can get some great deals on really fresh food, and they even have an indoor market where they sell meat, fish, cheese, baked goods, and even prepared foods like homemade pasta and crepes.
After getting all the ingredients at the market, we stopped at Penzey’s spices which is right across the street. I have wanted to go to Penzey’s for a while, so I was really excited that their new store happened to be so close. They have just about every spice you could ever want, including about 8 different varieties of cinnamon. I ended up getting poppy seeds, Ancho peppers and Garam Masala – all of which I’m really excited to use. And the prices are surprisingly reasonable ($8 total for my loot).

Now onto the Salmon Cakes! These babies have been one of my favorite dishes since way back when I was living in LA (that’s Louisiana not the cooler California version). I decided to try this recipe after Whitney had introduced me to crab cakes at Red Bar near Seaside, FL. I have no idea why I never tried a crab cake before this but I found that I loved them and am now constantly on the lookout for good ones.
However, the price of lump crab meat is daunting (especially here, far from the ocean), so I thought salmon cakes would be a nice alternative. These always prove to be delicious, and they are quite easy to make. I think the hardest part is removing the skin from the salmon filet – but most of the time the Fishmonger will do this for you, as long as you remember to ask.
While this recipe doesn’t call for a lot of ingredients, I think each of them is very important – so don’t skimp. I know adding pita to a salmon cake might seem a little strange, but the texture is much nicer than the usual breadcrumbs, and then you have some leftover pita bread sitting around your house (plus!). The coriander is the main spice, and it really complements the salmon well. If you like a lot of spice, feel free to up the cayenne pepper – but I usually only add a small pinch, and they are still plenty flavorful. Finally, the lemon yogurt sauce is a must to serve with these. It’s super easy to put together since you already zest a lemon and chop chives to put into the salmon cakes – the only other ingredient you need to buy is the yogurt itself.
I served the cakes with a cucumber salad – which complemented nicely but it not quite up to blog standards yet. Hopefully I’ll tweak it and share it with you soon!

Salmon Cakes with Lemon Yogurt Sauce
-Makes 4-5 salmon cakes or enough for about 3-4 people.
- 1 pound skinless salmon fillet, roughly cut into 1/2 inch pieces
- 1 large pita round (~10 inches), torn into small pieces
- 1/4 cup light mayonnaise
- 1 large egg
- 1/2 teaspoon coriander
- small pinch of cayenne pepper
- pinch of salt
- 4 T. total chopped Chives (divided)
- 2 teaspoons total lemon zest (divided)
- 2 T. olive oil (for sautéing)
For the Sauce:
- 3/4 cup plain yogurt
- 1 T. lemon juice
- Plus half the chives and half the lemon zest from above
To prepare the yogurt sauce: Mix the yogurt, lemon juice, 2 tablespoons of chives and 1 teaspoon of lemon zest in a small bowl. Keep cold until ready to serve.
In a medium bowl, mix together salmon, pita, mayonnaise, egg, coriander, cayenne pepper, salt and 2 T. chives and 1 teaspoon lemon zest.

Form the mixture into 4-5 patties, about 3-4 inches in diameter. This can be done ahead of time – just cover with plastic wrap and keep in the fridge).
Heat the oil on medium-high in a large stainless steel skillet. Cook the salmon cakes on medium high for 3-4 minutes per side (6-8 minutes total), or until golden brown on each side.
Serve warm with lemon wedges and yogurt sauce.

Adapted from Epicurious

