
Blueberry Crumble Coffee Cake

I can hardly believe it but Friday marks the end of my third year of medical school! I can remember at the beginning of this year wondering how I was ever going to make it- “working” at the hospital everyday on top of studying for standardized exams every five weeks, and trying to live a somewhat normal life on top of it. Then before I even had time to get really stressed out about it – it’s over! Not complaining one bit :-). I am finishing up the year with pediatrics, which quite to my surprise turned out to be one of my favorite rotations of the year. I have never been one of those people who thinks, “Awwwwwwwwww, little kids are sooooooooo cute.” In fact, I kind of grouped those people into the “lovers of unicorn and all things rainbow” that I just didn’t fit in with. However, in retrospect I realize that I had never really spent enough time with the little ones in order to make such a judgement. Little kids are pretty amazing little people, and they definitely do say the darndest things. And also, children’s hospitals = 1000x cooler than adult hospitals.
So in order to commemorate the end of another very good rotation, I decided to make coffee cake for the office to enjoy. I wanted something summery yet decadent and something that would work equally well for both breakfast and dessert. I think this cake hit the nail on the head. The lemon in the batter gives it a fresh appeal, and the streusel topping makes it a crumbly delight. I really thought this cake was over the top good – and based on the number of people at the office that asked for the recipe, I’m pretty sure I’m not alone. The only thing I might change for the future is to make individual serving sizes. I think it would work well in a muffin tin – just make sure you equally distribute the amazing streusel, otherwise you might cause some fights (at least when there are little kiddos involved).

Blueberry Crumble Coffee Cake
Makes a 9-inch round cake
For the Streusel:
- 1/4 cup granulated sugar
- 1/3 cup light brown sugar, lightly packed
- 1 teaspoon ground cinnamon
- 1/8 teaspoon ground nutmeg
- 1/4 pound (1 stick) unsalted butter, melted
- 1 1/3 cups all-purpose flour
For the Cake:
- 6 tablespoons unsalted butter, at room temperature (3/4 stick)
- 3/4 cup granulated sugar
- 2 extra-large eggs
- 1 ½ teaspoons pure vanilla extract
- zest from 1/2 a lemon
- 2/3 cup sour cream
- 1 1/4 cups all purpose flour
- 1 teaspoon baking powder
- 1/4 teaspoon baking soda
- 1/2 teaspoon kosher salt
- 1 cup fresh blueberries
Directions:
Preheat the oven to 350 degrees F. Butter and flour a 9-inch round baking pan.
For the Streusel: Combine granulated sugar, brown sugar, cinnamon and nutmeg in a bowl. Stir in melted butter, then flour and mix well.
For the Cake: In a stand mixer, cream butter and sugar on high speed for 4-5 minutes, until light. Reduce speed to low to add the eggs, then add the vanilla, lemon zest, and sour cream. In a medium bowl, sift together the flour, baking powder, baking soda, and salt. With the mixer on low speed, add the flour mixture to the batter until just combined. Fold in the blueberries and stir with a spatula to evenly mix in berries. Spoon the batter into the prepared pan and spread with a knife to level the top. With your fingers, crumble all the topping evenly over the batter. Bake for 40 to 50 minutes, until a cake tester comes out clean. Cool completely and serve. Sprinkle with powdered sugar if desired.
Barely Adapated from Barefoot Contessa (Ina Garten)
Best-Ever Raspberry Pie
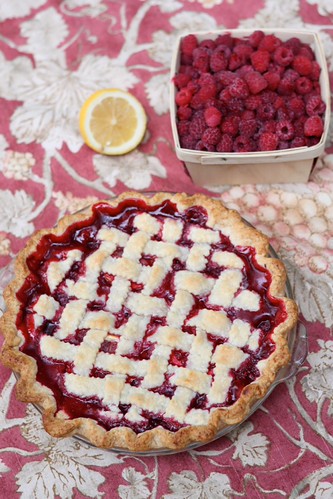
I promised you that there would be more raspberry recipes to come, and I don’t lie. I made this as part of the dinner part I had with my family over labor day weekend, but the truth is we ate so much of it for dinner that I felt the need to make another pie the next day :-). I’m planning on making a 3rd one, likely today, that’s how much I love this pie.
Now to give you an idea of why this must be the best ever raspberry pie, you should know that I am not much of a fruit pie fan. I’m not one to turn down any dessert, but fruit pie would never be my first choice. This pie is an exception. I really think it is the best recipe ever created for raspberry pie. I have never met a person who didn’t love it, and my mom has been making it every year since I can remember. Now there are a few keys to this pie that make it so delicious. First of all it really does help if you use good quality raspberries. I’ve bought a few of the store bought variety this year and have been sorely disappointed. This could be because I bought them before they were truly in season, but still I think raspberries are best either hand-picked or bought from a farmers market. Second, it uses crème de cassis or blackberry liqueur. I know that it’s a pain to buy one bottle of liqueur that you only use for one recipe, but that bottle will last you through several years of raspberry pie making – so it’s totally worth the investment. And third, there is butter and lemon slices in the pie filling itself – how can you go wrong.
For a while I have tried to avoid the realization that homemade pie crust is about 7864 times better than store-bought, mostly because I have been trying to avoid the extra work that comes with making homemade pie crust. However, I have (somewhat remorsefully) come to my senses. Homemade pie crust is just so much better. Its flakier, it melts in your mouth and it doesn’t have artificial taste that hints through in store bought crust. Since I learned the trick about rolling the pie crust out between 2 pieces of parchment paper, it has become infinitely easier to make. I think it is totally worth the extra 10 minutes, but I won’t tell if you still want to use store-bought :-). I haven’t included a recipe for pie crust here because it seems that everyone has there own favorite. I used a recipe from the pioneer woman, but I can’t say I’ve tried enough to really say it is the best ever. And really, if you are trying to save time my mom has made this countless times with store bought pie crust and I have still loved it. I also would guess that you could easily make this into a blackberry pie but I have never tried this since I love raspberries. If you do, let me know how it turns out!

Best Ever Raspberry Pie
– Makes 1 standard 9 inch pie
- 5 cups raspberries (2 1/2 pints)
- 1 cup granulated sugar
- 1/3 cup Crème de Cassis or blackberry liqueur
- 4 Tablespoons cornstarch
- 1 Tablespoon fresh squeezed lemon juice
- Pinch of salt
- 2 tablespoons butter sliced paper thin
- 3 paper thin slices of lemon (a mandoline would be best for this)
- Top and bottom layer of pie crust
- Preheat oven to 425 F.
- Toss raspberries and sugar gently together in mixing bowl.
- In a measuring cup, whisk liqueur and cornstarch together until smooth.
- Stir Cassis mixture, lemon juice and salt gently into berries.

- Line a standard 9 inch pie pan with crust. (Do not use a deep dish pie unless you significantly increase the number of berries) Spoon in the berries, and arrange lemon slices and butter over the berries.
- With the top pie crust layer, cut it into about ½ inch strips, preferably using a pastry cutter like this. Arrange over berries in a lattice pattern, alternating under-over. Crimp the edges of the pastry together.
 (This was the first pie we made)
 - Set on the middle rack of the oven and bake at 425F for 15 minutes. *Then lower heat to 350F and bake for another 30 to 40 minutes, or until crust is golden brown and filling is bubbling.
Slightly adapted from The Silver Palate Cookbook

Raspberry Lemonade Bars

This week marks the end of another wonderful rotation and so therefore also another baked good. As I said, I’m working on dermatology and I’ll have to say I’m spoiled. Not because I have the best hours (we work 11-12 hour days, there is a dermatologist shortage!) But I’m spoiled because I think I am working with one of the kindest, most cheerful and sincere doctors I have ever met, and I’m just not sure if my future rotations can live up to these high standards.
Since I went home this weekend, I had the pleasure of going raspberry picking with my mom (and dragging John along), which opened a new world of recipe possibilities. Despite the fact that it was about 97 degrees, we had a lot of fun and came home with quite a loot of berries. I have come up with quite a few fun ways to put them to use, so consider this fair warning if you soon tire of seeing raspberry recipes on this blog. As far as I’ve heard raspberry season (at least in Ohio) doesn’t end until mid-October so go ahead and pick some berries for yourself – you won’t even have to suffer through the heat.
About the bars themselves, I brought them in today, and they were a big hit. I described them as raspberry bars , and one of the nurses said, “They taste like raspberry lemonade!” I thought this was ironic because that was the actual name of the original recipe but she came up with that description de novo. If you notice this recipe requires a lot of juicing of lemons. I found this to be the most troublesome part, especially considering that after I had juiced 8 lemons I somehow managed to spill the entire cup of lemon juice all over myself. Since I didn’t have enough lemons to make another cup, I used some bottled lemon juice to make up the difference. They still tasted good but I wouldn’t recommend substituting all of the fresh squeezed lemon juice for the bottled stuff as it tends to be more tart. The other tedious part of this recipe is separating all those egg whites. If your wondering what to do with the leftover yolks, that’s easy – make ice cream! Of course you could also make traditional lemon bars if you want to skip the raspberry flavor all together, but I’m not advocating that.
Raspberry Lemonade Bars
Makes a 13 x 9 inch pan. * Recipe can be halved to make an 8×8 pan, but will need a slightly reduced baking time.
For the Crust:
- 2 sticks unsalted butter, softened
- 1/2 cup sugar
- 1 3/4 cup all-purpose flour, plus more for sprinkling
- 1/2 teaspoon salt
For the Raspberry Lemon Layer:
- 3 cups sugar
- 1 1/3 cups flour
- 3 T. lemon zest
- 1/4 teaspoon salt
- 3 cups raspberries (thaw if using frozen)
- 6 large egg whites
- 2 large eggs
- 1 1/3 cups freshly squeeze lemon juice
- Powdered sugar for dusting (if desired)
To make the Crust:
Preheat oven to 350°. Line a 13×9 inch pan with parchment paper.
Combine butter, sugar, flour and salt in a medium bowl and mix until butter is evenly cut into dough. Press dough evenly into pan, sprinkling additional flour if dough is sticky. Bake for 25 minutes, until golden brown. Remove from oven and keep warm
To make Filling:
Add flour, sugar, lemon zest and salt to a large bowl and whisk to combine.
Add the berries to a fine mesh sieve and mash through with a spatula to extract as much pulp and juice as possible, leaving behind the berry seeds.
Add the raspberry puree, egg whites and eggs and lemon juice to the flour mixture and whisk until evenly mixed. Pour over the warm crust.
Bake pan for 35-40 minutes until the center is almost set. Remove from oven and cool. Cover and refrigerate for at least 2 hours. Remove bars from pan using the parchment paper and run a sharp knife under water to slice bars. Sprinkle with powdered sugar before serving, if desired.
Adapted from Annie’s Eats, Originally from Sophistimom
Blueberry Scones

Believe it or not, I used to order scones from coffee shops because I thought they were a healthy option. In my defense, they always tasted so dry that I figured they must be healthy. After making these scones, I realized that they don’t exactly get the title of “healthy” but at the same time, they are way tastier than their coffee shop counterparts. Plus making them gives you the right to talk in a fake British accent and pretend you’re Kate Middleton for the day.
While these scones might you feel like British Royalty, they are great for another reason – you can freeze them unbaked, and then bake them from a frozen state. This is a great option if you want to impress some overnight guests without having to wake up at 4 am. Just flash freeze them individually on a baking sheet,wrap, and store in a freezer bag until ready to use.
The only tricky thing with making these is that the dough is a little sticky. I found that forming the dough into a rough square, and cooling it in the freezer for 10 minutes really helped the consistency. I also added quite a bit of flour, but try not to add too much or you might run into the dreaded dryness of a coffee shop scone. This recipe, as shown only makes 8 scones, so I think next time I will double it, and bake one batch to eat, while keeping the others un-baked in the freezer for a later date.

Blueberry Scones
Makes 8 scones
- 8 tbsp. (1 stick) unsalted butter, frozen whole
- 1½ cups fresh blueberries (slightly less than 1 pint container)
- ½ cup whole milk (or see my post tomorrow on good substitues for whole milk)
- ½ cup sour cream
- 2 cups (10 oz.) all-purpose flour, plus more for dusting the work surface
- ½ cup sugar
- 2 tsp. baking powder
- ¼ tsp. baking soda
- ½ tsp. salt
- zest of half a lemon (or 1 heaping teaspoon)
- For Topping: 2 T. butter, melted and Sugar for sprinling
If you plan on baking the scones immediately, preheat oven to 425˚ F. Wash and dry the blueberries and place in the freezer until needed.
Grate the frozen butter on the holes of a large box grater. In a small bowl, whisk together the milk and sour cream; refrigerate until needed.

In a larger bowl, combine flour, ½ cup sugar, baking powder, baking soda, salt and lemon zest. Whisk to combine. Add the grated butter to the flour mixture and toss with fingers until thoroughly coated.

Add the milk mixture to the dry ingredients and fold with a spatula just until combined. Transfer the dough to a generously floured work surface. Dust the top of the dough with flour, and knead with well floured hands, 6-8 times, just until the dough holds together in a ragged ball. Form the dough into a rough square, and place on a floured plate to chill in the freezer for 5-10 minutes.
Return the dough to the floured work surface and roll into an approximately 12-inch square. Sprinkle the blueberries evenly over the surface of the dough, and gently press down so that they are slightly embedded in the dough surface. Roll the dough up to form a tight log, so that the blueberries are in the center. Lay the log seam side down and press the the log into a 12 by 4-inch rectangle. Using a sharp knife, cut the rectangle crosswise into 4 equal rectangles. If your knife gets sticky, try flouring it. Cut each rectangle diagonally to form 2 triangles. Transfer to a parchment or silpat lined baking sheet.


If you are going to freeze these, flash freeze on a baking sheet for 20 minutes, then wrap individually and store in a freezer bag until needed. To bake, brush the tops of the scones with melted butter and sprinkle with sugar. Bake for 18-25 minutes (slightly longer if baking from a frozen state). Let cool on a wire rack before serving.

Slightly adapted from Annie’s Eats, Originally from Cook’s Illustrated Entertaining

