
Star Spangled Apple Pie

Between pinterest, google reader, and an ever growing cookbook collection, I read a lot of recipes. Usually I file them away so that I can peruse my favorites when trying to plan a menu. But every once in a while a recipe is so memorable that it pops into your head a whole year later, while at the grocery store frantically trying to finalize the memorial day barbeque. This recipe would fall into that category.
Normally I wouldn’t think of apple pie as a traditional Fourth of July dessert, but a star spangled apple pie – well that’s entirely patriotic. It’s amazing what a few star cut outs can do for the “festive” level of a dessert. Served with ice cream, a possibly a slice of cheddar cheese, it’s perfect for summertime. And after all the saying does go, “As American as apple pie”.

The other thing I really liked about this recipe was how simple it was – most of the ingredients you probably already have in your pantry. But since the crust is really the “star” in this pie, I think a homemade one is almost imperative. I had a little bit of trouble with overbrowning, so next time I make this I plan to tent some foil over the top to help even cooking. As you may know, I’m somewhat partial to sugar, but I truly did think that the sugar crystals elevated the crust from good to great, and would probably add even more when I make this for the next patriotic holiday.
Star Spangled Apple Pie
Makes 1 9-inch pie
- Pie Crust
- 6 medium/large Granny Smith apples (about 2½ lbs.), peeled, cored and sliced
- 1/3 cup granulated sugar
- 3 tbsp. brown sugar
- 1 tbsp. all-purpose flour
- ¾ tsp. ground cinnamon
- ¼ tsp. grated nutmeg
- 2 tbsp. freshly squeezed lemon juice
- 2 tbsp. cold unsalted butter, cut into pieces
- 1 large egg beaten with 1 tablespoon cold water (for egg wash)
- Coarse sugar/Sugar sprinkles
On a lightly floured surface, roll out half of the pie dough into approximately a 12-inch round. (Keep the other half of the pie dough chilled for now.) Transfer the dough to a 9-inch pie plate, trimming the excess and crimping the edges. Cover with plastic wrap and freeze for 30 minutes in order to help the crust hold it’s shape while baking.
Preheat the oven to 400˚ F. In a large mixing bowl, combine the sliced apples, sugars, flour, spices and lemon juice. Toss well to combine. When the bottom crust is finished chilling, pour the apple mixture and accumulated juices into the bottom pie crust and use a spatula to even the top out slightly. Place thin slices of cold butter over the apples. Roll out the remaining pie dough on a floured work surface. Cut out numerous star shapes and use these to cover the top of the pie, using as much of the dough as possible. Brush the top and edges of the crust with the egg wash, then sprinkle with coarse sugar.
Place the pie on the upper rack and bake until the crust is golden brown and the juices are bubbling, about 50-60 minutes. Watch carefully and tent with foil for the 2nd half of baking if necessary to prevent overbrowning. Transfer to a wire rack and allow to cool for at least 30 minutes before slicing. Serve warm or at room temperature.
Slightly Adapted from Annie’s Eats

Pecan Tassies (or Mini Pecan Pies)

I had something entirely different to share with you today – it was going to be a meal of sustenance, instead of another dessert. However, after serving these little delicacies last night, I decided that I must get this recipe out ASAP so that you can make them ASAP. I’m pretty sure these made both the gator’s and the buckeye’s losses yesterday seem less painful (at least to the people who might be pained by that sort of thing).
These treats were the perfect way to start off October. They are sweet, nutty and flakey. As a true candy lover, I think part of the reason I like these is because the brown sugar becomes caramelized on top as it mixes with the pecans, creating an almost toffee like texture on the outside with a sweet and melted inside. Because I only had enough cupcake pans to make 24 of these at a time, I ended up running out of filling for the last tray. While you’d think that extra filling would always be a good thing, it seemed like most of that extra filling just spilled out onto the pan and made a mess. Therefore I would recommend measuring out half of the filling if you are making these in batches, so you have a better idea of how much to use.
Basically these are like a miniature pecan pies, with a slightly more solidified filling and an amazing crust. They also smell amazing while baking. And I’m pretty sure they would perfectly complement a nice big glass of apple cider. So go ahead and enjoy a few (or 10) for dessert, or for breakfast (like I did today). Happy Fall!

Pecan Tassies (Mini Pecan Pies)
– Makes 48 mini cupcake sized tassies
For the Dough:
- 1 cup (2 sticks) unsalted butter
- 6 oz cream cheese (I used 1/3 less fat because that’s what I had)
- 2 cups flour
For the Filling:
- 1½ cups light brown sugar, packed
- 1 heaping cup chopped pecans, plus more for sprinkling on top
- 2 eggs
- 2 tablespoons melted butter
- ½ teaspoon vanilla extract
1. To make the dough: beat butter and cream cheese together until combined. Add the flour and mix until incorporated. Roll the dough into 48 individual balls (each ball should be a little smaller than a quarter). Place the balls on a plate, cover with plastic wrap and refrigerate for about an hour.
2. To make the filling: combine all ingredients (brown sugar, pecans, eggs, butter, vanilla) in medium bowl and mix to combine. Divide this into even halves if you are making this in batches.
3. Preheat the oven to 350 and lightly grease mini muffin pans.
4. To assemble: Take a ball of dough and roll it out into a flat circle. Place inside a mini muffin cup and repeat with remaining dough. Alternatively you can simply press the dough ball inside of the mini muffin tin to create a cup. I was worried about the crust being uneven, which is why I chose to roll the balls out, but to save time you can use the other method.

5. Fill each cup with a heaping teaspoon of filling. Top each with a sprinkle of roughly chopped pecans. The filling puffs up while baking, so it is not necessary to fill to the brim of the cup, in fact this tends make a mess because the filling overflows.
6. Bake at 350 for 20-25 minutes. Let cool slightly in pans, then transfer to a cooling rack. Store at room temperature in an airtight container.
Source: Brown Eyed Baker, originally adapted from “old firehall ladies auxiliary cookbook”.

Best-Ever Raspberry Pie
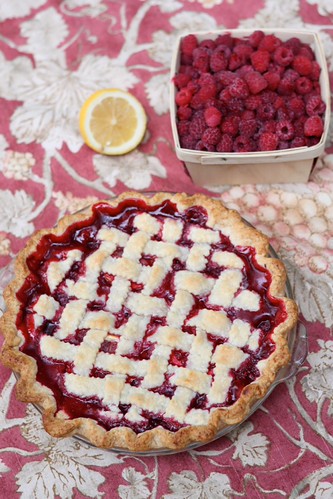
I promised you that there would be more raspberry recipes to come, and I don’t lie. I made this as part of the dinner part I had with my family over labor day weekend, but the truth is we ate so much of it for dinner that I felt the need to make another pie the next day :-). I’m planning on making a 3rd one, likely today, that’s how much I love this pie.
Now to give you an idea of why this must be the best ever raspberry pie, you should know that I am not much of a fruit pie fan. I’m not one to turn down any dessert, but fruit pie would never be my first choice. This pie is an exception. I really think it is the best recipe ever created for raspberry pie. I have never met a person who didn’t love it, and my mom has been making it every year since I can remember. Now there are a few keys to this pie that make it so delicious. First of all it really does help if you use good quality raspberries. I’ve bought a few of the store bought variety this year and have been sorely disappointed. This could be because I bought them before they were truly in season, but still I think raspberries are best either hand-picked or bought from a farmers market. Second, it uses crème de cassis or blackberry liqueur. I know that it’s a pain to buy one bottle of liqueur that you only use for one recipe, but that bottle will last you through several years of raspberry pie making – so it’s totally worth the investment. And third, there is butter and lemon slices in the pie filling itself – how can you go wrong.
For a while I have tried to avoid the realization that homemade pie crust is about 7864 times better than store-bought, mostly because I have been trying to avoid the extra work that comes with making homemade pie crust. However, I have (somewhat remorsefully) come to my senses. Homemade pie crust is just so much better. Its flakier, it melts in your mouth and it doesn’t have artificial taste that hints through in store bought crust. Since I learned the trick about rolling the pie crust out between 2 pieces of parchment paper, it has become infinitely easier to make. I think it is totally worth the extra 10 minutes, but I won’t tell if you still want to use store-bought :-). I haven’t included a recipe for pie crust here because it seems that everyone has there own favorite. I used a recipe from the pioneer woman, but I can’t say I’ve tried enough to really say it is the best ever. And really, if you are trying to save time my mom has made this countless times with store bought pie crust and I have still loved it. I also would guess that you could easily make this into a blackberry pie but I have never tried this since I love raspberries. If you do, let me know how it turns out!

Best Ever Raspberry Pie
– Makes 1 standard 9 inch pie
- 5 cups raspberries (2 1/2 pints)
- 1 cup granulated sugar
- 1/3 cup Crème de Cassis or blackberry liqueur
- 4 Tablespoons cornstarch
- 1 Tablespoon fresh squeezed lemon juice
- Pinch of salt
- 2 tablespoons butter sliced paper thin
- 3 paper thin slices of lemon (a mandoline would be best for this)
- Top and bottom layer of pie crust
- Preheat oven to 425 F.
- Toss raspberries and sugar gently together in mixing bowl.
- In a measuring cup, whisk liqueur and cornstarch together until smooth.
- Stir Cassis mixture, lemon juice and salt gently into berries.

- Line a standard 9 inch pie pan with crust. (Do not use a deep dish pie unless you significantly increase the number of berries) Spoon in the berries, and arrange lemon slices and butter over the berries.
- With the top pie crust layer, cut it into about ½ inch strips, preferably using a pastry cutter like this. Arrange over berries in a lattice pattern, alternating under-over. Crimp the edges of the pastry together.
 (This was the first pie we made)
 - Set on the middle rack of the oven and bake at 425F for 15 minutes. *Then lower heat to 350F and bake for another 30 to 40 minutes, or until crust is golden brown and filling is bubbling.
Slightly adapted from The Silver Palate Cookbook

Quick and Light Key Lime Pie

I know there are about 400 different recipes available for key lime pie. I have made my fair share of them, but it seems that I always go back to this recipe. It is not particularly traditional and it certainly takes some short cuts, but I think that’s why I like it. It’s easy to put together, doesn’t require a huge list from the grocery store and still tastes better than any store-bought version. In fact, I can remember making this on more than one occasion while we were vacationing at the beach without access to my usual kitchen repetoire. If you are having trouble finding key lime juice with the other drinks, try looking in the cocktail aisle as sometimes I’ve found it there. This pie also happens to be a lightened version, which no one would know, but generally just gives you an excuse to eat more than one piece :-).
I know that summer is coming to a close, but perhaps if you are looking for something to take to a labor day bbq today, you could have this ready in time. Besides, I would guess that we might be blessed with a few more hotter than h-e-double hockey sticks days before summer officially goes away. And heck, this pie is so good that no one is going to complain if you serve it in the middle of fall at thanksgiving dinner.
Quick and Light Key Lime Pie
– Makes 1 9-inch pie
- 2 large eggs
- 2 large egg whites
- 1/2 cup Key lime juice (I use Nellie and Joes)
- 1 teaspoon grated lime rind
- 1 (14 oz) can reduced fat sweetened condensed milk
- 1 reduced fat graham cracker crust (6 oz)
- 2 cups lite whipped topping, thawed
1. Preheat oven to 350°.
2. Beat eggs and egg whites with a mixer on medium until well blended. Add juice, lime rind and milk and blend.
3. Pour mixture into crust and bake for 20 minutes. Center should be almost set, but will set more as it cools.
4. Cool pie on wire rack. Transfer to refrigerator and chill for 4+ hours. Top with cool whip before serving.

Slightly adapted from Cooking Light

