
Peanut Butter Banana Bread

Studying all day can get a little old – so I really needed a change in my routine. I figured something new for breakfast would be a start. I secretly bought more bananas then we could eat, hoping some would end up “banana bread worthy” by the end of the week. And after avoiding the bananas all week, there were 4 bananas left on their last leg by Friday. Since I plan on eating this bread for breakfast, I figured what would be better than adding a little peanut butter to boost the protein, and the flavor. I found this recipe on Joy’s blog, which also happened to call for ground flax seed – more protein, more fiber – good stuff. After finishing off the raspberry bars in a ridiculously short time, I decided I needed to make a snack with a little more sustenance.

Then of course I had to go and ruin a perfectly healthy morning breakfast by adding chocolate chips to the batter. They were calling my name from the pantry, and I just couldn’t resist. I didn’t add too many. Promise. But really you could eat it for dessert if you so desire. You could also try adding butterscotch chips, or peanuts, or walnuts – or whatever happens to be calling your name from your pantry. I think next time I’m going to put both chocolate chips AND chopped peanuts – because I really love that peanut flavor. That’s one of the reasons this recipe calls for natural peanut butter – it has a much stronger peanut flavor than Jif.
This is a quick bread, and rightly named. It doesn’t take much time to make, and you don’t even need to get the mixer out. It’s pretty much just through all the ingredients in a bowl, mix, and bake. It’s moist and flavorful enough to eat just plain, but of course John likes to add butter to his.
Peanut Butter Banana Bread (with Chocolate Chips)
- 1 1/2 cups mashed ripe bananas (about 4)
- 1/3 cup plain or vanilla fat free yogurt
- 1/3 cup creamy all-natural peanut butter
- 3 tablespoons butter, melted
- 2 large eggs
- 1/2 cup granulated sugar
- 1/2 cup brown sugar
- 1 1/2 cups all purpose flour (or 1 cup whole wheat flour + 1/2 cup all purpose)
- 1/4 cup ground flaxseed meal
- 3/4 teaspoon baking soda
- 1/2 teaspoon salt
- 1 scant teaspoon cinnamon
- pinch of allspice
- 1/2 cup chocolate chips, or chopped peanuts
Preheat oven to 350°. Grease a 9×5 loaf pan.
In a large bowl, combine all the wet ingredients – bananans, yogurt, peanut butter, melted butter, and eggs. Mix with a wisk. Then add the brown and granulated sugar and stir.
Then add the flour, flaxseed, baking soda, salt, cinnamon and allspice to the wet ingredients. (You could also mix the dry ingredients separately in another bowl to start, but I don’t think it’s necessary).
Mix until no lumps remain and then stir in chocolate chips, or your mix-in of choice.
Bake at 350° for 55-65 minutes or until a toothpick inserted in the center come out clean. Let cool slightly in the pan, and then remove from pan and cool on a wire rack. Removing the bread from the pan lets the air circulate, so moisture doesn’t condense in the crust – which can make the bread tough.

Check out those chocolate chips – yummmm.
Adapted from Joy the Baker, Originally adapted from Cooking Light
Raspberry Crumble Bars

I’m really sorry for constantly tempting you with all these sweet treats. I really want this blog to be an even ratio of sweet treats to healthy dinners – but it just seems that all our dinners lately have been fairly un-blog worthy. Plus the fact that sweet treats just look so much prettier in pictures. At least these have raspberries in them, right?
I love raspberries. They are hands down my favorite berry. I know it’s not technically raspberry season yet, but as soon as I saw these raspberry bars on Brown Eyed Baker, I had a craving for them. My mother-in-law had given us some similar raspberry bars for Christmas last year, and to be honest I think I finished off the entire tin myself- John may have gotten ahold of one :-). They are delicious. They kind of taste like a raspberry pie, in an easy to eat bar form. When I finally left my dungeon (slash study room) to get groceries, I had my list all planned out to make these, and then the grocery store was completely out of raspberries. Sad day. But never fear, my knight in shining armor picked some up for me at costco. (Now of course I have an over abundance. Not complaining).
He also managed to get me this container of oatmeal:

Yes, that says 10 pounds. 10 pounds of oatmeal. I made 2 full batches of granola and have still barely made a dent in it. I figured these raspberry bars would help use some more of it up – but a 1/2 a cup out of a 10 pound box is really child’s play. So don’t be surprised if you see some more oatmeal using recipes around here.
Raspberry Crumble Bars
- 2½ cups all-purpose flour
- 2/3 cup granulated sugar
- ½ teaspoon salt
- 1 cup plus 2 tablespoons unsalted butter, divided, cut into ½-inch pieces and at cool room temperature
- ¼ cup light brown sugar
- ½ cup old-fashioned rolled oats
- ½ cup pecans, chopped fine
- ¾ cup raspberry preserves
- 1 cup fresh raspberries (frozen can be substituted, just thaw first)
- squeeze of lemon juice
1. Preheat oven to 375°. Line a 13×9 inch pan with tin foil, overlapping on the edges and spray with cooking spray.
2. Combine flour, sugar and salt in a mixing bowl. Mix on low using a paddle attachment, then add 1 cup of butter, 1 piece at a time. Mix on low until the crust begins to crumble like sand.
3. Reserve 1 1/4 cups of crumb mixture (to be used for topping). Spread the remaining mixture into the bottom of the foil lined pan, and press down to form an even crust. Bake for 14-18 minutes.
4. In the meantime, combine the raspberry preserves, fresh raspberries and lemon juice in a small bowl. Mash with a fork, leaving bits of berries intact.
5. In a separate bowl, mix together oatmeal, brown sugar, crumb mixture and remaining 2 T. of butter. Using your fingers, pinch the mixture until the butter is fully incorporated.
6. Remove baked crust from oven and immediately spread preserve mixture on top. Then crumble the streusel mixture on top of the berries, covering the top.
7. Bake for an additional 25 minutes, or until bubbling. Let cool in pan for about an hour. Let cool completely before slicing.

Source: Brown Eyed Baker
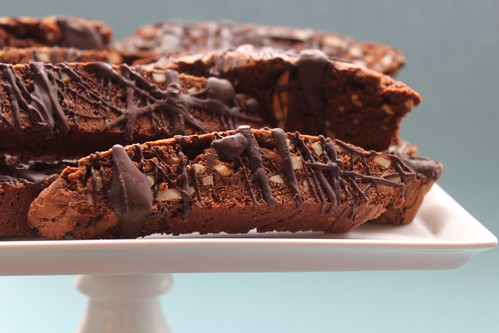
Chocolate Almond Biscotti
It’s Mother’s Day, and while I may be biased (aren’t we all), I think I have the best mom ever. She has taught me so much, and continues to inspire me, guide me, and encourage me through all of life’s twists and turns. I wish I could be with her today, but these pesky boards have me walled up in my apartment. (I actually wrote this post last week and saved it for today because I knew I’d be studying). Since I can’t be there to thank her in person for all she’s done for me, I really wanted to send her something in appreciation. I first started with the idea of chocolate-raspberry truffles, which I’m sure my mom would love but they need to be refrigerated and therefore are not mail friendly. Then I thought I’d make toffee, but I made this at Christmas and while it was delicious, it’s way to easy to eat all of it in one day (and then regret doing that). Then I thought about the fact that my mom, like me, is back in school. Speaking as a student myself, sometimes we just need a cup of coffee. I’m personally not a big coffee fan (diet coke is one of my guilty pleasures), but when I’m too tired to turn another page in my notes, coffee has been my friend.
I finally decided on these chocolate almond biscotti because they are perfect for a student, who can enjoy them with a cup of coffee during some late night studying. They also happen to be very mail friendly because they are sturdy and keep for a long time. If you’d like, you can pop them in the freezer and they will keep even longer. They are also delicious, but not so over the top that you will find yourself sneaking back to eat more and more – they are really best enjoyed dipped in coffee (although my mom loves chocolate, so I can’t really make any guarantees :-)). So thanks Mom for everything you have done for me, and for inspiring me with how hard you’re studying and how much your learning! I hope this biscotti make your late nights a little more enjoyable! Happy Mother’s Day to all the moms out there – you are truly appreciated!

Chocolate Almond Biscotti
– Makes about 32 biscotti
- 9 squares (9 oz) semi-sweet chocolate (or 1 1/2 cups chocolate chips)
- 2 1/2 cups flour
- 1 1/2 t. baking powder
- 1/4 t. salt
- 5 T. unsalted butter, softened
- 1/2 cup granulated sugar
- 1/2 cup brown sugar, packed
- 3 eggs
- 1 teaspoon vanilla
- 1 heaping cup slivered almonds
- 3 oz (1/2 cup) semi-sweet chocolate for drizzling (optional)
1. Preheat oven to 325°. In a small bowl, combine flour, baking powder and salt.
2. If using chocolate squares, coarsely chop them. Melt the chocolate in the microwave for 2 minutes, then stir to melt all the pieces.


3. Beat butter and both sugars together on high. Add the eggs and beat well. Then add the melted chocolate and vanilla. Slowly add the flour mixture, and mix thoroughly. Add the slivered almonds, as the last mix in.


4. Transfer dough to a floured surface and divide into 2 equal pieces. If the dough is too sticky, add a bit more flour. Roll each piece of dough into a log about 10 x 2 inches, and place on a baking sheet about 3 inches apart.
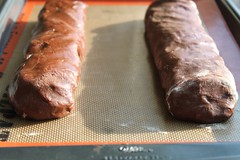
5. Flatten the rolls slightly by pressing down on them with a spatula. Bake at 325 for 40-45 minutes.
6. Remove rolls from oven and allow to cool for 15 minutes. Then transfer to a cutting board and cut each roll diagonally into about 16 pieces. (*A very sharp knife worked better than a serrated one for me).

7. Lay pieces back on the baking sheet, and bake (still at 325°) for an additional 20 minutes.

8. Finish by drizzling with melted chocolate if desired. Store in an airtight container for up to 2 weeks or freeze for future use.

Adapted from Baker’s Chocolate Squares
Blackberry Lemon Tart

The last few days have made me realize something – it’s probably a good thing I normally have to study all day. In the last 4 days, which I self proclaimed my vacation before I start studying for the boards, I think I have gone to the grocery store 6 times, Bed, Bath and Beyond twice, and the mall once. Despite the fact that I meant for this to be a relaxing break, I created numerous little projects for myself, and then convinced myself that they absolutely HAD to be done. Things like making this blackberry lemon tart, from scratch. (One of the trips to bed bath and beyond was to buy a tart pan, which I clearly HAD to have to make this). But I’m not complaining, because it was all a lot of fun.
For the last day before we lock ourselves away to start seriously studying, our friends had a little dinner party. At first I really wanted to make cupcakes to bring, but when I saw blackberries at the store, I changed my game plan, and searched for the perfect spring time dessert that would use blackberries. Like I’ve said before, normally I’m a sucker for a chocolate dessert. I still can never see myself ordering strawberry ice cream when there’s a chocolate chip on the menu – but making a super chocholately dessert didn’t really seem to go with the nice weather, and I know a lot of our friends actually like fruit-filled desserts. I also happen to be a sucker for marscapone cheese, so I knew I would like this. If you’re worried about making your own tart crust – don’t be! It was a lot easier than I thought, and as much as I try to convince myself that store bought crust is just as good, this recipe proved me wrong. This is a great spring time dessert, and it actually quite easy to put together. The only part that requires baking is the crust, which can be made ahead of time. Just assemble right before serving so that the blueberries don’t bleed onto the filling.

Blackberry Lemon Tart
For the Crust:
- 1 egg yolk
- 2 T. ice cold water
- 1 t. vanilla or almond extract
- 1 1/4 cup flour
- 1/3 cup sugar
- 1/4 t. salt
- 1 stick (8 T.) butter, very cold and cut into 1/4 inch pieces
In a small bowl, mix the egg yolk, vanilla extract and ice cold water. Keep cold.
Add the flour, sugar and salt to the bowl of a food processor. (If you don’t have a food processor, use a large bowl and pastry cutter, or 2 knives for the next steps)
Add the butter to the food processor and pulse until a fine meal is formed. Then add the egg mixture, and pulse until dough just begins to come together. Form dough into a ball, wrap in plastic wrap and refrigerate for 30 minutes.

On a lightly floured surface, roll dough into circular-like shape, a little larger than your tarte pan, and between 1/8-1/4 inch thick. To pick the dough up, roll it around your rolling pin, and then roll it back out onto the tarte pan. Press into the edges of the pan, and pinch off excess around the edges. To help reinforce the edges, you can fold the excess tarte dough back onto itself, and then trim any excess still left. Then chill tart for another 20 minutes (or until ready to bake)
When ready to bake, place foil on top of the dough, and fill with pie weights (which can be beans, peas, rice, etc.). NOTE: I used parchment paper on top of my dough, but did not bring the paper up around the tart edges. This causes the edges to fall slightly when baking so next time I will use foil, and cover the entire surface, so that the pie weights reach all the way around to the edges of the tarte, helping to support the structure.

Bake at 350 for 15-20 minutes or until just golden. Remove pie weights and cool.
For the Filling
- 1 (8 oz) container marscapone cheese
- 3/4 cup light sour cream
- 4 Tablespoons powdered sugar
- 2 Tablespoons honey
- Juice of 1 lemon
- Zest of 2 lemons
- Blackberries for topping
In a small bowl combine all ingredients except blackberries, and stir vigorously, or blend with a mixer. Spread mixture into cooled tart and top with blackberries immediately before serving.
Adapted from The London Times

