
Apple Cider Muffins with Browned Butter Glaze

So, you know my previous obsession with California? Well, because we’ve had the most amazing weather for the last month, I’m starting to realize that Ohio is pretty awesome! The leaves are starting to change, there is fog over the valleys when I drive to work, and the sun has that autumn glow. It’s wonderful! Although you will surely need to remind me of this come February, when I cannot wait for winter to be over! To keep my California dream alive, my best friend from like the fourth grade just landed a coveted fellowship spot at UCLA, so I’m quite sure my love will be rekindled when I go to visit. But for now, I’m loving Ohio.
Now about these muffins. Obviously, they totally go with October, but they would be equally perfect for Thanksgiving breakfast. They are actually pretty healthy – chunks of apple and apple sauce keep them very moist without much fat. Then of course you add this browned butter glaze, which sort of ruins the healthy aspect, but you absolutely cannot leave it off. It is amazing. Together, these were best apple muffins I’ve ever had.
A few technical points…. First, you precook the apple with a bit of sugar and spice. This step gives the apples a pie-like texture, instead of the dehydrated apple you find in some baked goods. Additionally, I found out the hard way that there are so many liquid components to these, that they will seep if allowed to sit in an air tight container. I’m quite sure this didn’t make the best presentation when John brought them into class, but apparently they were still well loved. To avoid this, go a little lighter on the amount of apple in the batter, and store with a rack underneath. These muffins are just hearty enough that you can call them breakfast without too much guilt.
Apple Cider Muffins with Browned Butter Glaze
- 4 Tablespoons butter
- 2 -2 ½ honeycrisp apples, peeled and diced
- 3 tablespoons apple cider
- 1 1/2 cups whole wheat pastry flour
- 1/2 cup old-fashioned rolled oats
- 1 teaspoon baking soda
- 1/2 teaspoon baking powder
- 3/4 teaspoon cinnamon
- 1/4 teaspoon allspice
- 1/4 teaspoon salt
- 1 pinch of nutmeg
- 1 large egg
- 1/3 cup loosely packed brown sugar
- 2 teaspoons vanilla extract
- 1 cup unsweetened applesauce
- 1/4 cup apple cider
For the Glaze:
- 4 tablespoons browned butter, melted and cooled*
- 1 1/2 tablespoons apple cider
- 1 cup powdered sugar
Directions:
Begin by melting the butter in a small skillet over medium heat. Continue to cook, swirling occasionally until the butter turns a deep golden brown. Be careful not to burn. *Repeat this step for the browned butter in the glaze.
Preheat oven to 350 degrees F. Heat a small skillet over medium-low heat and add diced apples with 3 tablespoons apple cider, and a pinch of cinnamon and salt. Cook, stirring occasionally, until apples are soft and caramely, about 8-10 minutes. In a bowl, whisk together flour, oats, baking soda, baking powder, salt and spices. Set aside. Line a muffin tin with liners.
In a large bowl, whisk egg and brown sugar together until smooth and no lumps remain. Add in vanilla extract, butter, apple sauce and apple cider, whisking again until smooth. Gradually add in dry ingredients, mixing until just combined. Fold in diced apples. Do not overmix. Fill each muffin liner 3/4 full to scantly full.
Bake for 15-17 minutes, or until tops slightly golden. When cool enough to handle, transfer to a wire rack to cool.
Brown Butter Apple Cider Glaze
In a medium bowl, combine browned butter, vanilla extract and powdered sugar. Whisk until the mixture comes together then add in 1 tablespoon of apple cider, continuing to mix. If it still doesn’t appear glaze-like, add in cider 1/2 tablespoon at a time and mix again. Don’t worry if it becomes too liquidy – just add a tiny bit of powdered sugar until you get the desired consistency. Spoon glaze on warm muffins or dip each top in the glaze, then serve.
Slightly Adapted from How Sweet It Is
Pumpkin Doughnuts

Let me just profess how incredibly happy I am that it is October! Not only for the amazing weather, the change of leaves, and a special someone’s birthday, but also because my work schedule is much more manageable, and I actually have a few minutes to breathe. Of course at the top of my weekend to do list was celebrating the season by making baked goods! My friend Val also happens to be very found of October, seasonal festiveness and baking, so I knew pumpkin spice doughnuts would be right up her alley. I actually felt like a normal person, chit chatting on a Saturday afternoon, experimenting in the kitchen, and enjoying fall. It was so much fun!
Truth be told, I had bought a doughnut cutter specifically for these doughnuts more than a year ago, and had yet to use it. Fall passed me by, and making pumpkin doughnuts in December just seemed wrong. We found that the doughnuts “holes” made with the cutter were much larger than expected, so we ended up cutting them into fourths and making more snack size bites.
Now, I know people “bake” doughnuts, and that is much healthier, but let’s be honest, by definition doughnuts are fried. I’m not about to go redefining the very essentials of a doughnut by baking them, so yes, I fried these. Healthy? No. Guilty pleasure? Yes. I have only fried things one other time in my life, and it was pretty much the worst disaster I’ve had yet in the kitchen. (Picture an apartment so smoke filled you couldn’t reenter it for hours….). Happy to say this time went much more smoothly. The only difficult part is getting the oil to stay at the right temperature. Don’t be tempted to turn the heat to high – stick with medium – and use a heavy duty pan, like cast iron, that will keep consistent heat. Overall, these were considerably easier than I was expecting, but just as fun and festive as I was hoping.

Pumpkin Doughnuts
Makes 14-16 doughnuts and doughnut holes
Ingredients:
For the doughnuts:
- 3 1/2 cups all-purpose flour
- 4 teaspoons baking powder
- 1/2 teaspoon baking soda
- 1 teaspoon salt
- 2 teaspoons ground cinnamon
- 1 teaspoon ground ginger
- 1/2 teaspoon ground nutmeg
- 1/4 teaspoon ground cloves
- 1 cup sugar
- 3 tablespoons unsalted butter, at room temperature
- 1 large egg
- 2 large egg yolks
- 1 teaspoon vanilla extract
- 1/2 cup buttermilk
- 1 cup canned pure pumpkin
- Canola or Peanut Oil (for deep-frying)
For the cinnamon-sugar:
- 1/2 cup sugar
- 2 teaspoons cinnamon
For the spiced glaze:
- 1 cup powdered sugar
- 1/4 teaspoon ground cinnamon
- Dash of ground nutmeg
- Dash of ground ginger
- Dash of ground cloves
- 2 tablespoons milk
Directions:
In a medium bowl, whisk together the flour, baking powder, baking soda, salt, cinnamon, ginger, nutmeg and cloves and set aside. In the bowl of a stand mixer fitted with the paddle attachment, beat together the sugar and butter until well blended. Add egg, then yolks and vanilla. Add the pumpkin mixture and stir. Alternating buttermilk and flour mixture, continue to mix until all ingredients added and well blended. Cover the mixture and freeze for 1 hour, or refrigerate for 3.
Line two baking sheets with parchment or wax paper and lightly flour your work surface. Gently roll dough to about 1 – 1.5 cm thickness. Using a floured doughnut cutter or 3-inch round cutter, cut out dough rounds. If needed, use a floured 1-inch cutter to remove the centers (or the bottom of a 1 m piping tip). Arrange the doughnuts and holes on the prepared baking sheets, and if possible chill until ready to fry. Gather dough scraps and continue cutting until all the dough is used.
Line a cooling rack with several paper towels. Add enough oil to a skillet or Dutch oven to reach a depth of 1 – 1½ inches. Heat oil until the temperature reaches 365º to 370º. Fry doughnuts a few at a time, adjusting heat as needed to maintain temperature, until golden brown, about 2 minutes per side. Fry doughnut holes in a couple batches, turning occasionally, until golden brown, about 3 minutes. Use a strainer to transfer doughnuts to paper towels.
To make the cinnamon-sugar, whisk together the cinnamon and sugar in a small, shallow bowl until combined. When doughnuts are cool enough to touch, dip in cinnamon-sugar mixture and turn to coat completely.
Make the spiced glaze by combining powdered sugar and spices in a small bowl. Add the milk and whisk to combine, until a thick glaze is formed. Add more milk as needed to achieve desired consistency. Dip the remaining doughnuts in the glaze and allow to set before serving.
Source: Cook like a Champion
Cinnamon Chip Scones

The end of last week marked the end of my 14th week of AHECs (also known as rural health rotations). We are required to do 8 weeks in a rural health setting as part of our medical school curriculum, but I have had such good experiences in these small towns that I chose to do another 6! This last one was definitely no exception. I got to work one-on-one with probably the second nicest radiologist I’ve ever met (father-in-law will always be first!), who taught me something new everyday, and really helped me to feel prepared for residency by letting me go through films on my own when we had free time. The staff was all so welcoming and made me feel like part of the team, and the patients are just so sweet and so in need of good healthcare in these rural areas.

I had seen this recipe for cinnamon scones almost a year ago and hunted down some cinnamon chips shortly after; but then never actually made these. Then randomly, I saw 2 of my favorite bloggers post scone recipes within days of each other, and I took it as a sign. Scones were clearly the answer of what to bring for my last day of my last rural health rotation! I ended up going with the original recipe I found, because I already had a lot of the ingredients on hand, and I liked that I didn’t have to buy a lot of heavy whipping cream or buttermilk. You can certainly use the method I used in the lemon blueberry scones, and freeze these unbaked, and then bake from a frozen state whenever a morning treat is calling. I am confident they would turn out wonderfully, as cold butter is one of the key ingredients to good scones. I’m certainly glad I had some wonderful staff members to share these with because free time + baked goods is not a good combination around here :-).
Cinnamon Chip Scones
– Makes 16-24 scones
- 3 cups All-purpose Flour
- 1/4 cup granulated sugar
- 2 Tablespoons brown sugar
- 5 teaspoons Baking Powder
- 1/2 teaspoon Ground Cinnamon
- 2 sticks (1 Cup) Unsalted Butter
- 3/4 cups Heavy Cream
- 1 whole Egg
- 1 teaspoon Vanilla Extract
- 1 cup Cinnamon Chips
- Topping
- 1/2 cup Sugar
- 1 teaspoon Ground Cinnamon
- 1-1/2 teaspoon Heavy Cream
1) Preheat oven to 350 degrees. (Unless you chose to freeze and bake later*)
2) In a large bowl, mix together flour, granulated and brown sugar, 1/2 teaspoon ground cinnamon, and baking powder. Cut butter into pieces, then cut into dry ingredients with a pastry cutter or 2 knifes until mixture resembles coarse crumbs. Stir in cinnamon chips.
3) Mix together cream, egg, and vanilla extract. Pour into flour/butter mixture, stirring gently with a fork to combine.
4) Turn onto work surface (mixture will be very crumbly and falling apart.) Divide the dough into 2-3 equal portions. Gently press together the sides as you roll the top of each. Form either into either 2 large circles (to make 16 scones) or 3 medium circles (to make 24 smaller scones).

5) Mix together topping ingredients, stirring with a fork. Sprinkle over the top of the dough, lightly pressing.
6) Cut each circle into 8 wedges. Transfer to a cookie sheet and bake for 20 to 25 minutes. Allow to cool completely. Serve with coffee.
*If freezing, flash freeze for 20 minutes, then wrap individually and store in freezer. When ready to bake, preheat oven to 375º and bake for 25-30 minutes or until just beginning to brown.
Adapted from The Pioneer Woman
Baked French Toast

After 5 straights days of early wake-ups to cold, dreary rain, sleeping in on a Saturday and enjoying breakfast sounded like a much better idea then running. Back in Toledo, when the weather gets bad I tend to hit up the treadmill at our apartment complex, but on my last away rotation, it just seemed like a waste to brace the weather to drive to the gym, just so I can run in place. I’ve actually been pleasantly surprised that my runs in the cold rain have been pretty enjoyable, it’s just much harder to take that first step out the door on a Saturday morning. In fact, I’ve now made it my goal to run outside all winter this year. So in comes this amazing french toast, that can be made the night before and ready within 30 minutes of waking up on a sleepy Saturday.
This is really the perfect meal for company because to make a double batch would be no extra trouble. It certainly beats sitting over the stove and flipping pancake after pancake while the finished ones sit in the oven getting soggy. Besides, I have always preferred French toast to pancakes, which likely stems from my childhood (okay..and high school..and college) obsession with all things French. This dish is really wonderful enough to eat on its own, with out added syrup or butter, which is something I would rarely say about pancakes. We served it with some turkey sausage, and it made for such a cozy warm Saturday morning. And thanks to some help from lululemon (my unfortunate new obsession), I still had a good run in the rain later that day.

Baked French Toast
Serves 4-6
Ingredients:
- 4 tablespoons (1/2 stick) unsalted butter, melted
- 3/4 cup packed light brown sugar
- 1 loaf (about 1 pound) brioche or challah, sliced 1 1/2 inches thick
- 6 large eggs, lightly beaten
- 1 cup milk (at least 2%)
- 1 tablespoon pure vanilla extract
- 3/4 teaspoon ground cinnamon
- 1/4 teaspoon ground ginger
- sprinkling of ground nutmeg
- 1/2 cup chopped pecans
- Maple syrup, confectioners’ sugar or fresh fruit for serving, optional
Directions:
Combine the butter and brown sugar in a 9×13-inch baking dish. Arrange the bread slices in the dish. (It’s fine if they overlap.) In a large bowl, whisk together the eggs, milk, vanilla, cinnamon and ginger. Pour the mixture evenly over the bread and allow it to soak in. Top with pecans and nutmeg and cover tightly with plastic wrap. Refrigerate at least 3 and up to 12 hours.
When ready to bake, preheat oven to 350º. Set the dish out while the oven is preheating. Bake until browned and set, about 35 minutes. Allow to cool slightly on a wire rack before serving.
Adapted from: Cook Like a Champion, Originally from Bon Appetit, Y’all
Pumpkin Cream Cheese Filled Muffins

I cannot believe it is already fall. Seriously…Where did summer go? It was especially shocking this year because I was in South Carolina, and when I came back – BAM – cold, rainy weather. I have never been one of those people who looks forward to fall. Being someone who loves to be outside, I just find it much more enjoyable when the weather is warm. Sure it’s sometimes nice to curl up with a blanket on a cold night, but there are more than enough months for that here in Ohio. The one redeeming factor of fall is the promise of fall foods (well that and having an excuse to buy new boots). Actually these pumpkin muffins alone might actually be reason enough to look forward to the season.
I made these several times last year but they always went so fast I never had a chance to snap a picture. When I needed something to take into clinic for a “luncheon” we had planned, I was thrilled to make these again; both because I love them and because I knew I’d finally be able to share them with you all. Someone described them as a pumpkin roll in muffin form, and I’d have to say this is spot on, but these muffins might even be better because they have a streusel topping. Since I tend to be a late night baker, on more then one occasion I have started mixing only to remember that the cream cheese needs to freeze for a full 2 hours before you can bake with it. I tried it once without letting the cream cheese harden, and as soon at the cream cheese gets hot, it bubbles up right through the top of the muffin and spills onto the pan. Wasting cream cheese filling is pretty much an immortal sin, so plan ahead and mix up some cream cheese to put in the freezer right now. Then bring these muffins anywhere and you will become popular (but unfortunately they will not help you remember the bones in the hand.)

Pumpkin Cream Cheese Muffins
Makes 20-24 muffins
Ingredients
For the filling:
- 8 oz. cream cheese, softened
- 1 cup powdered sugar
For the muffins:
- 3 cups all-purpose flour
- 1 tsp. ground cinnamon
- 1 tsp. ground nutmeg
- 1 tsp. ground cloves
- 1 tbsp. plus 1 tsp. pumpkin pie spice
- 1 tsp. salt
- 1 tsp. baking soda
- 4 large eggs
- 2 cups sugar
- 2 cups pumpkin puree
- 1¼ cups vegetable oil
For the topping:
- ½ cup sugar
- 5 tbsp. flour
- 1½ tsp. ground cinnamon
- 4 tbsp. cold unsalted butter, cut into pieces
To prepare the filling, combine the cream cheese and powdered sugar in a medium bowl and mix well until blended and smooth. Transfer the mixture to a piece of plastic wrap and shape into a log about 1½-inches in diameter. Smooth the plastic wrap tightly around the log, and reinforce with a piece of foil. Transfer to the freezer and chill until at least slightly firm, at least 2 hours.
To make the muffins, preheat the oven to 350˚ F. Line muffin pans with paper liners. In a medium bowl, combine the flour, cinnamon, nutmeg, cloves, pumpkin pie spice, salt and baking soda; whisk to blend. In the bowl of an electric mixer combine the eggs, sugar, pumpkin puree and oil. Mix on medium-low speed until blended. With the mixer on low speed, add in the dry ingredients, mixing just until incorporated.
To make the topping, combine the sugar, flour and cinnamon in a small bowl; whisk to blend. Add in the butter pieces and cut into the dry ingredients with a pastry blender or two forks until the mixture is coarse and crumbly. Transfer to the refrigerator until ready to use.
To assemble the muffins, fill each muffin well with a small amount of batter, just enough to cover the bottom of the liner (1-2 tablespoons). Slice the log of cream cheese filling into 24 equal pieces. Place a slice of the cream cheese mixture into each muffin well. Divide the remaining batter among the muffin cups, placing on top of the cream cheese to cover completely. Sprinkle a small amount of the topping mixture over each of the muffin wells.
Bake for 20-25 minutes. Transfer to a wire rack and let cool completely before serving.
Source: Annie’s Eats
Blueberry Crumble Coffee Cake

I can hardly believe it but Friday marks the end of my third year of medical school! I can remember at the beginning of this year wondering how I was ever going to make it- “working” at the hospital everyday on top of studying for standardized exams every five weeks, and trying to live a somewhat normal life on top of it. Then before I even had time to get really stressed out about it – it’s over! Not complaining one bit :-). I am finishing up the year with pediatrics, which quite to my surprise turned out to be one of my favorite rotations of the year. I have never been one of those people who thinks, “Awwwwwwwwww, little kids are sooooooooo cute.” In fact, I kind of grouped those people into the “lovers of unicorn and all things rainbow” that I just didn’t fit in with. However, in retrospect I realize that I had never really spent enough time with the little ones in order to make such a judgement. Little kids are pretty amazing little people, and they definitely do say the darndest things. And also, children’s hospitals = 1000x cooler than adult hospitals.
So in order to commemorate the end of another very good rotation, I decided to make coffee cake for the office to enjoy. I wanted something summery yet decadent and something that would work equally well for both breakfast and dessert. I think this cake hit the nail on the head. The lemon in the batter gives it a fresh appeal, and the streusel topping makes it a crumbly delight. I really thought this cake was over the top good – and based on the number of people at the office that asked for the recipe, I’m pretty sure I’m not alone. The only thing I might change for the future is to make individual serving sizes. I think it would work well in a muffin tin – just make sure you equally distribute the amazing streusel, otherwise you might cause some fights (at least when there are little kiddos involved).

Blueberry Crumble Coffee Cake
Makes a 9-inch round cake
For the Streusel:
- 1/4 cup granulated sugar
- 1/3 cup light brown sugar, lightly packed
- 1 teaspoon ground cinnamon
- 1/8 teaspoon ground nutmeg
- 1/4 pound (1 stick) unsalted butter, melted
- 1 1/3 cups all-purpose flour
For the Cake:
- 6 tablespoons unsalted butter, at room temperature (3/4 stick)
- 3/4 cup granulated sugar
- 2 extra-large eggs
- 1 ½ teaspoons pure vanilla extract
- zest from 1/2 a lemon
- 2/3 cup sour cream
- 1 1/4 cups all purpose flour
- 1 teaspoon baking powder
- 1/4 teaspoon baking soda
- 1/2 teaspoon kosher salt
- 1 cup fresh blueberries
Directions:
Preheat the oven to 350 degrees F. Butter and flour a 9-inch round baking pan.
For the Streusel: Combine granulated sugar, brown sugar, cinnamon and nutmeg in a bowl. Stir in melted butter, then flour and mix well.
For the Cake: In a stand mixer, cream butter and sugar on high speed for 4-5 minutes, until light. Reduce speed to low to add the eggs, then add the vanilla, lemon zest, and sour cream. In a medium bowl, sift together the flour, baking powder, baking soda, and salt. With the mixer on low speed, add the flour mixture to the batter until just combined. Fold in the blueberries and stir with a spatula to evenly mix in berries. Spoon the batter into the prepared pan and spread with a knife to level the top. With your fingers, crumble all the topping evenly over the batter. Bake for 40 to 50 minutes, until a cake tester comes out clean. Cool completely and serve. Sprinkle with powdered sugar if desired.
Barely Adapated from Barefoot Contessa (Ina Garten)
Blueberry Yogurt Multigrain Pancakes

While I don’t really consider myself a breakfast person, getting up before 5 AM has a way of turning anyone into a breakfast person. I’ve found that after 10 weeks of surgery, my ability to sleep in past 10 am on the weekends has seriously diminished. When you’re used to waking up at 4:45, suddenly 8 am becomes a reasonable sleep in and when you find yourself with a whole morning to fill with weekend fun, it doesn’t get much better than a morning run followed by breakfast.
One of my biggest qualms with normal brunch food is that I feel like it sets me up for a day of feeling stuffed, tired and overall unhealthy. Breakfast is the one meal of the day where I always try to have some protein, fiber and fruit – and pancakes with syrup doesn’t really fit the bill. But these pancakes. These pancakes are an entirely different story. Multigrain = fiber. Blueberries = fruit . Yogurt = protein (and calcium!). And to make it even better, I think my favorite part about these pancakes is that they are divine with a dollop of yogurt and a slight drizzle of honey – no butter or syrup needed. I had actually gotten the butter dish out, just in case, and had to laugh out loud when John goes “Why did you even get the butter out for these pancakes?” If you understand John’s obsession with butter, you will understand how shocking this statement was.
These are also quite simple to make, and I’ve made them several weekends in a row. I tried them with some chopped frozen rasberries, and the combination of raspberries + lemon is also really out of this world. If you are looking for something fun, easy and festive to make for Mother’s Day, look no further. I’m pretty sure all Mom’s will appreciate something that is both delicious and healthy for breakfast.

Blueberry Yogurt Multigrain Pancakes
Makes about 6-8 large pancakes (Feeds 3-4)
- 2 large eggs
- 1 cup plain or vanilla yogurt, (fat free, low fat or greek yogurt are fine)
- 2 -3 tablespoons milk, plus more depending on preference
- 3 tablespoons butter, plus extra for buttering skillet
- 1/2 teaspoon lemon zest
- 1/2 teaspoon vanilla extract
- 1/2 cup whole wheat flour
- 1/2 cup all-purpose flour
- 1/4 cup barley or rye flour
- 2 tablespoons sugar
- 1 tablespoons plus 1 teaspoons baking powder
- 1/2 teaspoon table salt
- 1 cup blueberries, frozen, or rinsed and dried
- Yogurt and Honey for serving
Melt half of butter. Remove from heat and stir in second tablespoon of butter until melted. This helps to cool the butter to room temperature before adding it to the other ingredients.
Whisk egg and yogurt together in the bottom of a medium/large bowl. Add in 2-3 Tablespoons milk.. If you’re using a thick yogurt, 1-2 more Tablespoons of milk. Whisk in melted butter, zest and vanilla extract. In a separate, small bowl, combine flours, sugar, baking powder and salt. Stir dry ingredients into wet only until dry ingredients are moistened. A few remaining lumps is fine. Batter will be thick.
Preheat your oven to 200°F and have a baking sheet ready (to keep pancakes warm). Heat your skillet or saute pan to medium. Melt a pat of butter in the bottom and ladle 1/3 – 1/2 cup of batter at a time. Press a few berries into the top of each pancake. The batter is on the thick side, so you will want to use your spoon or spatula to gently nudge it flat, or you may find that pressing down on the berries does enough to spread the batter. When a few bubbles on the pancakes rise to the surface and pop, (about 3-4 minutes), flip them and cook for another 3 minutes, until golden underneath. . Transfer pancakes to warm oven as they are done cooking, where you can leave them there until you’re ready to serve them.
Serve in a big stack, with yogurt and honey.
French Croissants

Before you go running away by the long list of seemingly complicated steps that are involved in this recipe, let me tell you a story. I actually did the same thing when I saw Annie‘s post about homemade croissants. I thought to myself, seriously, who has the time (or desire) to do all that! And yet here I am, telling you about homemade croissants. See, a funny thing happened. It was called Christmas vacation. After I saw that homemade croissants made the list of one of Annie’s favorite things from her entire year of hundreds of recipes, I started to think of them in a different light. Then came a whole week of free time and a house full of people to feed on New Years morning, and croissants suddenly started to seem like a good idea. And it turned out to be such a good idea that I felt the need to make them again last weekend. Do they take more time then buying them at the store? Yes. But do they taste like no other baked good you’ve ever made before? Yes.
About half way through making this recipe, I feared the croissants would turn out like those crescent rolls that come in a tube. Then something magical happened in the baking process, and flakey, buttery, French goodness arose. I was so excited watching these puff up and golden in the oven, and I think our guests were even more excited about the final result. Everyone loved these. I can’t wait to make them again in the future. They are best eaten shortly after they come out of the oven, but they are still wonderful the next day (they’d probably last a few more days – if you don’t eat them immediately). While I didn’t include instructions for freezing, I believe the best times to attempt freezing would be after the second lamination of the dough, or after the final shaping of the croissants. If you try this, I would love to know how freezing turned out!

French Croissants
Makes 12 large croissants
For the dough:
- 3 cups (15 oz) all purpose flour, plus more for dusting
- 1 tablespoon instant yeast
- 1/4 cup sugar
- 1¼ tsp. salt
- 1¼ cups whole milk, cold (or use 1 cup skim with 1/4 cup whipping cream)
- 2 tablespoons unsalted butter
For the butter square:
- 24 T. (3 sticks) unsalted butter, cut into 1-tablespoon pieces and kept cold
- 2 T. all purpose flour
Egg wash:
- 1 large egg, lightly beaten
To make the butter square, toss flour and butter together. Using the blade of a large knife or a bench scraper work the butter back and forth until it is smooth and homogenous. It will be sticky. Wrap in plastic wrap, flatten the butter into a 7×7 inch square. Refrigerate for at least 30 minutes.

Once the dough has chilled, remove it from the fridge and roll out on a floured work surface into an 11 by 11 inch square. (It may seem small but it will complement the butter square perfectly).

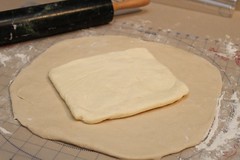
Place the chilled butter square diagonally on the 11-inch dough square.
Fold the edges of the dough up around the butter so that they meet in the middle.

Pinch the dough seems to seal.

Tap the center of the dough square with a rolling pin in order to soften the butter, and roll the dough into a 14 inch square. Make sure to flour the surface as you go so the dough doesn’t stick.

Fold the dough into thirds to form a long rectangle.

Then starting at the short ends, fold the dough again into thirds.

At this point wrap the dough in plastic wrap and refrigerate for 2 hours, or longer.
Repeat this process again- roll dough into a 14 inch square, fold into thirds, then fold into thirds again. Rewrap in plastic wrap and refrigerate for another 2 hours, or longer. (I usually do the above steps the day before, and save the steps below for the morning in which the croissants will be served. I believe you could stop at this point and freeze the dough, or half of the dough, but I have not tried this myself.)
Remove the folded dough from the fridge and divide in half. (You could also roll the dough into one very large 20×20 inch rectangle but I found half of the dough more manageable)

Roll one of the 2 dough pieces into a 10×20 inch rectangle.

Then cut the 10×20 inch rectangle into thirds, so that each section is just shy of 7 inches. Then cut each rectangle in half diagonally.

Take one triangle, and stretch the dough slightly so that each long side of the triangle is about equal in length. Cut a 1-inch slit in the bottom of the triangle and roll until the tip of the triangle.

Place croissants on a baking sheet lined with parchment or a silicon baking mat, and fold the edges of the dough next to each other to create a crescent. Repeat with remaining dough. Cover with plastic wrap and let rise until puffy, about 45 minutes. At this point preheat the oven to 400°.

Brush croissants with egg wash bake in a preheated oven until the golden brown, about 18-22 minutes, rotating pans half way through baking.

Allow to cool on a wire rack for several minutes. Store airtight at room temperature for up to 2 days or wrap well and freeze. Reheat in a 300˚ F oven for 5-10 minutes.

Source: Annie’s Eats, as adapted from Baking Illustrated
Baked Oatmeal with Fruit

You can really ask anyone who knows me – I’m not much of a breakfast person. It used to be the standing joke that John would go out to breakfast with our friend Amanda and order and entire platter of biscuits plus other breakfast monstrosities, while I would go on a 20 mile run. It’s not that I don’t love breakfast food, I just don’t like eating it in the morning. Sometimes I wish that people went out to brunch for dinner. I would most certainly order a plate full of pecan waffles, slather them with syrup and not feel guilty at all about eating what is basically a dessert and counting it as dinner. However, I just don’t like doing this for breakfast.
On any given weekday, I’m franticly trying to get out the door, half dressed and planning to put my makeup on at stoplights on my way to school. Breakfast is usually a granola bar I grab as I’m running around like a chicken with my head cut off. So the fact that I have eaten a warm breakfast everyday for the last 2 weeks must tell you that something is up. I don’t want to go so far as to say this oatmeal has changed my life, but after all they do say a good breakfast is the start to a good day and I have had a very good past 2 weeks.
This dish has taken the reigns as the best oatmeal I have ever eaten, and this is coming from someone who usually eats oatmeal all winter. It’s moist, flavorful and filled with fruit. The flavor of the toasted pecans really come through, so don’t try to save yourself a step by tossing them in un-toasted. It’s a well balanced meal and it keeps you full a lot longer than a granola bar. I think that perhaps the best thing about this oatmeal is that you can make a batch and easily reheat it for breakfast for the rest of the week. Since I have no desire to get up earlier than necessary to make myself food, I have made this on Sunday night the last 2 weeks and then reheated it throughout the week. I ate it 5 days later and it still tasted great. I plan on making this many more times as the weather gets colder, and I can’t wait to experiment with an apple or pumpkin flavor. I’ll be sure to share those with you as soon as I’ve got the recipe down :-)!

Baked Oatmeal with Fruit
– Make a 1 & 1/2 quart casserole (4-6 servings)
- 1 cup old fashioned rolled oats
- 1/3 cup pecans, light toasted then chopped
- 1/2 teaspoon baking powder
- 3/4 teaspoon ground cinnamon
- pinch of salt
- 1/4 cup maple syrup
- 1 cup milk (I used skim)
- 1 large egg
- 2 T. butter, melted
- 1 teaspoon vanilla extract
- 2 ripe bananas, sliced into 1/2 inch pieces
- 1 cup blueberries and/or raspberries
1. Preheat oven to 375°. Grease a 1 & 1/2 quart casserole with butter or cooking spray.
2. In a medium bowl toss together oats, pecans, baking powder cinnamon and salt (dry ingredients).
3. In a small bowl whisk together the liquid ingredients reserving 1 T. of butter (maple syrup, milk, egg, 1 T. butter and vanilla).
4. Line the bottom of the baking dish wish sliced bananas. Then top with about 2/3 of the blueberries and/or raspberries.
5. Spread the oat mixture over the fruit. Drizzle the milk mixture over the oats, trying to distribute as evenly as possible.
6. Bake the oatmeal for 35-45 minutes. Remove from oven and top with remaining 1 T. of butter.
7. Dish can be served straight from the oven and topped with additional toppings if desired. (I didn’t find this necessary). Alternatively, this can be made, refrigerated and individual pieces can be reheated in the microwave for about 1 – 1 1/2 minutes.
Slightly Adapted from The Curvy Carrot, originally from Super Natural Everyday by Heidi Swanson
Blueberry Scones

Believe it or not, I used to order scones from coffee shops because I thought they were a healthy option. In my defense, they always tasted so dry that I figured they must be healthy. After making these scones, I realized that they don’t exactly get the title of “healthy” but at the same time, they are way tastier than their coffee shop counterparts. Plus making them gives you the right to talk in a fake British accent and pretend you’re Kate Middleton for the day.
While these scones might you feel like British Royalty, they are great for another reason – you can freeze them unbaked, and then bake them from a frozen state. This is a great option if you want to impress some overnight guests without having to wake up at 4 am. Just flash freeze them individually on a baking sheet,wrap, and store in a freezer bag until ready to use.
The only tricky thing with making these is that the dough is a little sticky. I found that forming the dough into a rough square, and cooling it in the freezer for 10 minutes really helped the consistency. I also added quite a bit of flour, but try not to add too much or you might run into the dreaded dryness of a coffee shop scone. This recipe, as shown only makes 8 scones, so I think next time I will double it, and bake one batch to eat, while keeping the others un-baked in the freezer for a later date.

Blueberry Scones
Makes 8 scones
- 8 tbsp. (1 stick) unsalted butter, frozen whole
- 1½ cups fresh blueberries (slightly less than 1 pint container)
- ½ cup whole milk (or see my post tomorrow on good substitues for whole milk)
- ½ cup sour cream
- 2 cups (10 oz.) all-purpose flour, plus more for dusting the work surface
- ½ cup sugar
- 2 tsp. baking powder
- ¼ tsp. baking soda
- ½ tsp. salt
- zest of half a lemon (or 1 heaping teaspoon)
- For Topping: 2 T. butter, melted and Sugar for sprinling
If you plan on baking the scones immediately, preheat oven to 425˚ F. Wash and dry the blueberries and place in the freezer until needed.
Grate the frozen butter on the holes of a large box grater. In a small bowl, whisk together the milk and sour cream; refrigerate until needed.

In a larger bowl, combine flour, ½ cup sugar, baking powder, baking soda, salt and lemon zest. Whisk to combine. Add the grated butter to the flour mixture and toss with fingers until thoroughly coated.

Add the milk mixture to the dry ingredients and fold with a spatula just until combined. Transfer the dough to a generously floured work surface. Dust the top of the dough with flour, and knead with well floured hands, 6-8 times, just until the dough holds together in a ragged ball. Form the dough into a rough square, and place on a floured plate to chill in the freezer for 5-10 minutes.
Return the dough to the floured work surface and roll into an approximately 12-inch square. Sprinkle the blueberries evenly over the surface of the dough, and gently press down so that they are slightly embedded in the dough surface. Roll the dough up to form a tight log, so that the blueberries are in the center. Lay the log seam side down and press the the log into a 12 by 4-inch rectangle. Using a sharp knife, cut the rectangle crosswise into 4 equal rectangles. If your knife gets sticky, try flouring it. Cut each rectangle diagonally to form 2 triangles. Transfer to a parchment or silpat lined baking sheet.


If you are going to freeze these, flash freeze on a baking sheet for 20 minutes, then wrap individually and store in a freezer bag until needed. To bake, brush the tops of the scones with melted butter and sprinkle with sugar. Bake for 18-25 minutes (slightly longer if baking from a frozen state). Let cool on a wire rack before serving.

Slightly adapted from Annie’s Eats, Originally from Cook’s Illustrated Entertaining
Peanut Butter Banana Bread

Studying all day can get a little old – so I really needed a change in my routine. I figured something new for breakfast would be a start. I secretly bought more bananas then we could eat, hoping some would end up “banana bread worthy” by the end of the week. And after avoiding the bananas all week, there were 4 bananas left on their last leg by Friday. Since I plan on eating this bread for breakfast, I figured what would be better than adding a little peanut butter to boost the protein, and the flavor. I found this recipe on Joy’s blog, which also happened to call for ground flax seed – more protein, more fiber – good stuff. After finishing off the raspberry bars in a ridiculously short time, I decided I needed to make a snack with a little more sustenance.

Then of course I had to go and ruin a perfectly healthy morning breakfast by adding chocolate chips to the batter. They were calling my name from the pantry, and I just couldn’t resist. I didn’t add too many. Promise. But really you could eat it for dessert if you so desire. You could also try adding butterscotch chips, or peanuts, or walnuts – or whatever happens to be calling your name from your pantry. I think next time I’m going to put both chocolate chips AND chopped peanuts – because I really love that peanut flavor. That’s one of the reasons this recipe calls for natural peanut butter – it has a much stronger peanut flavor than Jif.
This is a quick bread, and rightly named. It doesn’t take much time to make, and you don’t even need to get the mixer out. It’s pretty much just through all the ingredients in a bowl, mix, and bake. It’s moist and flavorful enough to eat just plain, but of course John likes to add butter to his.
Peanut Butter Banana Bread (with Chocolate Chips)
- 1 1/2 cups mashed ripe bananas (about 4)
- 1/3 cup plain or vanilla fat free yogurt
- 1/3 cup creamy all-natural peanut butter
- 3 tablespoons butter, melted
- 2 large eggs
- 1/2 cup granulated sugar
- 1/2 cup brown sugar
- 1 1/2 cups all purpose flour (or 1 cup whole wheat flour + 1/2 cup all purpose)
- 1/4 cup ground flaxseed meal
- 3/4 teaspoon baking soda
- 1/2 teaspoon salt
- 1 scant teaspoon cinnamon
- pinch of allspice
- 1/2 cup chocolate chips, or chopped peanuts
Preheat oven to 350°. Grease a 9×5 loaf pan.
In a large bowl, combine all the wet ingredients – bananans, yogurt, peanut butter, melted butter, and eggs. Mix with a wisk. Then add the brown and granulated sugar and stir.
Then add the flour, flaxseed, baking soda, salt, cinnamon and allspice to the wet ingredients. (You could also mix the dry ingredients separately in another bowl to start, but I don’t think it’s necessary).
Mix until no lumps remain and then stir in chocolate chips, or your mix-in of choice.
Bake at 350° for 55-65 minutes or until a toothpick inserted in the center come out clean. Let cool slightly in the pan, and then remove from pan and cool on a wire rack. Removing the bread from the pan lets the air circulate, so moisture doesn’t condense in the crust – which can make the bread tough.

Check out those chocolate chips – yummmm.
Adapted from Joy the Baker, Originally adapted from Cooking Light
Cinnamon Sugar Pull Apart Bread

Have you ever made homemade cinnamon rolls? After receiving some delicious ones as a gift, we decided to give them a whorl ourselves this past Christmas. Yes, they were absolutely delicious – but they happen to be something that I’m not sure I can imagine myself making again. Just a little too much. Something I personally would prefer as a dessert , and with SO many wonderful options for dessert out there, cinnamon rolls wouldn’t be my first choice. It also probably had something to do with the fact that I think I ate 4 of them on Christmas morning and then felt like a dying sloth the rest of the day. So moral of the story, 4 cinnamon rolls = too much for me. But homemade cinnamon sugar pull apart bread = perfect.
This bread is really divine. It’s easier to make than cinnamon rolls, it’s unique and it uses ingredients I had around the house. I adapted it slightly from Joy’s original recipe, only because I almost never buy whole milk, and I hate buying it for the 1/2 cup that a lot of recipes call for. I know a lot of people just substitute skim – but I think of baking as a science, and I don’t like to mess with science. When you really think about it, skim milk even looks a lot different than whole milk. No milk mustache with skim. So I figured, what could I combine with skim milk to give me a milk mustache? Yogurt! The recipe came out great, even with fat free yogurt – but if you happen to have whole milk, just use 1/3 cup of it instead of the 1/4 cup milk and 2 T. yogurt.
Cinnamon Sugar Pull Apart Bread
- 2 3/4 cup flour + more for rolling
- 1 packet (2 1/4 teaspoons) quick rise yeast
- 1/4 cup sugar
- 1/2 teaspoon salt
- 4 T. butter (1/2 stick)
- 1/4 cup skim milk
- 2 T. plain fat free yogurt
- 1/4 c. water
- 1 teaspoon vanilla
- 2 eggs, slightly beaten
- 4 T. butter, melted and browned in a frying pan (about 5 minutes on medium)
- 1 cup sugar
- 2 teaspoons cinnamon
- 1/2 teaspoon nutmeg
In a large bowl, stir together flour, yeast, sugar and salt.

In a small saucepan over medium-low heat, warm butter, milk and yogurt, until butter is just melted. Remove from heat, add water and vanilla and let cool for 3 minutes.

Using a spatula, stir the milk mixture into the flour mixture. Then add the eggs, and continue to stir with the spatula. Dough will be very sticky, but avoid trying to knead it with your fingers like I did.

If you must, add a little bit of flour. Just so that you can form the dough into some resemblance of a ball. This dough should be sticky so try not to overdo it on the flour.
Once formed into ball, place in a well greased bowl. Cover with plastic wrap and let rise in a warm place for 1 hour.
Once about doubled in size, place dough ball onto a lightly floured surface, and roll into a rectangular shape, about 22 x 14. ***Alternatively, you could refrigerate the dough ball at this point, and do the remaining steps the next day. (A good plan if you want this for breakfast).

Mix the sugar, cinnamon and nutmeg in a small bowl. Spread the browned butter over the surface with a brush, then sprinkle sugar mixture all over the dough. (It seems like a lot of sugar – but it’s worth it).

Cut the rectangle into 6 equal strips.
Then lay the strips on top of each other, and cut again into 6 pieces.

Place the pieces in a well greased 9×5 loaf pan. Cover and let rise for 30 minutes more.

Bake at 350 for 30-35 minutes. You might need to cover the top with tin foil to keep it from overbrowning. Remove pan from the oven, let rest for 20 minutes, then slide a knife around the edges to loosen the loaf. Remove from pan and serve warm.

Slightly adapted from Joy the Baker
Healthy Granola

I’ve really been trying to eat more yogurt, and more fruits and vegetables. It’s not that I don’t like these things, in fact I actually really love them – its just that sometimes I forget how good they are. I figured having granola around would be a perfect way to insure I’d eat both yogurt and fruit in the morning. If I have some awesome granola in the pantry, how could I pass up a fruit, yogurt and granola parfait for breakfast?
I’ve tried a bunch of granola and I’ve learned that some granola should actually be in the grocery store right next to the “Cookie Crisps” cereal, because it offers about the same nutritional value. I’ve got nothing against Cookie Crisps, but if your trying to make yourself a healthy breakfast, don’t be tricked by some “healthy” granola impostor at the store. This granola actually is healthy, and the flax seed really helps to up the nutritional value. Flax seed adds some fiber, and it’s the best source of Omega-3 fatty acids you can get – but you barely notice it’s there. You could definitely try upping the amount used if you’re feeling adventurous. I found mine in the same aisle as the flour, and it’s sold at most grocery stores. A lot of granola recipes call for dried fruit, but since I tend it eat this with yogurt and fruit anyways, I like mine plain.
Healthy Granola
- 5 1/2 cups old-fashioned oats
- 1 3/4 cup sliced or slivered almonds
- 3/4 teaspoon salt
- 1 1/2 teaspoons cinnamon
- 1/2 teaspoon ginger
- 1/3 cup flax seed, milled
- 3/4 cup brown sugar
- 3/4 cup applesauce
- 1/4 cup honey
- 1 Tablespoon vegetable oil
Preheat oven to 300º. Mix the brown sugar, honey, applesauce and oil in a small bowl or a measuring cup. In a large bowl, stir together oats, almonds, salt, cinnamon, ginger and flax seed. Add the applesauce mixture to the dry ingredients and stir to moisten all the oats.
Spray a cookie sheet with cooking spray, and spread the granola evenly on the sheet. Place in the oven for 30 minutes, then remove, and flip the granola using a spatula, cook for 20-25 minutes more. Remove from oven, and let cool on the cookie sheet. It will still seem a little moist when you first removed it from the oven, but will crisp more as it cools.

