
French Croissants

Before you go running away by the long list of seemingly complicated steps that are involved in this recipe, let me tell you a story. I actually did the same thing when I saw Annie‘s post about homemade croissants. I thought to myself, seriously, who has the time (or desire) to do all that! And yet here I am, telling you about homemade croissants. See, a funny thing happened. It was called Christmas vacation. After I saw that homemade croissants made the list of one of Annie’s favorite things from her entire year of hundreds of recipes, I started to think of them in a different light. Then came a whole week of free time and a house full of people to feed on New Years morning, and croissants suddenly started to seem like a good idea. And it turned out to be such a good idea that I felt the need to make them again last weekend. Do they take more time then buying them at the store? Yes. But do they taste like no other baked good you’ve ever made before? Yes.
About half way through making this recipe, I feared the croissants would turn out like those crescent rolls that come in a tube. Then something magical happened in the baking process, and flakey, buttery, French goodness arose. I was so excited watching these puff up and golden in the oven, and I think our guests were even more excited about the final result. Everyone loved these. I can’t wait to make them again in the future. They are best eaten shortly after they come out of the oven, but they are still wonderful the next day (they’d probably last a few more days – if you don’t eat them immediately). While I didn’t include instructions for freezing, I believe the best times to attempt freezing would be after the second lamination of the dough, or after the final shaping of the croissants. If you try this, I would love to know how freezing turned out!

French Croissants
Makes 12 large croissants
For the dough:
- 3 cups (15 oz) all purpose flour, plus more for dusting
- 1 tablespoon instant yeast
- 1/4 cup sugar
- 1¼ tsp. salt
- 1¼ cups whole milk, cold (or use 1 cup skim with 1/4 cup whipping cream)
- 2 tablespoons unsalted butter
For the butter square:
- 24 T. (3 sticks) unsalted butter, cut into 1-tablespoon pieces and kept cold
- 2 T. all purpose flour
Egg wash:
- 1 large egg, lightly beaten
To make the butter square, toss flour and butter together. Using the blade of a large knife or a bench scraper work the butter back and forth until it is smooth and homogenous. It will be sticky. Wrap in plastic wrap, flatten the butter into a 7×7 inch square. Refrigerate for at least 30 minutes.

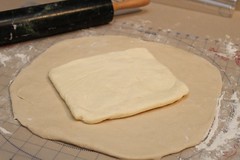
Once the dough has chilled, remove it from the fridge and roll out on a floured work surface into an 11 by 11 inch square. (It may seem small but it will complement the butter square perfectly).

Place the chilled butter square diagonally on the 11-inch dough square.
Fold the edges of the dough up around the butter so that they meet in the middle.

Pinch the dough seems to seal.

Tap the center of the dough square with a rolling pin in order to soften the butter, and roll the dough into a 14 inch square. Make sure to flour the surface as you go so the dough doesn’t stick.

Fold the dough into thirds to form a long rectangle.

Then starting at the short ends, fold the dough again into thirds.

At this point wrap the dough in plastic wrap and refrigerate for 2 hours, or longer.
Repeat this process again- roll dough into a 14 inch square, fold into thirds, then fold into thirds again. Rewrap in plastic wrap and refrigerate for another 2 hours, or longer. (I usually do the above steps the day before, and save the steps below for the morning in which the croissants will be served. I believe you could stop at this point and freeze the dough, or half of the dough, but I have not tried this myself.)
Remove the folded dough from the fridge and divide in half. (You could also roll the dough into one very large 20×20 inch rectangle but I found half of the dough more manageable)

Roll one of the 2 dough pieces into a 10×20 inch rectangle.

Then cut the 10×20 inch rectangle into thirds, so that each section is just shy of 7 inches. Then cut each rectangle in half diagonally.

Take one triangle, and stretch the dough slightly so that each long side of the triangle is about equal in length. Cut a 1-inch slit in the bottom of the triangle and roll until the tip of the triangle.

Place croissants on a baking sheet lined with parchment or a silicon baking mat, and fold the edges of the dough next to each other to create a crescent. Repeat with remaining dough. Cover with plastic wrap and let rise until puffy, about 45 minutes. At this point preheat the oven to 400°.

Brush croissants with egg wash bake in a preheated oven until the golden brown, about 18-22 minutes, rotating pans half way through baking.

Allow to cool on a wire rack for several minutes. Store airtight at room temperature for up to 2 days or wrap well and freeze. Reheat in a 300˚ F oven for 5-10 minutes.

Source: Annie’s Eats, as adapted from Baking Illustrated
Coffee Ice Cream with Chocolate Chunks

I have been wanting an ice cream maker all summer (or maybe even all my life), but I faithfully waited until my birthday hoping to get one. I did get some really wonderful presents, but an ice cream maker wasn’t one of them. I may or may not have had a slight freak out about this incident which may or may not have precipitated an emergency run to the store on my birthday to pick one up. Basically you don’t want to mess with me and ice cream. Needless to say, now I have an ice cream maker ;-).
My first order of business with my new toy was a raspberry ice cream with large chocolate chunks. While the recipe stated that it made about one quart, about 5 minutes into churning there was ice cream pouring out of the top of the 1 1/2 quart machine. It really didn’t freeze and while it didn’t taste awful, I ended up having to throw it out.
However once we got back from vacation I was determined to tackle the infamous French ice cream. I poured through “The Perfect Scoop”, looking for the perfect ice cream, an I finally decided on coffee ice cream because it’s John’s favorite and I liked that it would perfectly complement some large chocolate chunks. I will warn you in advance that this ice cream is VERY coffee flavored. This is in part due to the fact that I ended up steeping the coffee beans with the milk for several hours while I was running errands, so if you want a milder flavor, steep the beans for a shorter period of time. With the chocolate chunks, I was trying to replicate the famous Grater’s ice cream, but I found that they were slightly more hard than I would’ve liked. If you are brave enough you can add extra oil to the chocolate, which will keep it softer in the ice cream. You could also try making truffles and adding them to the ice cream, but I was trying to keep it simple.
Coffee Ice Cream with Chocolate Chunks
– Makes about 1 quart
- 1 -1/2 cups whole milk
- 3/4 cup sugar
- 1 -1/2 cups whole coffee beans
- Pinch of salt
- 1- 1/2 cups heavy cream
- 5 large egg yolks
- 1/4 teaspoon vanilla extract
- 1/4 teaspoon ground coffee
For the Chocolate chunks
- 4 oz dark chocolate (60% cacoa)
- 1 T. vegetable oil
1. Begin by warming milk, sugar, coffee beans, salt and 1/2 cup of heavy cream in a saucepan. Once warmed through, cover, remove from heat and let steep at room temperature for about 1 hour. If you’d like a stronger flavor, continue to steep in the refrigerator for 2-4 more hours.

2. Rewarm the coffee bean-milk mixture. Pour the remaining 1 cup of heavy cream in a large bowl and set a large fine mess sieve over top.

3. In a separate medium bowl, whisk together the egg yolks. 
4. Slowly pour the warm coffee bean-milk mixture into the egg yolks, whisking constantly in order to temper the yolks. Then scrape the warmed egg yolk mixture with coffee beans back into the saucepan.


5. Stir the mixture constantly over medium heat with a heatproof spatula, scraping the bottom as you stir. The mixture should thicken and coat the spatula. If you have a reliable thermometer, the temperature should be 170-175° when the custard is done.

6. Once the custard is thick, pour it through the strainer into the cream and stir. Press on the coffee beans to extract as much flavor as possible, then you can discard the beans. Mix in vanilla and finely ground coffee and stir until cool. To cool the ice cream more quickly, you can place the bowl in an ice bath in the sink and continue to stir.


7. To make the chocolate chunks, melt chocolate and oil in the microwave. Stir to mix and then poor mixture onto a rimmed plate. Cool in the freezer until hard. Break the chocolate into chunks and keep cold until ready to use in the ice cream.
8. Chill the milk mixture in the refrigerator and then freeze according to your ice cream maker’s instructions. When there are about 5 minutes left of freezing time, add the cold chocolate chunks and allow them to mix in. Make sure to chill the bowl adequately before churning the ice cream (most machines required 20+ hours of chilling time). Store ice cream in an air tight container in the freezer.

Adapted from The Perfect Scoop by David Lebovitz
Royal Icing – Recipe and Tutorial


So maybe St. Patrick’s day isn’t considered a major holiday for most people, but those people didn’t grow up in my family. In my (half) Irish family, St. Patty’s day is probably the next big holiday after Thanksgiving and Christmas. I had been wanting to decorate St. Patty’s day cookies pretty much since I finished the Valentine’s Day ones. It worked out perfectly, because my festive mother was here to help me decorate them! I mentioned earlier that I really wanted to try to get good enough at royal icing to post a “How to” – and I think I have just about reached that point. I’ve made it enough times now that I have it down to a science. It’s kind of addicting, so be careful. My mom and I are already planning next year’s St. Patty’s Day cookie decorating, and we were even brainstorming about Easter….
A lot of people wonder – “Why use royal icing?….Doesn’t buttercream taste better?”. And I’ll say, yes if you are eating icing by itself, buttercream is definitely the way to go – but with a buttery cookie underneath royal icing adds a perfect amount of sweetness without being too rich. Plus the royal icing seals in the moisture of the cookie, so your cookies can be made ahead of time, and will last a lot longer. More importantly, it’s just not possible to decorate with buttercream the way you can with royal icing. Ever wonder how professional cookies get that completely smooth surface with multiple colors and no “spread marks”? That’s right – they use royal icing.
So here’s the recipe, followed by a long tutorial. I tried to include as many pointers as possible, but for the most part you can figure out what to do looking at the pictures.
Royal Icing
- 4 cups Powdered Sugar (About 1 Pound)
- 2 Tablespoons Meringue Powder
- 5 Tablespoons Water (to start)
Combine all ingredients in the bowl of a stand mixer. Mix on low (Speed 2 or 4) for 7-10 minutes, or until the sheen has disappeared and the icing has a matte appearance. It will be too thick to use at this point so you will be adding more water later; however, getting it to this texture makes a difference in the final product.
How to Decorate with Royal Icing
- 1 -2 batches of Royal Icing and Sugar Cookies
- Small plastic containers with lids
- Pastry Bags (I like disposable so you don’t have to clean them)
- Couplers and Decorating Tips (I use size 3)
- Toothpicks
- Gel Food Coloring
- Miniature Squeeze bottle (optional)
First, start by planning out what colors you will want to use, and how much of each. For these cookies, I made 5 colors: Green, Light Green, Orange, Black, and White. According to color need, divide the white icing into the containers. Add about 1 additional teaspoon of water to each container. Stir to incorporate. You may need to add another teaspoon or 2 in order to get a good consistency for piping. The key is to get the icing thin enough that you can easily pipe a smooth line, but thick enough that the icing will still dry quickly.

Using toothpicks, add a little bit of gel food color and stir with a spoon. Continue adding color until you achieve the desired tint. For dark colors, like black or red, you will need a lot of gel.

Prepare your pastry bags by cutting about 3/4 of an inch from the tip. Place the coupler inside the bag, and secure the appropriate tip. I prefer size 3 for edging the cookies, but I used a mix of sizes 2-4, because that’s what I have. If you do not have pastry bags and tips , you can try using a ziploc bag and cutting the corner to make a VERY small hole. I only spent about $10 for all the couplers, tips and bags, but if you are only going to make these once, it might not be worth it.

Fold down the edges of the pastry bags, and using a spoon or knife, scoop the icing into the pastry bag. You only need a very small amount of icing to edge the cookies, but I think it’s easier to work with if you have a moderate amount of icing in the bag. Also, it’s easy to simply squeeze the left over icing back into the original container when you are finished.

Pipe the icing around the edges of each cookie to make an outline. To get the smoothest line possible you do not want the tip to be touching the cookie.


I think it’s better to work quickly and let the icing lie smoothy, than to try to get an absolutely perfect shape for the outline. If you look at these, some of the cookies have a smoother outline, and some are more squiggly.

Once the cookies are lined, squeeze unneeded icing back into the container. Now it’s time to thin the icing for flooding. Add 1 teaspoon water at a time to each icing, stirring after each addition. You want the icing to be thin enough that when a spoonful of it is poured back into the container, it takes about 4 seconds for it to disappear into the pool of icing. It is better to err on the side of too thick of icing than to thin. If you accidentally make the icing too thin, add a little bit of powdered sugar to get it back to a normal consistency.

You should now let the icing set for about 5 minutes in order to get the air bubbles to rise to the surface. The first time making this, I didn’t do this, and you end up with air bubbles on what was supposed to be your smooth surface cookie. Once the air bubbles have risen to the surface, gently stir the icing through once, just to pop them.

If you are using mini squeeze bottles, this would be the time to transfer the icing into the bottle. It’s easier to do if the icing is in a flexible plastic container, because you can bend the container to funnel the icing in. This was my first time using squeeze bottles, and it does make it a lot easier to flood the cookies, but it also makes one more thing to clean when finished.


Now flood the cookies. If you are using squeeze bottles, just squeeze it around the edges and move inward to fill the cookie in.


If you are not using squeeze bottles, spoon the icing onto the top of the cookie, and then spread it to the edges using a toothpick. 2 pointers: 1) If you spread the icing over just over the edge of the piping, it will help to blend the piping with the flooded icing. 2) It looks a lot better if you over-flood the cookies, so that the icing ends up creating a dome look on top of the cookie. If you under-fill them, the center will sink down and the outer edge piping will be very visible.


If you want to decorate the cookies with sprinkles, as I did with the pots of gold, it’s best to put this on while the icing is still wet. If you want to pipe a design on top of the cookies, it’s best to let the cookies dry for at least 45 minutes (or overnight). For the “plaid” effect on the cookies, I cleaned up while letting the cookies dry, and I just used the little bit of icing I had left in my pastry bags and piped perpendicular lines over several cookies in a row.

Let let the cookies dry for several hours or overnight before packing them up. The cookies should then be stored in an airtight container or cellophane bags. These cookies will last for at least a full week, and once the icing has dried, it is very sturdy. Therefore these cookies can be made in advance and are great for mailing.

Inspired by Annie’s Eats
Pizza Dough
I swear to you, I would not lie to you, this pizza dough is so easy and cheap to make that you will become addicted to it! I love it so much because you can make a big batch (which hardly takes anytime), and then freeze the dough into separate Ziploc bags to take out and use for an easy weeknight meal. Plus, it’s way better than the canned kind. I have been known to start a batch of this pizza dough at very odd times, like at the start of a movie, or after a movie, or in the middle of listening to a lecture (I love muli-tasking). But I find this to be the beauty of this dough – you can make it WHENEVER you want, and it will still taste great later!
This pizza dough is what I use with my Spinach and Ricotta Pizza that I posted about a week ago.
One thing I’d like to mention, GET A PIZZA STONE! I can’t tell you what a difference a pizza stone makes in homemade pizza! They are not that expensive, but if you don’t want to buy one, I’ve heard of people using clay tiles from a gardener’s shop as a cheap alternative. The pizza stone is crucial because as it preheats in the oven, it holds the oven’s heat. Then when you transfer your pizza onto the stone using parchment paper, the bottom of your crust gets cooked directly. This causes the crust to come out firm and crispy, even if you have a lot of watery, or heavy toppings (like vegetables).
Pizza Dough
– Makes enough for 2 pizzas (about 13 inches each)
- 1/2 Cup warm water + 1 1/4 cups room temperature water
- 1 Packet Yeast or 2 1/4 teaspoons (I use quick rise but I’m sure any would work)
- 4 cups (22 ounces) Flour* (Again, food scales are great for flour!)
- 1 1/2 teaspoons salt
- 2 Tablespoons Olive Oil
- Cooking Spray
*Bread flour is best for this recipe because it made from a high-gluten flour with barley added, which is specifically formulated to allow the yeast to work effectively. It gives a loftier texture and a certain softness. However, I often substitute all-purpose flour if that is what I happen to have on hand.
1. Combine the 1/2 cup warm water with the yeast in a 2 cup measuring cup and let sit for 5 minutes. You should see the yeast dissolving as it becomes activated.

2. Add the remaining 1 1/4 cups room temperature water to the yeast (I usually just add water from the faucet until the measuring cup reads a total of 1 3/4 cup). Also add the 2 Tablespoons of olive oil to the water.
3. Place the flour and salt in the bowl of a mixer fitted with the paddle attachement. With the mixer on low add the water mixture and stir until the flour has become moist. Then switch to the dough hook attachment.
4. Knead the dough on low (kitchen aid setting 2 or 4) until smooth and elastic, about 5-10 minutes.

5. Oil a large bowl using cooking spray. Remove the dough from the mixing bowl and place in the oiled bowl. Cover with plastic wrap.

6. Let the dough rise in a warm place for about 90 minutes or until doubled in size (I usually put mine on top of the stove, but depending on how warm your kitchen is it could take a little over 90 minutes).
7. Punch the dough down and then either…
- Freeze it: It is really important that you double wrap the dough with plastic wrap, and then put it in a Ziploc bag. The dough continues to rise even after you put it in the freezer – so if you don’t double wrap it, dough ends up leaking out of the plastic and gets exposed to the cold. When you want to use the frozen dough, put it in the fridge up to a day before, or put it out on the counter for few hours before you are ready to start cooking.
- Use it several hours or a day later: I recommend still wrapping it and putting it in the freezer. The yeast is really active in this dough and if you put it in the fridge it doesn’t slow the yeast down enough, so your dough continues to rise, and rise, and rise! The colder temperature of the freezer is enough to “hibernate” the yeast, and then after it has cooled sufficiently you can put it back into the fridge.
- Use it immediately: All you have to do is flour your work surface and roll it out into a circle. I do this on parchment paper so that it is easy to transfer to the oven. I will show you my rolling method when I make a pizza soon!

8. To Cook it: Preheat the oven with your pizza stone to 475 degrees for 30 minutes. Top your pizza as desired. Brush the outer crust with a little olive oil in order to help it brown. Bake for 10-15 minutes.
Recipe found at Annie’s Eats, and originally from the book Baking Illustrated (which is a cookbook I’m hoping to add to my collection soon!)
Homemade (and easier than you’d think) Pita Bread

 For some reason, I have a problem with leftovers. I’m not really sure when it started, but it seems that every time I make something for dinner, I never eat the leftovers. John told me he was really surprised one day when I heated up Mexican pizza to eat the next day, and that’s when I started to realize – there are 3 foods that I actually like as leftovers: 1) pizza, 2) Thanksgiving, & 3)chicken parm. However, the fact that I don’t like leftovers doesn’t mean that I NEVER eat them. In fact, last night I made some delicious chicken gyros with homemade tzatziki sauce (one of John’s new favorite meals), and there is so much left over that I would really feel pretty guilty letting them all go to waste. In order to make the leftovers taste a little better, I thought – I’ll make something new to go with them! And so began the adventure of making homemade pita bread.
For my first time making pita, it tasted great!, but it wasn’t the prettiest thing I’d ever seen….. It definitely didn’t look like store bought, and I’m not sure you could really call it a “pocket”, but it was delicious fresh out of the oven! Hopefully you can learn from my mistakes….
One of the things I find the most difficult about making bread, is all the “wait 10 minutes, let rise for 20 minutes…etc”. So I wrote out the time estimates for each step. Also, the steps that require you to ACTIVELY be doing something are denoted with a * (as opposed to the steps where you can, if you’d like, stare at the dough while the yeast works its magic).
Recipe for Pita Bread
3 cups plus 1/4 cup unbleached all-purpose flour (454 grams (food scales are great for flour!))
2 teaspoons salt
2 teaspoons instant yeast
2 tablespoons olive oil
1 tablespoon honey
1 1/4 cups water, at room temperature
*STEP 1: 10 minutes: Using a spatula, mix ALL ingredients together in the bowl of a mixer (Yep, all at one time – you don’t have to put the yeast in the water and let it sit, and all that jazz). Using the dough hook attachment, knead the dough for about 10 minutes (speed 4 on the Kitchen aid), or you can work up a sweat and knead it by hand.
It should go from looking like this:

To looking like this:

STEP 2: 8 hrs – 3 days OR 90 minutes: Once the dough looks smooth, place it in a bowl sprayed with oil, and then spray a little oil on top of the dough. Cover and let sit in the fridge for 8 hrs -3 days OR in a warm, draft free place for 90 minutes. (I love this step because the recipe actually says, “for best flavor development, mix the dough up to 3 days ahead” – Yeah for making things ahead of time!)
*STEP 3: 3 minutes: Divide the risen dough into 8 equal pieces and roll each piece into a ball.

STEP 4: 20 minutes: Cover the dough with a damp towel and let it sit for 20 minutes. This step allows the dough the relax before you start shaping it – if at any point you have trouble shaping the dough, just let it relax for a few minutes, and it should be easier to shape.

*STEP 5: 15 minutes: On a lightly floured surface, take each piece of dough and shape it into a circle using your hands and/or a rolling pin. This is the step that gave me some trouble. In retrospect, I was trying to make the pita too large, and therefore the dough became very uneven in thickness. The next time I make these, I will try to roll them to about 6 inches wide, 1/4 inch in thickness.

Above – See how uneven they are? Don’t try to roll them as thin as I did. The most important thing is to keep them even.
STEP 6: 30-40 minutes: Place the rounds on an oiled baking sheet and cover with oiled plastic wrap. Let rise for 30-40.
STEP 7: While the rounds are rising preheat the oven to 475 degrees. If you have a baking stone, place it in the oven and preheat it as well. If you don’t have a baking stone, turn a baking sheet upside down and preheat it in the oven.
*STEP 8: 9 minutes: Place as many rounds as you can fit on your baking stone at a time in the oven (I put 3 at a time). Bake each for 3-5 minutes, and then continue with the remaining rounds, cooking each for 3-5 minutes.

The second time I made them, I made sure they were very smooth and even before baking them and look how nice they puffed up:


(Updated 2/15/11)
Recipe Adapted from the Smitten Kitchen

