
French Croissants

Before you go running away by the long list of seemingly complicated steps that are involved in this recipe, let me tell you a story. I actually did the same thing when I saw Annie‘s post about homemade croissants. I thought to myself, seriously, who has the time (or desire) to do all that! And yet here I am, telling you about homemade croissants. See, a funny thing happened. It was called Christmas vacation. After I saw that homemade croissants made the list of one of Annie’s favorite things from her entire year of hundreds of recipes, I started to think of them in a different light. Then came a whole week of free time and a house full of people to feed on New Years morning, and croissants suddenly started to seem like a good idea. And it turned out to be such a good idea that I felt the need to make them again last weekend. Do they take more time then buying them at the store? Yes. But do they taste like no other baked good you’ve ever made before? Yes.
About half way through making this recipe, I feared the croissants would turn out like those crescent rolls that come in a tube. Then something magical happened in the baking process, and flakey, buttery, French goodness arose. I was so excited watching these puff up and golden in the oven, and I think our guests were even more excited about the final result. Everyone loved these. I can’t wait to make them again in the future. They are best eaten shortly after they come out of the oven, but they are still wonderful the next day (they’d probably last a few more days – if you don’t eat them immediately). While I didn’t include instructions for freezing, I believe the best times to attempt freezing would be after the second lamination of the dough, or after the final shaping of the croissants. If you try this, I would love to know how freezing turned out!

French Croissants
Makes 12 large croissants
For the dough:
- 3 cups (15 oz) all purpose flour, plus more for dusting
- 1 tablespoon instant yeast
- 1/4 cup sugar
- 1¼ tsp. salt
- 1¼ cups whole milk, cold (or use 1 cup skim with 1/4 cup whipping cream)
- 2 tablespoons unsalted butter
For the butter square:
- 24 T. (3 sticks) unsalted butter, cut into 1-tablespoon pieces and kept cold
- 2 T. all purpose flour
Egg wash:
- 1 large egg, lightly beaten
To make the butter square, toss flour and butter together. Using the blade of a large knife or a bench scraper work the butter back and forth until it is smooth and homogenous. It will be sticky. Wrap in plastic wrap, flatten the butter into a 7×7 inch square. Refrigerate for at least 30 minutes.

Once the dough has chilled, remove it from the fridge and roll out on a floured work surface into an 11 by 11 inch square. (It may seem small but it will complement the butter square perfectly).

Place the chilled butter square diagonally on the 11-inch dough square.
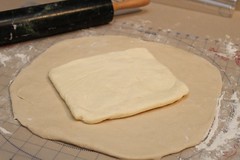
Fold the edges of the dough up around the butter so that they meet in the middle.

Pinch the dough seems to seal.

Tap the center of the dough square with a rolling pin in order to soften the butter, and roll the dough into a 14 inch square. Make sure to flour the surface as you go so the dough doesn’t stick.

Fold the dough into thirds to form a long rectangle.

Then starting at the short ends, fold the dough again into thirds.

At this point wrap the dough in plastic wrap and refrigerate for 2 hours, or longer.
Repeat this process again- roll dough into a 14 inch square, fold into thirds, then fold into thirds again. Rewrap in plastic wrap and refrigerate for another 2 hours, or longer. (I usually do the above steps the day before, and save the steps below for the morning in which the croissants will be served. I believe you could stop at this point and freeze the dough, or half of the dough, but I have not tried this myself.)
Remove the folded dough from the fridge and divide in half. (You could also roll the dough into one very large 20×20 inch rectangle but I found half of the dough more manageable)

Roll one of the 2 dough pieces into a 10×20 inch rectangle.

Then cut the 10×20 inch rectangle into thirds, so that each section is just shy of 7 inches. Then cut each rectangle in half diagonally.

Take one triangle, and stretch the dough slightly so that each long side of the triangle is about equal in length. Cut a 1-inch slit in the bottom of the triangle and roll until the tip of the triangle.

Place croissants on a baking sheet lined with parchment or a silicon baking mat, and fold the edges of the dough next to each other to create a crescent. Repeat with remaining dough. Cover with plastic wrap and let rise until puffy, about 45 minutes. At this point preheat the oven to 400°.

Brush croissants with egg wash bake in a preheated oven until the golden brown, about 18-22 minutes, rotating pans half way through baking.

Allow to cool on a wire rack for several minutes. Store airtight at room temperature for up to 2 days or wrap well and freeze. Reheat in a 300˚ F oven for 5-10 minutes.

Source: Annie’s Eats, as adapted from Baking Illustrated
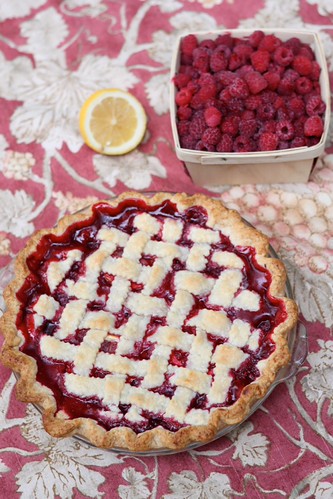
Best-Ever Raspberry Pie
I promised you that there would be more raspberry recipes to come, and I don’t lie. I made this as part of the dinner part I had with my family over labor day weekend, but the truth is we ate so much of it for dinner that I felt the need to make another pie the next day :-). I’m planning on making a 3rd one, likely today, that’s how much I love this pie.
Now to give you an idea of why this must be the best ever raspberry pie, you should know that I am not much of a fruit pie fan. I’m not one to turn down any dessert, but fruit pie would never be my first choice. This pie is an exception. I really think it is the best recipe ever created for raspberry pie. I have never met a person who didn’t love it, and my mom has been making it every year since I can remember. Now there are a few keys to this pie that make it so delicious. First of all it really does help if you use good quality raspberries. I’ve bought a few of the store bought variety this year and have been sorely disappointed. This could be because I bought them before they were truly in season, but still I think raspberries are best either hand-picked or bought from a farmers market. Second, it uses crème de cassis or blackberry liqueur. I know that it’s a pain to buy one bottle of liqueur that you only use for one recipe, but that bottle will last you through several years of raspberry pie making – so it’s totally worth the investment. And third, there is butter and lemon slices in the pie filling itself – how can you go wrong.
For a while I have tried to avoid the realization that homemade pie crust is about 7864 times better than store-bought, mostly because I have been trying to avoid the extra work that comes with making homemade pie crust. However, I have (somewhat remorsefully) come to my senses. Homemade pie crust is just so much better. Its flakier, it melts in your mouth and it doesn’t have artificial taste that hints through in store bought crust. Since I learned the trick about rolling the pie crust out between 2 pieces of parchment paper, it has become infinitely easier to make. I think it is totally worth the extra 10 minutes, but I won’t tell if you still want to use store-bought :-). I haven’t included a recipe for pie crust here because it seems that everyone has there own favorite. I used a recipe from the pioneer woman, but I can’t say I’ve tried enough to really say it is the best ever. And really, if you are trying to save time my mom has made this countless times with store bought pie crust and I have still loved it. I also would guess that you could easily make this into a blackberry pie but I have never tried this since I love raspberries. If you do, let me know how it turns out!

Best Ever Raspberry Pie
– Makes 1 standard 9 inch pie
- 5 cups raspberries (2 1/2 pints)
- 1 cup granulated sugar
- 1/3 cup Crème de Cassis or blackberry liqueur
- 4 Tablespoons cornstarch
- 1 Tablespoon fresh squeezed lemon juice
- Pinch of salt
- 2 tablespoons butter sliced paper thin
- 3 paper thin slices of lemon (a mandoline would be best for this)
- Top and bottom layer of pie crust
- Preheat oven to 425 F.
- Toss raspberries and sugar gently together in mixing bowl.
- In a measuring cup, whisk liqueur and cornstarch together until smooth.
- Stir Cassis mixture, lemon juice and salt gently into berries.

- Line a standard 9 inch pie pan with crust. (Do not use a deep dish pie unless you significantly increase the number of berries) Spoon in the berries, and arrange lemon slices and butter over the berries.
- With the top pie crust layer, cut it into about ½ inch strips, preferably using a pastry cutter like this. Arrange over berries in a lattice pattern, alternating under-over. Crimp the edges of the pastry together.
 (This was the first pie we made)
 - Set on the middle rack of the oven and bake at 425F for 15 minutes. *Then lower heat to 350F and bake for another 30 to 40 minutes, or until crust is golden brown and filling is bubbling.
Slightly adapted from The Silver Palate Cookbook


