
French Croissants

Before you go running away by the long list of seemingly complicated steps that are involved in this recipe, let me tell you a story. I actually did the same thing when I saw Annie‘s post about homemade croissants. I thought to myself, seriously, who has the time (or desire) to do all that! And yet here I am, telling you about homemade croissants. See, a funny thing happened. It was called Christmas vacation. After I saw that homemade croissants made the list of one of Annie’s favorite things from her entire year of hundreds of recipes, I started to think of them in a different light. Then came a whole week of free time and a house full of people to feed on New Years morning, and croissants suddenly started to seem like a good idea. And it turned out to be such a good idea that I felt the need to make them again last weekend. Do they take more time then buying them at the store? Yes. But do they taste like no other baked good you’ve ever made before? Yes.
About half way through making this recipe, I feared the croissants would turn out like those crescent rolls that come in a tube. Then something magical happened in the baking process, and flakey, buttery, French goodness arose. I was so excited watching these puff up and golden in the oven, and I think our guests were even more excited about the final result. Everyone loved these. I can’t wait to make them again in the future. They are best eaten shortly after they come out of the oven, but they are still wonderful the next day (they’d probably last a few more days – if you don’t eat them immediately). While I didn’t include instructions for freezing, I believe the best times to attempt freezing would be after the second lamination of the dough, or after the final shaping of the croissants. If you try this, I would love to know how freezing turned out!

French Croissants
Makes 12 large croissants
For the dough:
- 3 cups (15 oz) all purpose flour, plus more for dusting
- 1 tablespoon instant yeast
- 1/4 cup sugar
- 1¼ tsp. salt
- 1¼ cups whole milk, cold (or use 1 cup skim with 1/4 cup whipping cream)
- 2 tablespoons unsalted butter
For the butter square:
- 24 T. (3 sticks) unsalted butter, cut into 1-tablespoon pieces and kept cold
- 2 T. all purpose flour
Egg wash:
- 1 large egg, lightly beaten
To make the butter square, toss flour and butter together. Using the blade of a large knife or a bench scraper work the butter back and forth until it is smooth and homogenous. It will be sticky. Wrap in plastic wrap, flatten the butter into a 7×7 inch square. Refrigerate for at least 30 minutes.

Once the dough has chilled, remove it from the fridge and roll out on a floured work surface into an 11 by 11 inch square. (It may seem small but it will complement the butter square perfectly).

Place the chilled butter square diagonally on the 11-inch dough square.
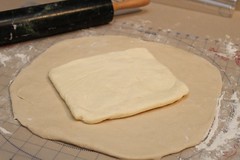
Fold the edges of the dough up around the butter so that they meet in the middle.

Pinch the dough seems to seal.

Tap the center of the dough square with a rolling pin in order to soften the butter, and roll the dough into a 14 inch square. Make sure to flour the surface as you go so the dough doesn’t stick.

Fold the dough into thirds to form a long rectangle.

Then starting at the short ends, fold the dough again into thirds.

At this point wrap the dough in plastic wrap and refrigerate for 2 hours, or longer.
Repeat this process again- roll dough into a 14 inch square, fold into thirds, then fold into thirds again. Rewrap in plastic wrap and refrigerate for another 2 hours, or longer. (I usually do the above steps the day before, and save the steps below for the morning in which the croissants will be served. I believe you could stop at this point and freeze the dough, or half of the dough, but I have not tried this myself.)
Remove the folded dough from the fridge and divide in half. (You could also roll the dough into one very large 20×20 inch rectangle but I found half of the dough more manageable)

Roll one of the 2 dough pieces into a 10×20 inch rectangle.

Then cut the 10×20 inch rectangle into thirds, so that each section is just shy of 7 inches. Then cut each rectangle in half diagonally.

Take one triangle, and stretch the dough slightly so that each long side of the triangle is about equal in length. Cut a 1-inch slit in the bottom of the triangle and roll until the tip of the triangle.

Place croissants on a baking sheet lined with parchment or a silicon baking mat, and fold the edges of the dough next to each other to create a crescent. Repeat with remaining dough. Cover with plastic wrap and let rise until puffy, about 45 minutes. At this point preheat the oven to 400°.

Brush croissants with egg wash bake in a preheated oven until the golden brown, about 18-22 minutes, rotating pans half way through baking.

Allow to cool on a wire rack for several minutes. Store airtight at room temperature for up to 2 days or wrap well and freeze. Reheat in a 300˚ F oven for 5-10 minutes.

Source: Annie’s Eats, as adapted from Baking Illustrated


I made these this past weekend! They’re so rewarding.
February 9, 2012 at 8:05 pm
Those look gorgeous! What a amazing treat for your family.
February 10, 2012 at 12:16 am
So glad you took the plunge and tried homemade croissants. Yours look great!
February 15, 2012 at 7:39 am
I woke up this morning thinking about this recipe! I’m tempted to buy the stuff to make them right now 🙂
February 25, 2012 at 9:11 am