
Bahn Mi Bowls with Lemongrass Meatballs

In the last nearly 2 years since I moved away from my hubby and Houston (the world’s cutest and most surgery prone dog), I have been trying to make as many of the foods that I enjoy but know they (he) might not care for. These bowls don’t scream “All-American”, which arguably is hubby’s favorite type of food, so I added them to the “To make before John comes” list. They stayed on that list for far too long, mostly because they called for ground pork, which a) I almost never buy and b) is not that great for you. Well then came along Chrissy Teigen’s cookbook, and somehow a scantily clad supermodel can convince me that eating pork is good. And hence, I had pork in my freezer.
Nonetheless, I was still a little worried about a meatball entirely made of pork, which led me to an important discovery. You can make ground chicken at home! I had a chicken breast in the freezer, so I partially thawed it and popped it in the magic bullet and bam! Homemade ground chicken! I mixed it about 50/50 with the pork and these meatballs turned out perfect! I actually felt like if I didn’t add the chicken they might have been a bit too greasy.
And finally, about the finished product. To make them easier I used left over brown rice from a meal earlier in the week, and then its simply mixing a few things for meatballs and shredding some carrots. These actually turned out so good that I decided I made them again for John, and even the All-American kid liked them.
Bahn Mi Bowls with Lemongrass Meatball
Quick Pickled Vegetables
- 1/3 cup rice vinegar
- 2 T sugar
- 1 teaspoon sesame oil
- 1/2 teaspoon salt
- 5 carrots, cut into thin ribbons (I used a peeler)
- 5 mini bell peppers cut into rings
- 1/2 pound ground pork
- 1/2 pound ground chicken
- 1-2 tablespoons lemongrass paste*
- 4 cloves garlic, minced
- 1 tablespoon chili paste (like Sriracha or Sambal Oelek)
- 1 tablespoon fish sauce
- 2 teaspoons cornstarch
- 1 teaspoon salt
- brown rice, quinoa, rice, or noodles
- cilantro, or other herb toppings such as basil, mint, scallions
- crushed peanuts
- spicy mayo (just mix mayo with a hit of sriracha)
- Quick Pickled Carrots: Whisk the rice vinegar, palm sugar, sesame oil, and salt together. Soak the carrots and peppers in the mixture for 30 minutes to 1 hour.
- Meatballs: Mix all ingredients. Roll into small meatballs with your hands, refrigerate if possible to increase firmness. Heat a little bit of olive oil over medium high heat. Add the meatballs and fry until golden brown on the outside and fully cooked (not pink) inside, or 165 degrees.
- Bowls: Layer the carrots and meatballs over quinoa, rice, or noodles. Top with herbs, peanuts, and/or spicy mayo.
*You can find this near the herbs in the refrigerated produce section of most grocery stores (found mine at harris teeter)
Slighlty adapted from Pinch of Yum
Salted Brown Butter Chocolate Chip Cookies
Hi y’all. So it has been about 2 years …eeek. Sorry about that. There have been new jobs, new cities, new friends, lots of vacations, and 2 dog surgeries that have happened since then, but I have been cooking the whole time! I decided to start an instagram account (@spicenice), more for a personal way to keep a log of things I have made and liked; but I got a request for this chocolate chip cookie recipe and I figured, why not start blogging again!
I made these cookies for a very specific purpose – to give to the wonderful workers at Pet Palace, who saved our dear dog Houston’s life by recognizing immediately that something was wrong with our normally bubbly and light hearted pup, and got him to the vet ASAP. They really couldn’t have been more wonderful – between covering the initial diagnostic vet bill, to transporting him all the way across town to where he could have the needed emergency surgery done, to just generally loving our pup, we are really grateful. And so I figured they deserved a special cookie. Chocolate chip will forever be my favorite (and the most popular); but how can you make it even better….brown butter and flakey sea salt, that’s how. These were really good. I actually consider it a serious win on the new years resolutions that I managed to only eat 2. Enjoy, and hopefully you’ll be hearing from me again soon!

Salted Brown Butter Chocolate Chip Cookies
Ingredients
16 tablespoons (2 sticks) unsalted butter
2 and 1/4 cups flour
1 teaspoon salt
1 teaspoon baking soda
1/2 cup granulated sugar
1 cup light brown sugar
1 large egg
1 large egg yolk
2 tablespoons milk
1 and 1/2 teaspoons vanilla
One bag semisweet chocolate chip cookies
Fleur de Sel or flaky sea salt
Instructions
1. In a medium saucepan over medium heat, melt the butter and cook, swirling the pan occasionally, until it is frothy and browned, about 7-8 minutes or so (the browning process goes quickly once it starts so watch it carefully.)
2. Transfer the butter to a small bowl and let cool to room temperature, or place in fridge to help the process.
3. In a separate bowl, whisk together the flour, salt, and baking soda.
4. In the bowl of your standing mixer fitted with the paddle attachment, beat the browned butter and both types of sugar, until smooth and light, about 7 minutes. This will only work if you have let the butter cool completely.
5. Add in the whole egg, the egg yolk, milk, and the vanilla.
6. Decrease the mixer speed to low and add the dry ingredients.
7. Gently fold in the chocolate chips.
8. Cover the cookie dough tightly with plastic wrap and refrigerate overnight.
9. The next day, preheat the oven to 375 degrees and line two baking sheets with parchment paper or silicon mats.
10. Using a cookie dough scoop, place about 2-3 Tablespoons of dough onto the prepared baking sheets, spacing them about 2 inches apart. Sprinkle each cookie individual with flakey sea salt. For thinner cookies let the dough reach room temperature before baking.
11. Bake each cookie sheet until the cookies are golden brown on the bottom, about 12-14 minutes or so. Because of they previously browned butter they brown quickly so check yours accordingly.
Adapted from: The Curvy Carrot, Originally from Food and Wine magazine, June 2012 issue.
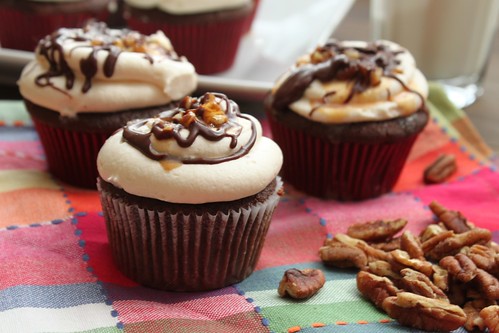
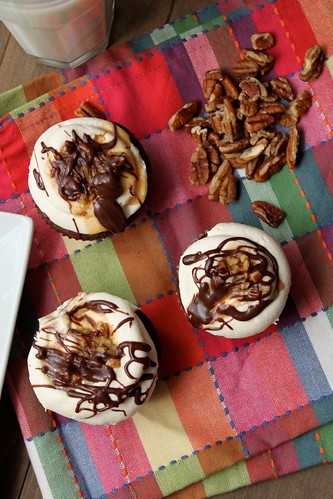
Turtle Cupcakes
Being in the position I’m in can be very stressful, with lots of uncertainty in the future and I’m not the best at dealing with it. That’s why I’m so grateful for wonderful co-workers who help keep me grounded, make me laugh and always know how to calm me down. They are the best; and while terrible at our short lived diet plans, I still love them. Eating healthy is hard when you work in a dermatology office that seems to have an endless supply of girl scout cookies and leftover cake. So when it was my funniest friend’s birthday, I obviously had to make cupcakes, to contribute to the problem.
I toyed with a few flavor ideas, but ultimately decided on turtle because, 1) I had all the ingredients and 2) who doesn’t love a turtle sundae. It’s basically a super moist, yet sturdy, cupcake base, topped with a caramel cream cheese frosting, ganache and a caramel pecan filling. “Some people” were a little worried about how nuts would taste on a cupcake, but I assure you, you have nothing to fear. It was delicious. If I had to make them again, I would probably double the caramel and pipe some caramel filling, or scoop some caramel pecan filling, into the center. I also used low fat sour cream (because it’s what I had), but no one complained :-)!
TURTLE CUPCAKES
Makes 2 dozen
INGREDIENTS
For the cupcakes:
½ cup plus 1 tablespoon Dutch-process cocoa powder
½ cup plus 1 tablespoon hot water
2¼ cups all-purpose flour
¾ tsp. baking soda
¾ tsp. baking powder
½ tsp. salt
2 sticks plus 1 tablespoon unsalted butter, at room temperature
1 2/3 cups sugar
3 large eggs, at room temperature
1 tbsp. vanilla extract
¾ cup sour cream
For the caramel and filling:
½ cup sugar
½ cups heavy cream, warmed
1 vanilla bean, split lengthwise (optional)
¼ tsp. coarse salt
½ tsp. vanilla extract
½ cup chopped pecans
For the frosting:
12 oz. cream cheese, cold
12 tbsp. (6 oz.) unsalted butter, at room temperature
6 tbsp. caramel sauce (recipe above)
2¼ cups confectioners’ sugar, sifted
Pinch of coarse salt
For the chocolate ganache:
2 oz chopped bittersweet (60% cacao) chocolate
1/4 cup heavy cream
1 T. butter
DIRECTIONS
- Preheat the oven to 350˚ F. Line cupcake pans with paper liners. In a small bowl, combine the cocoa powder and hot water and whisk until smooth. In another medium bowl combine the flour, baking soda, baking powder, and salt, and whisk to blend.
- Combine the butter and sugar in a medium saucepan set over medium heat. Cook, stirring occasionally, until the mixture is smooth and the butter is completely melted. Transfer the mixture to the bowl of an electric mixer and beat on medium-low speed until the mixture is cool, about 4-5 minutes. Add the eggs one at a time, mixing well after each addition and scraping down the sides of the bowl as needed. Blend in the vanilla and then the cocoa mixture until smooth. With the mixer on low speed, add the flour mixture in three additions alternating with the sour cream, beginning and ending with the dry ingredients and mixing each addition just until incorporated.
-
Divide the batter evenly between the prepared liners. Bake until a toothpick inserted in the center comes out clean, about 18-20 minutes, rotating the pans halfway through baking. Let cool in the pan about 5-10 minutes, then transfer to a wire rack to cool completely.
- To make the caramel, spread the sugar in an even layer over the bottom of a large, heavy-bottomed saucepan. Place over medium-low heat, watching carefully. When the sugar begins to liquefy around the edges, use a heatproof spatula to gently stir it towards the center. Continue stirring very gently until all the sugar is melted, taking care not to over stir. Measure out the heavy cream in a liquid measuring cup and scrape the seeds from the vanilla bean into the cream. Set aside. Once the caramel reaches a deep amber color, immediately remove the sauce pan from the heat. (To test the color, spoon a drop onto a white plate or bowl.) Carefully pour half of the heavy cream into the saucepan in a steady stream down the edge of the pan, whisking constantly. The mixture will steam and bubble violently. Stir until the cream is well incorporated, then whisk in the remaining cream. Stir in the salt and the vanilla. If any sugar has seized or hardened, place the saucepan over low heat and whisk until smooth. Transfer to a bowl and let cool to room temperature. If you desired, double the recipe and pipe a small dollop of caramel into the center of each cupcake at this time.
- To make the frosting, combine the cream cheese, butter, and caramel sauce in the bowl of an electric mixer. Beat on medium-high speed until smooth and creamy, about 2 minutes. Mix in the confectioners’ sugar and salt at medium speed until light and fluffy, about 2 minutes more. Transfer the frosting to a pastry bag with a large round tip. Pipe a heavy swirl of frosting over the top of each cupcake. Use the tip of a small offset spatula or a small spoon to scoop an indentation out of the center of the frosting.
- To make the chocolate ganache, chop chocolate and place in a small bowl. Heat heavy cream in a saucepan or carefully in the microwave until hot. Pour over chocolate. Let sit for 1-2 minutes, then stir until smooth. Stir in 1 T butter. Let sit at room temperature until desired consistency.
- In a small bowl, mix together of the caramel sauce and the chopped pecans. Fill the indentations in the frosting with a small spoonful of the caramel-pecan mixture. Drizzle the cupcakes with additional caramel sauce, chocolate ganache, and sprinkle with additional chopped pecans, if desired.
Recipe from Annie’s Eats
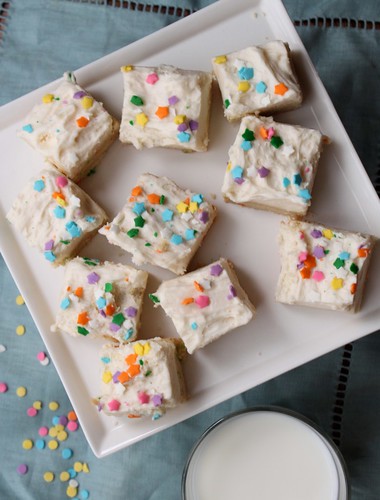
Funfetti Sugar Cookie Bars
In case you missed it, the super bowl was this weekend, and…it. was. amazing. While I will never give up hope of seeing a Browns super bowl in my lifetime, the caliber of the patriots vs. seahawks game really made appreciate ‘Merica. Also, can we please talk about that half time show? While I am by no means being unfaithful to my one true love (Taylor Swift), Katy Perry did a phenomenal job. The whole thing was American entertainment at its finest.
We had a small get together at our house, in the midst of a terrible snow storm. There may or may not have been multiple difficulties getting both in and out of the driveway, but everyone (amazingly and thankfully) made it both here and back safely. Thanks for braving the weather for us! There was lots of food, including my all time favorite pizza bites, and of course these cookie bars.
I picked these because they were relatively simple and can be made with ingredients you probably have lying around the house – butter, sugar and sprinkles -so they are perfect for a snow day. I actually used left over halloween sprinkles for the inside, and then some left over stars for the topping. What I like most about these bars is that they can so easily be adapted for any holiday depending on the sprinkles you choose. With valentine’s day around the corner, there may be another batch coming up shortly (I’m sure no one will protest). 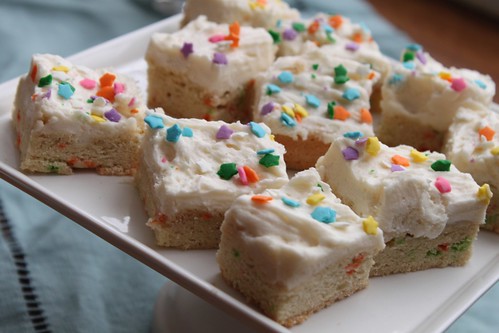
Funfetti Sugar Cookie Bars
adapted from Smells Like Home
Makes one 13×9 inch pan
- 2 1/2 cups all-purpose flour
- 1/2 tsp salt
- 1/4 tsp baking soda
- 1/2 cup (1 stick) unsalted butter, at room temperature
- 1 cups sugar
- 2 large eggs
- 1 tsp vanilla extract
- 3 Tbs sprinkles
Preheat oven to 350° F. Lightly grease a 9×13 inch baking dish and set aside.
Whipped Vanilla Frosting
- 1 cup (2 sticks) unsalted butter, at room temperature
- 2 cups confectioners’ sugar, sifted
- 2 tbsp heavy cream (substitute sour cream if unavailable)
- 1 tsp vanilla extract
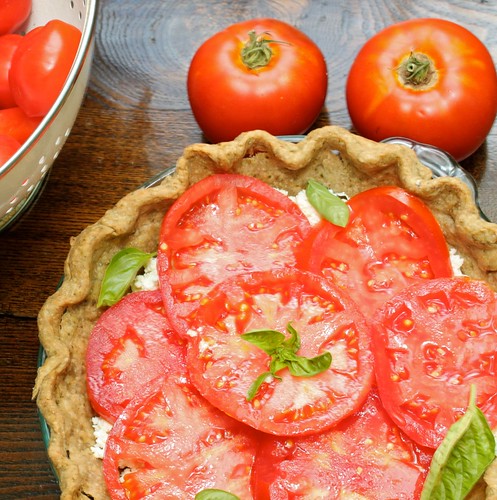
Fresh Tomato Ricotta Tarte with Garlic Herb Crust
In some parts of the country, it might be a little late for this post; but here in Ohio, we’re still trying to find ways to enjoy fresh garden tomatoes before the first frost hits. Hopefully that first frost will not present itself as 2 inches of snow in the middle of October (like it decided to last year). After the infamous 2013-2014 winter, I’d be fine waiting until Christmas Day for snow, and then having winter be over. For now, I’m still revealing in the fact that it’s beautiful, a perfect 70 degrees, with the garden is still going strong.
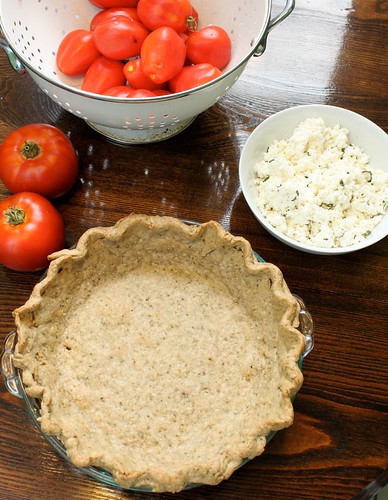
I felt like being a bit adventurous (per usual) and made ricotta cheese from scratch for this recipe. It was pretty each- basically just heat milk, add lemon juice and vinegar, and then strain over cheese cloth for about 10 minutes. It was fun to try, but it did take this from being an easy weeknight meal to kind of a production with multiple things to clean up. I made the dough for the crust a day in advance, so this was pretty simple when it came to putting together. It really highlights the tomatoes, and lets you hang onto that last bit of summer. Better get on it before it becomes a winter wonderland around here!
Fresh Tomato and Ricotta Tarte with Garlic Herb Crust
Serves 6
For the crust:
- ¼ cup fresh basil leaves
- 1 clove garlic, coarsely chopped
- 1¼ cups all purpose flour
- Coarse salt and freshly ground pepper, to taste
- 8 tbsp. cold unsalted butter, cut into small pieces
- 3 tbsp. ice cold water
For the filling:
- 2 cups ricotta cheese
- 2 cloves garlic, minced or pressed
- 1 tsp. oregano
- 2 tbsp. minced fresh basil, plus more for garnish
- Coarse salt and freshly ground black pepper, to taste
- 3-4 tbsp. milk, if needed
- 2 large ripe heirloom tomatoes, thickly sliced
- Extra virgin olive oil, for drizzling
Directions
1) To make the crust, combine the garlic and basil in the bowl of a food processor. Pulse until finely minced, scraping down the bowl as needed. Add in the flour and salt and pepper to taste, and pulse again to combine. (If you don’t have a food processor, just mince the garlic and basil as well as you can and then stir into the flour mixture. It will work just fine.) Add in the butter and pulse until the mixture resembles coarse meal and the largest butter pieces are the size of peas. Add in the water and pulse just until the dough comes together. Remove from the bowl, form into a disc and cover with plastic wrap. Transfer to the refrigerator and chill 1-2 hours, until firm. This can also be done in 1-2 days in advance.
2) Transfer the chilled dough to a lightly floured work surface. Roll out into a flat round sheet about 12 inches in diameter, or large enough to fully line a 9-inch pie plate. Transfer to the pie plate, trimming away any excess at the edges and crimping the dough to create a fluted edge. Transfer the pie plate to the freezer and chill 15-20 minutes, until firm.
3) Preheat the oven to 375˚ F. Line the chilled pie shell with aluminum foil, making sure all edges of the crust are fully covered. Fill the pie shell with baking beads if available to weigh the crust down (dry beans or rice also work). Bake for 25 minutes. Remove the foil and baking beads, return the pie shell to the oven and continue to bake until the crust is golden and fully set, about 10-12 minutes more. Transfer the pie plate to a wire rack and let the crust cool completely.
4) In a medium bowl combine the ricotta, garlic, and herbs. Stir together until evenly combined. To give the ricotta a smoother texture (if needed), stir in 3-4 tablespoons of milk until evenly combined. Season with salt and pepper to taste. Spread the ricotta into the pie shell in an even layer. Layer the tomato slices on top of the ricotta, drizzle lightly with olive oil, and season with salt and pepper. Garnish with additional minced basil. Slice with a sharp knife and serve immediately.
Source: Annie’s Eats
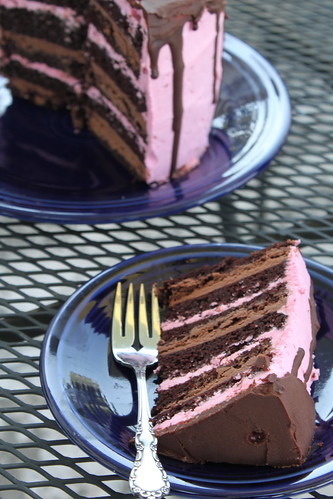
Six Layer Chocolate Cake with Raspberry Buttercream and Whipped Ganache
So I celebrated a big one a few weeks ago. Yep, a whole year has passed. Since my brother and I were born on the same day, our birthdays were always a big deal. It all started when I was 6, and my brother was turning 1. Tell a six year old that they have to share their birthday after 5 years of flying solo, and well, it could’ve been a little rough. Instead my parents went over the top and had an all out celebration with a tiered cake, our whole family, and a clown who doubled as a magician. I still cheered when the clown told me he was going to make my brother disappear, but overall, I LOVED sharing a birthday.
This year was no different. It’s been pretty great being back in Ohio and being able to once again share birthdays with my favorite brother. I insisted on making the cake, because it’s the one time of the year I don’t feel bad about going all out with an over the top birthday cake. Six layers was obviously a necessity, but because I didn’t want to be eating leftover cake for weeks, I thought 6 inches was perfect. The only problem – I didn’t have any six inch cake pans. Thankfully whole foods came to my rescue. I noticed they sold 6-inch cakes and jokingly asked the baker if she had any pans for sale. Well it turns out they bake all their cakes in disposable paper rounds – and she gave me 3 for a buck, steal!
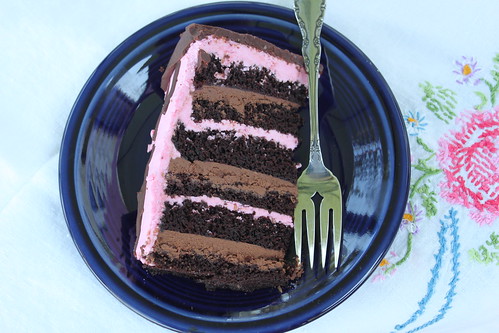
The initial recipe called only for the raspberry filling, which does make a beautiful contrasting interior, but I really wanted more chocolate, so I alternated a chocolate ganache frosting with the raspberry butter cream. It was not much more work because the ganache is just 2 ingredients, whipped to a fluffy consistency. But I will say the cake on it’s own is a moist, rich, dense chocolate cake, and could easily stand as the only chocolate in the cake if you want to double the strawberry buttercream instead. The whole thing is then topped with a rich chocolate ganache that drips down the sides and makes for a wonderful presentation. If your looking for some other wonderful birthday cakes, here’s a few I’ve made:
Six Layer Chocolate Cake with Raspberry Buttercream and Whipped Ganache
Makes 1- 6 layer, 6 inch cake.
For the Cake:
- 1-1/2 cups (180 g) all-purpose flour
- 1-1/3 cups (275 g) sugar
- 1/2 cup (60 g) dark cocoa powder
- 1-1/4 teaspoons (6 g) baking soda
- 1-1/4 teaspoons (6 g) baking powder
- 1 teaspoon (5 g) salt
- 140 ml (5 liquid oz) buttermilk
- 130 ml (4.5 liquid oz) espresso or strong, hot brewed coffee
- 75 ml vegetable oil
- 2 eggs, room temperature, lightly beaten
- 1 tablespoon (15 ml) pure vanilla extract
For the Raspberry Swiss Meringue Buttercream:
- 3 large, fresh egg whites (100 g)
- 3/4 cup sugar
- 1 1/2 teaspoons pure vanilla extract
- 2 sticks butter, cut into cubes and cool
- 1/4 cup raspberry puree, strained to remove seeds
- few drops of pink food coloring (optional)
For the Whipped Chocolate Ganache Filling:
- 8 oz bittersweet chocolate, chopped
- 1 cup heavy cream
For the Chocolate Glaze:
- 4 oz bittersweet chocolate, chopped
- 1/3 c. heavy cream
- 2 T unsalted butter
Instructions
- Preheat oven to 350° F. Prepare three 6-inch round cake pans with butter, parchment paper rounds, and flour or cocoa powder. Tap out excess.
- In bowl of electric mixer, sift all dry ingredients.
- Add all remaining ingredients to bowl with the dry ingredients and with paddle attachment on mixer, mix for 2 minutes on medium speed (you may need the plastic splash-guard that comes with mixer) and pour into prepared pans. If possible, use digital kitchen scale and weigh pans for even layers. Batter will be liquidy.
- Bake for 20 minutes and then rotate pans in oven. Cakes are done when toothpick or skewer comes out with a few crumbs, about 30 minutes total. Try not to over-bake.
- Cool on wire racks for 20 minutes then gently invert onto racks until completely cool.
- If using raspberry puree, place a handful of fresh or frozen raspberries in a food processor, and process until a smooth. Press through a mess sieve to remove seeds and retain at least 1/4 cup to add to frosting.
- Wipe the bowl of an electric mixer with paper towel and lemon juice, to remove any trace of grease. Add egg whites and sugar, and simmer over a pot of water (not boiling), whisking constantly but gently, until temperature reaches 160°F, or if you don’t have a candy thermometer, until the sugar has completely dissolved and the egg whites are hot.
- With whisk attachment of mixer, begin to whip until the meringue is thick, glossy, and the bottom of the bowl feels neutral to the touch (this can take up to 10 minutes or so). *Don’t begin adding butter until the bottom of the bowl feels neutral, and not warm.
- Switch over to paddle attachment and, with mixer on low speed, add butter cubes, one at a time, until incorporated, and mix until it has reached a silky smooth texture (if curdles, keep mixing and it will come back to smooth). *If mixture is too runny, refrigerate for about 15 minutes and continue mixing with paddle attachment until it comes together. Add vanilla and salt, continuing to beat on low speed until well combined.
- Add raspberry puree to taste and if desired a few fresh raspberries, and blend until combined. Add small amount of pink food coloring, if desired.
For the Whipped Chocolate Ganache.
- Heat heavy cream in a small saucepan until just before boiling.
- In a heat safe bowl, pour cream over chopped chocolate. Let sit for ~5 minutes, then stir to melt chocolate.
- Allow mixture to cool to room temperature, stirring occasionally (about 30-45 minutes). (Or place in the fridge for a few minutes at a time to expedite the process)
- Whip mixture on high until it becomes paler and fluffy, about 2-4 minutes.
- Place the chocolate, butter and heavy cream in a medium heatproof bowl over a pot of simmering water. Stir the mixture using a rubber spatula until melted and smooth. *Be careful to not get even a droplet of water into your bowl of chocolate and butter.
- Slice the 1st cake layer in half horizontally, using a large serrated knife or dental floss and place cut side up on your cake board, pedestal, or plate.
- The general order of the cake starting from the bottom will be:
- Cake
- Whipped Ganache
- Cake
- Raspberry Buttercream
- Cake
- Whipped Ganache
- Cake
- Raspberry Buttercream
- Cake
- Whipped Ganache
- Cake
- Raspberry Buttercream
- Finish with layer of Chocolate Glaze
- Using a small offset palette knife, spread approximately 1/2 cup of whipped ganache evenly on top.
- Add a layer of cake and cover with about 1/2 cup raspberry buttercream.
- Repeat this with remaining cake layers, until you come to the final layer, which you will place face-down on the top of the cake.
- Place cake on a turntable (if possible), and using a small offset palette knife for the top of the cake, and medium straight palette knife for the sides, cover the cake in a thin layer of buttercream to seal in crumbs. Refrigerate for 30 minutes (or more). *This does not need to be perfect, as that will come with the top “coat” of buttercream.
- Chill cake.
- If glazing the cake, make the glaze and set aside for a few moments to cool a bit. Pour glaze over chilled cake, smoothing the top with a clean small offset palette knife.
- Chill again to set, serve at cool room temperature.
Cake and Swiss Meringue Buttercream adapted from Sweetapolita, Chocolate Ganache from Martha Stewart
Beef Bourguignonne

This French delicacy, labled by Julia Child as “certainly one of the most delicious beef dishes concocted by man”, comes to you from no other than my very own Mom. That’s right, the lady who we tease about being “Irish”, and who would much prefer to set the table then make the food, made Beef Bourguignonne. In fact, this isn’t the first time she has made it – I would go so far as to call this one of my mom’s signature dishes. I can remember coming home from college to this meal. It instantly became my perfect comfort food. After a long week on a new service, mom invited us over for Sunday dinner, and this was the absolute perfect compliment to a snowy and cold February day.
At first I figured that because it came from a crock pot, it must be easy…. Don’t be fooled – this recipe is actually quite a bit of work because everything has to be browned before slow cooking. However, it’s great for company because all the work can be done early morning and then you can relax the rest of the day and actually visit with your guests. It is a stick to your ribs kind of meal that will certainly get you through this seemingly endless winter.

Beef Bourguignonne
Serves 8-10
- 1 ½ cups all purpose flour
- 5 lbs. beef stew meat, in 1 inch pieces
- salt and ground pepper to taste
- 1/4 c. olive oil
- 4 bacon slices, cut into 1 inch pieces
- 5-7 large carrots, peeled and cut into 1/2 inch slices
- 2 yellow onions, slices 1/4 inch thick
- 5 garlic cloves, chopped
- 2 bay leaves
- 6 fresh tyme springs
- 6 fresh parsley sprigs
- 1 lb. white button mushrooms, halved
- 1 bottle Pinot Noir (from Burgundy if you want to be fancy)
- 1 Tbs. beef demi-glace
- Steamed baby red potatoes (about 4 per person)
Place the flour in a large bowl. Season the beef with salt and pepper, add to the flour and stir to coat evenly. Transfer to a plate, shaking off the excess flour.
Off the heat, pour the wine into the sauté pan and set over medium-high heat. Whisk in the demi-glace and bring to a boil, stirring to scrape up the browned bits from the pan bottom. Add to the slow cooker, cover and cook until the meat is fork tender, 6 hours on high or 8 hours on low. Discard the bay leaves.
Transfer the beef bourguignonne to a platter and serve with steamed potatoes. Serves 10.
Apple Cider Caramels

I know you are probably up to your ears in left over Halloween candy, and the last thing you want to think about is making your own candy….but I promise you, these are worth it! This recipe has been circulating the internet for over a year, and despite coming from THE Smitten Kitchen, I was still a bit hesitant as to whether these would actually taste like apple cider. Well my friends, I can attest to ahhhmazingness of these caramels. Somehow, magically, they do indeed taste like apple cider. (Or maybe not so magically….you do use an entire quart of the stuff and boil it down to a mere 1/3 cup to infuse the caramel with cider flavor).
I actually had made these for our pumpkin carving party, but because of the unpredictable nature of intern year (and medicine in general), I was 2 hours late to my own party…. so instead, I have been enjoying these myself for the past 2 weeks. (Good thing I’m not the dentist in the family…) I also insist that everyone who comes to our house tries at least one – and the response is always the same….”ahhhhmazing.” So before cider is gone until next fall, make these. You won’t regret it.

Apple Cider Caramels
Makes 64 caramels
- 4 cups apple cider
- 1/2 teaspoon ground cinnamon
- 2 teaspoons flaky sea salt, such as Maldon, or less of a finer one
- 8 tablespoons (1 stick) unsalted butter, cut into chunks
- 1 cup granulated sugar
- 1/2 cup packed light brown sugar
- 1/3 cup heavy cream
Boil the apple cider in a 3- to- 4- quart saucepan over high heat until it is reduced to a dark, thick syrup, between 1/3 and 1/2 cup in volume, stirring occasionally. This took about 1 hour on my stove.
Line the bottom and sides of an 8- inch straight- sided square metal baking pan with 2 long sheets of crisscrossed parchment, then butter. Set it aside. Stir the cinnamon and flaky salt together in a small dish.
Once you are finished reducing the apple cider, remove it from the heat and stir in the butter, sugars, and heavy cream. Return the pot to medium- high heat with a candy thermometer attached to the side, and let it boil until the thermometer reads 252 degrees, about 5 minutes. Do not take your eyes off it as it burns quickly.
Immediately remove caramel from heat, add the cinnamon- salt mixture, and give the caramel several stirs to distribute it evenly. Pour caramel into the prepared pan. Let it sit until cool and firm—about 2 hours, though it goes faster in the fridge. Once caramel is firm, use your parchment paper sling to transfer the block to a cutting board. Use a well- oiled or buttered knife to cut the caramel into 1-by-1-inch squares. Sprinkle with additional flaky sea salt if desired. Wrap each one in a 4-inch square of parchment or waxed paper twisting the sides to close. Caramels will be somewhat on the soft side at room temperature, and chewy/firm from the fridge.
Caramels keep, in an airtight container at room temperature.
Source: Smitten Kitchen
Pumpkin Whoopie Pies

While it may be the end of October, it’s certainly not the end of fall inspired treats. I made these for a trip down to Lexington to see some of our best friends, and they were definitely a big hit. I knew Samiya in particular would like them because, well, because they’re cute and little and involve pumpkin! Moving to a new place, with new people, has really made me miss the awesome friends we had in med school. Following college, I moved to Louisiana with three crazy awesome roommates, and there was pretty much a constant source of entertainment and adventure at our house (and in Louisiana in general). Then in medical school, our apartment complex was basically like a grown-up college dorm, where study groups, dinner parties and watching people play video games was always only a step away. It’s a lot different now, living in a neighborhood, with friends scattered all over, and schedules that are completely different because of residency. But I guess that’s just part of growing up, and it’s not so bad.

Now these pumpkin whoopie pies were described as a pumpkin cupcake in a different form, and I’d say that’s pretty close to accurate! The batter is a bit more dense than a cupcake, but just as moist, and the filling is strikingly similar. Truthfully, can you go wrong with cream cheese frosting? I really liked these because they are visually appealing, and easy to eat…which turned out to be both a good and bad thing. Just glad I had people to help me finish them off :-).

Pumpkin Whoopie Pies
Makes approximately 36 sandwiches
For the pumpkin cookies:
- 3 cups all-purpose flour
- 1 tsp. salt
- 1 tsp. baking soda
- 1 tsp. baking powder
- 2 tbsp. cinnamon
- 1 tsp. ground ginger
- ½ tsp. ground nutmeg
- 1 cup granulated sugar
- 1 cup dark brown sugar, firmly packed
- 1 cup canola oil
- 3 cups chilled pumpkin puree
- 2 large eggs
- 1 tsp. vanilla extract
For the maple cream cheese filling:
- 3 cups powdered sugar, sifted
- ½ cup unsalted butter, at room temperature
- 8 oz. cream cheese, cold
- 2 tbsp. maple syrup
- 1 tsp. vanilla extract
To make the pumpkin cookies, preheat the oven to 350° F. Line two baking sheets with parchment paper or silicone baking mats. In a large bowl, whisk together the flour, salt, baking soda, baking powder and spices. Set aside. In a separate bowl, whisk sugars and oil together. Add the pumpkin puree and whisk to combine thoroughly. Add the eggs and vanilla and whisk until combined. Sprinkle the flour mixture over the pumpkin mixture and whisk until completely combined.
Transfer the cookie batter to a pastry bag fitted with a large plain round tip. Pipe small rounds of the batter onto the prepared baking sheets, about 1½-2 inches in diameter. If desired, smooth the top of cookies with a few drops of water and the bottom of a spoon.
Bake for 10-12 minutes, until the cookies are just starting to crack on top and a toothpick inserted into the center of a cookie comes out clean. Remove from the oven and let the cookies cool on the pan for about 10 minutes. Transfer to a wire rack to cool completely. Repeat with remaining batter.
To make the filling, combine the butter and cream cheese in the bowl of an electric mixer. Beat on medium-heat speed until smooth, about 1-2 minutes. Add the powdered sugar, maple syrup and vanilla and beat until smooth. Be careful not to overbeat the filling or it will lose structure, if this occurs refrigerate for 20 minutes. Transfer the filling to a pastry bag fitted with a plain tip.
To assemble, pair the cookies up by size. Pipe filling onto the flat side of one cookie of each pair, and sandwich together with the remaining cookie. Refrigerate for at least 30 minutes to firm before serving.
Adapated from Annie’s Eats
Apple Cider Muffins with Browned Butter Glaze

So, you know my previous obsession with California? Well, because we’ve had the most amazing weather for the last month, I’m starting to realize that Ohio is pretty awesome! The leaves are starting to change, there is fog over the valleys when I drive to work, and the sun has that autumn glow. It’s wonderful! Although you will surely need to remind me of this come February, when I cannot wait for winter to be over! To keep my California dream alive, my best friend from like the fourth grade just landed a coveted fellowship spot at UCLA, so I’m quite sure my love will be rekindled when I go to visit. But for now, I’m loving Ohio.
Now about these muffins. Obviously, they totally go with October, but they would be equally perfect for Thanksgiving breakfast. They are actually pretty healthy – chunks of apple and apple sauce keep them very moist without much fat. Then of course you add this browned butter glaze, which sort of ruins the healthy aspect, but you absolutely cannot leave it off. It is amazing. Together, these were best apple muffins I’ve ever had.
A few technical points…. First, you precook the apple with a bit of sugar and spice. This step gives the apples a pie-like texture, instead of the dehydrated apple you find in some baked goods. Additionally, I found out the hard way that there are so many liquid components to these, that they will seep if allowed to sit in an air tight container. I’m quite sure this didn’t make the best presentation when John brought them into class, but apparently they were still well loved. To avoid this, go a little lighter on the amount of apple in the batter, and store with a rack underneath. These muffins are just hearty enough that you can call them breakfast without too much guilt.
Apple Cider Muffins with Browned Butter Glaze
- 4 Tablespoons butter
- 2 -2 ½ honeycrisp apples, peeled and diced
- 3 tablespoons apple cider
- 1 1/2 cups whole wheat pastry flour
- 1/2 cup old-fashioned rolled oats
- 1 teaspoon baking soda
- 1/2 teaspoon baking powder
- 3/4 teaspoon cinnamon
- 1/4 teaspoon allspice
- 1/4 teaspoon salt
- 1 pinch of nutmeg
- 1 large egg
- 1/3 cup loosely packed brown sugar
- 2 teaspoons vanilla extract
- 1 cup unsweetened applesauce
- 1/4 cup apple cider
For the Glaze:
- 4 tablespoons browned butter, melted and cooled*
- 1 1/2 tablespoons apple cider
- 1 cup powdered sugar
Directions:
Begin by melting the butter in a small skillet over medium heat. Continue to cook, swirling occasionally until the butter turns a deep golden brown. Be careful not to burn. *Repeat this step for the browned butter in the glaze.
Preheat oven to 350 degrees F. Heat a small skillet over medium-low heat and add diced apples with 3 tablespoons apple cider, and a pinch of cinnamon and salt. Cook, stirring occasionally, until apples are soft and caramely, about 8-10 minutes. In a bowl, whisk together flour, oats, baking soda, baking powder, salt and spices. Set aside. Line a muffin tin with liners.
In a large bowl, whisk egg and brown sugar together until smooth and no lumps remain. Add in vanilla extract, butter, apple sauce and apple cider, whisking again until smooth. Gradually add in dry ingredients, mixing until just combined. Fold in diced apples. Do not overmix. Fill each muffin liner 3/4 full to scantly full.
Bake for 15-17 minutes, or until tops slightly golden. When cool enough to handle, transfer to a wire rack to cool.
Brown Butter Apple Cider Glaze
In a medium bowl, combine browned butter, vanilla extract and powdered sugar. Whisk until the mixture comes together then add in 1 tablespoon of apple cider, continuing to mix. If it still doesn’t appear glaze-like, add in cider 1/2 tablespoon at a time and mix again. Don’t worry if it becomes too liquidy – just add a tiny bit of powdered sugar until you get the desired consistency. Spoon glaze on warm muffins or dip each top in the glaze, then serve.
Slightly Adapted from How Sweet It Is
Pumpkin Doughnuts

Let me just profess how incredibly happy I am that it is October! Not only for the amazing weather, the change of leaves, and a special someone’s birthday, but also because my work schedule is much more manageable, and I actually have a few minutes to breathe. Of course at the top of my weekend to do list was celebrating the season by making baked goods! My friend Val also happens to be very found of October, seasonal festiveness and baking, so I knew pumpkin spice doughnuts would be right up her alley. I actually felt like a normal person, chit chatting on a Saturday afternoon, experimenting in the kitchen, and enjoying fall. It was so much fun!
Truth be told, I had bought a doughnut cutter specifically for these doughnuts more than a year ago, and had yet to use it. Fall passed me by, and making pumpkin doughnuts in December just seemed wrong. We found that the doughnuts “holes” made with the cutter were much larger than expected, so we ended up cutting them into fourths and making more snack size bites.
Now, I know people “bake” doughnuts, and that is much healthier, but let’s be honest, by definition doughnuts are fried. I’m not about to go redefining the very essentials of a doughnut by baking them, so yes, I fried these. Healthy? No. Guilty pleasure? Yes. I have only fried things one other time in my life, and it was pretty much the worst disaster I’ve had yet in the kitchen. (Picture an apartment so smoke filled you couldn’t reenter it for hours….). Happy to say this time went much more smoothly. The only difficult part is getting the oil to stay at the right temperature. Don’t be tempted to turn the heat to high – stick with medium – and use a heavy duty pan, like cast iron, that will keep consistent heat. Overall, these were considerably easier than I was expecting, but just as fun and festive as I was hoping.

Pumpkin Doughnuts
Makes 14-16 doughnuts and doughnut holes
Ingredients:
For the doughnuts:
- 3 1/2 cups all-purpose flour
- 4 teaspoons baking powder
- 1/2 teaspoon baking soda
- 1 teaspoon salt
- 2 teaspoons ground cinnamon
- 1 teaspoon ground ginger
- 1/2 teaspoon ground nutmeg
- 1/4 teaspoon ground cloves
- 1 cup sugar
- 3 tablespoons unsalted butter, at room temperature
- 1 large egg
- 2 large egg yolks
- 1 teaspoon vanilla extract
- 1/2 cup buttermilk
- 1 cup canned pure pumpkin
- Canola or Peanut Oil (for deep-frying)
For the cinnamon-sugar:
- 1/2 cup sugar
- 2 teaspoons cinnamon
For the spiced glaze:
- 1 cup powdered sugar
- 1/4 teaspoon ground cinnamon
- Dash of ground nutmeg
- Dash of ground ginger
- Dash of ground cloves
- 2 tablespoons milk
Directions:
In a medium bowl, whisk together the flour, baking powder, baking soda, salt, cinnamon, ginger, nutmeg and cloves and set aside. In the bowl of a stand mixer fitted with the paddle attachment, beat together the sugar and butter until well blended. Add egg, then yolks and vanilla. Add the pumpkin mixture and stir. Alternating buttermilk and flour mixture, continue to mix until all ingredients added and well blended. Cover the mixture and freeze for 1 hour, or refrigerate for 3.
Line two baking sheets with parchment or wax paper and lightly flour your work surface. Gently roll dough to about 1 – 1.5 cm thickness. Using a floured doughnut cutter or 3-inch round cutter, cut out dough rounds. If needed, use a floured 1-inch cutter to remove the centers (or the bottom of a 1 m piping tip). Arrange the doughnuts and holes on the prepared baking sheets, and if possible chill until ready to fry. Gather dough scraps and continue cutting until all the dough is used.
Line a cooling rack with several paper towels. Add enough oil to a skillet or Dutch oven to reach a depth of 1 – 1½ inches. Heat oil until the temperature reaches 365º to 370º. Fry doughnuts a few at a time, adjusting heat as needed to maintain temperature, until golden brown, about 2 minutes per side. Fry doughnut holes in a couple batches, turning occasionally, until golden brown, about 3 minutes. Use a strainer to transfer doughnuts to paper towels.
To make the cinnamon-sugar, whisk together the cinnamon and sugar in a small, shallow bowl until combined. When doughnuts are cool enough to touch, dip in cinnamon-sugar mixture and turn to coat completely.
Make the spiced glaze by combining powdered sugar and spices in a small bowl. Add the milk and whisk to combine, until a thick glaze is formed. Add more milk as needed to achieve desired consistency. Dip the remaining doughnuts in the glaze and allow to set before serving.
Source: Cook like a Champion
Apple, Ham and White Cheddar Panini

Every once in a while I see a recipe and immediately feel the need to make it that very same day. This would be one of those recipes. With an absolutely beautiful September behind us, and what I’m hoping will be an even more beautiful October ahead, I couldn’t pass up a recipe that so perfectly matched this fall weather. It helps that there’s only about 5 ingredients and that from start to finish this only took about 20 minutes. Residency + a long commute + triathlons + general career/life crises have been taking up pretty much all my time, and blogging hasn’t been at the top of my list…but truth be told, I miss it!
You know this sandwich must be pretty great, considering it made me come out of blog hibernation. In fact, it really makes me want to go apple picking and drink cider. The combination might sound a bit odd, but the apple and apple butter is really a nice balance to the saltiness from the ham and cheese. Plus, I love adding sweetness to anything I can. So if you’re looking for a quick an easy dinner to enjoy with fall, look no further. 
Apple, Ham and White Cheddar Panini
Serves 4
Ingredients
- 8 slices sourdough bread
- 3 T. butter, at room temperature
- 2 large apples, thinly sliced
- Sliced white cheddar cheese, about 4 ounces
- Thinly sliced maple ham, 6-8 ounces
- 1/2 cup apple butter
Heat a grill pan or case iron skillet to medium heat. Butter the outside of each sandwich liberally. On one piece of bread, layer apple slices, cheese and ham. On the other slice apply a thick layer of apple butter. Sandwich the pairs together so that the buttered sides are facing outwards.
Cook the sandwiches, turning once, until both sides are golden and the cheese is melted. Slice in half and serve immediately.
Source: Annie’s Eats
Fourth Year Adventures
So I apologize that this post is not really recipe related, but I figure maybe someone out there would be interested in what life is like as a matched fourth year medical student. In case you don’t get this from the post, in the words of Barney Stinson it’s legen… wait for it…… dary. It’s a pretty great feeling to have so much freedom after 3.75 years of being a slave to the books. Lately, I’ve seen a few second year med students post about doing UWorld questions while preparing for Step 1 (the most stressful test I’ve ever taken in my life), and I just want to tell them… It gets better, so much better! So let this post be a testament to that!
While John was finishing up classes, I had the pleasure of going to a med school friend’s bachelorette in Vegas. While I previously have claimed that “Vegas isn’t really my scene”, this trip proved me wrong.

We did all the vegas-y things that 20-sometthings do, including this….

When I got back, it was a few days of real life, before I made a trip to Columbus to see one of my best friends. It just so happened she had the weekend off, AND there was an elaborate birthday extravaganza planned on the Santa Maria. I’ll have to say, everyone really took the pirate theme to heart, and it made for a really fun party.

Then I sort of last minute booked my trip to San Francisco to see my roomies from college. The picture below is in Dolores park, with 4 girls who all met through PWild, a 2 week wilderness backpacking adventure before college started. My love affair with California is still going strong.

We packed a lot into a few days thanks to our amazing tour guide, who also happens to be finishing up business school. We started the weekend with dinner and drinks in Oakland, and I’m still dreaming about the garden gimlet with crushed cucumber and hand muddled mojitos of that night. Then we hit up Muir woods, hiked to Stinson beach, and finished the day off in Dolores Park. Emily and I used the time change to our full advantage and were waking up around 6 – which gave me the chance to join all the other runners down at the embarcadero. And we even made a trip up to Napa and Sonoma. So much diversity in such a small area. So at least for now, I’ve still got my sights set on California!

When I got back, it was a day full of packing, and the big move to Cleveland! We stored all our stuff in a pod, and about 20 hours before we left for Italy, I realized that I had stored my Passport away in that pod full of tightly packed stuff. By some miracle, the pod was moved to a reachable location, and we were able to sneak onto the property, unpack the pod, and recover the passport. I kept saying, “I can’t believe I did that!” but really, I totally can. Sorry John, take the good with the bad I guess :-).

And then John and I left together for our 2 weeks in Italy! We had a really hard time deciding where we wanted to go as a graduation trip, but ultimately we thought Italy offered the most of the things we were interested in – good food, gorgeous views, pretty hikes, and good wine :-).
We started the trip in Tuscany, and stayed in an old 8th century village that was converted to a hotel.

We visited several small towns, and some bigger ones like Siena. It was kind of crazy to think about the fact that Tuscany is like Italy’s version of farmlands. Wine and olives instead of corn and soybeans. I think I could deal with that :-). My absolutely favorite part of this trip was the cooking class we took from 2 Italian sisters, who hosted us in their home. We heard about them through Backroads , and you can find them at Tutti a Tavola. This is their personal patio, and yes that is a field of olive trees right on their land. We even bought a liter of olive oil, pressed on their property, to bring home.

It was just really neat to be in an actual Tuscan home, cooking actual tuscan food. We had a wonderful 5 course dinner, and had so much fun preparing it together. We started with grissini (crunchy italian breadsticks), covered with thin pancetta and then rolled in a mix of brown sugar and crushed red pepper.

Then we roasted tomatoes filled with breadcrumbs, parsley, garlic and of course olive oil. These eventually got mixed with pasta, but they would be fabulous on their own as well.

Then we had pork loin, literally encrusted in italian bread and fennel.

And of course John helped with the Tiramisu.

We met 2 girls from San Francisco a couple from denver, and another couple from Australia. It was such a fun and interesting evening. We headed over to Pienza the next day, and enjoyed this view from our window.

Literally everywhere you look in Tuscany is right off a post card. This was from the hillside town of Montepulciano.

After a few more days of wine tastings, and visiting beautiful countryside towns, we headed down to the coast. I seriously don’t know how John drove on all the crazy roads with crazy Italian drivers, but he never once complained and even seemed to enjoy it. I wouldn’t have lasted 2 minutes.

When we left the states, my mom cried. When we got back, she told us it wasn’t because she was sad to see us go, but because she was so worried about John driving along the Amalfi coast. It is pretty harrowing, thank goodness he likes to drive stick shift, because I can’t imagine driving there with an automatic. We checked out Sorrento, Positano, Amalfi, Ravello and a few smaller towns, but Positano was by far my favorite.

And by night…

I think my second favorite part of the trip was a hike we did called “Footpath of the Gods” or Sentiero degli dei. It was about a 6 mile hike from Bomerano, into Positano. It started off a little rough because we somehow missed the initial sign starting the trail, and ended up walking about 4 miles before finally getting back to the starting point. Once we actually got on the trail it was an easy, well marked hike, with beautiful views.

For being called “The Amalfi Coast”, the actual town of Amalfi was really nothing to write home about. But we still of course took the obligatory picture.

We also took a one day trip to Pompei and Mount Vesuvius, which truthfully I didn’t know anything about, and so wasn’t really expecting much. It ended up being awesome! Pompeii is the largest archeological site IN THE WORLD. It is an entire town from the six or seventh century BC that became preserved under ash when Mount Vesuvius erupted in 79 AD. John is standing in front of what used to be a “fast food joint” in the town. Literally, they made food, and people would take it to go! They also had “plumbing systems” (in BC times people!), and shops, amazingly elaborate houses, and of course the standard gymnasiums, bath houses, amphitheater, that I always associate with Roman times.

We packed a lot into the trip, and even made it over to the Isle of Capri for our last night.

I didn’t want to bore you with too many details, but I didn’t even begin to cover everything we did! If you have any questions about planning a similar trip, be sure to let me know! Overall, it was a really nice getaway for just the two of us before I start residency. It was filled with a lot (probably too much) pasta, wine and gelato, but we both enjoyed every second :-).

Black Bean Patties with Corn Relish and Avocado Cream Sauce

You know the saying, “If you want something done, give it to a busy person?” Well in the past month, I have found that this saying is pretty much spot on. Somehow when I was working 10-12 hour days, studying for shelf exams, running, being a wife, and taking care of a puppy, I had time to post all these new things I made. Then second semester fourth year happened, and for the first time since I can remember, I have a lot of free time, yet I have posted almost nothing on this blog! It’s really true, when you are busy, you just get more done! That being said, it’s not like I haven’t been in the kitchen. I have been trying out lots of fun recipes – everything from making my own greek yogurt, tiramisu cupcakes, shrimp enchiladas and the very delicious but dangerous blackberry pie bars– I just didn’t get any pictures! So finally, here’s a new recipe just in time for the summer-like weather.
I loved this dinner because it’s healthy enough that you feel good about eating it, but the avocado cream sauce gives it just a touch of sass that still makes you feel like your cheating. And if you really feel like being rebellious, I think it would go great with these cookies.

Black Bean Patties with Corn Relish and Avocado Cream Sauce
– Makes about 18 patties
For the patties:
- 2 (15 oz.) cans black beans, drained and rinsed, divided in half
- 2 roasted red bell peppers*, divided in half
- 2 large eggs
- 1 tsp. oregano
- 1 tsp. cumin
- 1 chipotle chile in adobo, minced
- 1 small onion, finely diced
- 2/3 cup cornmeal or panko (plus more, as needed)
- Salt and pepper
- Canola or vegetable oil
For the corn relish:
- 2 tsp. canola oil
- 2 cups corn kernels
- 1 clove garlic, minced
- 1 jalapeño, seeded and minced
- 1 medium tomato, seeded and diced
- Juice of 1 lime
- 2 tbsp. minced fresh cilantro
- Salt and pepper, to taste
For the avocado cream sauce:
- 1 avocado, pitted and coarsely chopped
- ½ cup greek yogurt or light sour cream
- Juice of 1 lime
- Salt and pepper, to taste
Directions
*To Roast the Red Peppers: Preheat oven to 475°. Line a baking pan with aluminum foil Coat the outside of each pepper with olive oil. Cook the peppers for about 20 minutes, turning occasionally, until the skin is lightly browned. Remove from oven and pull aluminum foil around the peppers. Allow to cool for at least 20 minutes, then peel of skin and remove seeds. Can be done several days in advance and stored in the refrigerator.
1. To make the bean patties, place half of the beans in the bowl of a food processor with 1 coarsely chopped bell pepper, the eggs, oregano, cumin, and chipotle. Process until smooth. Finely chop the remaining bell pepper. In a large bowl, lightly mash the remaining beans. Stir in the bell pepper, onion, and smooth bean mixture. Season to taste with salt and pepper
2. Stir in the cornmeal or panko, a bit at time, mixing lightly just until the mixture firms up. (Pick up a bit and see if it can be easily molded into a ball. If it is too sticky, add a little more. I ended up needing at least 1 cup). Chill the mixture for 30 minutes.
3. While the bean mixture is chilling, make the corn relish. Heat the canola oil in a medium skillet over medium-high heat. Add the corn to the pan and sauté briefly until lightly browned, 2-3 minutes. Stir in the garlic and jalapeño and cook just until fragrant, about 1 minute. Transfer the mixture to a bowl. Stir in the tomato, lime juice, and cilantro. Season with salt and pepper to taste.
4. To make the avocado cream sauce, combine all ingredients in the bowl of a food processor or blender. Process until completely smooth.
5. Form the bean mixture into patties approximately 3½ inches in diameter. Heat about 2 tablespoons of canola oil in a large skillet over medium heat. Add the patties in batches, cooking until lightly browned and firm, about 3-4 minutes per side. Serve the patties warm topped with the corn relish and drizzled with the avocado cream sauce.
Source: Annie’s Eats
Quick and Easy Chinese Orange Beef

It is not very often that I like to make something twice, and it is also rare that I like to eat leftovers… so the fact that I made this twice in one week, AND had the leftovers for lunch, should tell you that this meal was a total winner. The first time I made it, I wasn’t expecting much. I mostly just made it to add some variety to our menu, as I have a hard time incorporating lean beef. Then I made it and completely fell in love. For non-marinated flank steak, it was incredibly tender and orange flavor really shines through. Plus, any meal that satisfies my sweet tooth with something nutritious and delicious, is an obvious A+ (Think Blueberry Salmon, Mango Salmon, and Strawberry Pizza). I think this will be a regular in our rotation, because it really does make great lunches the rest of the week.
This meal is ready from start to finish in less then 30 minutes, but some of the steps are more time consuming then the others. For example, the zesting the orange and grating the ginger. To save time even more time you could easily buy the ginger in a squeeze bottle in the refrigerator section, or make the sauce ahead of time. Be sure to start the rice early so it’s ready when the meat is done! 
Quick and Easy Chinese Orange Beef
Serves 4-6
Ingredients
2-3 teaspoons grated orange zest (I just zest 1 whole orange)
1/2 cup fresh squeezed orange juice
1/4 cup dark brown sugar
2 tablespoons rice vinegar
2 tablespoons soy sauce
2 teaspoons Asian chili sauce
2 teaspoons grated fresh ginger
2 teaspoons cornstarch
vegetable oil for pan
1-1/2 pounds flank steak (to clarify: that’s one steak, that weighs about 1.5 pounds)
3-4 green onions, sliced
hot white or brown rice for serving
Instructions
Trim fat from flank steak, then slice as thin as possible across the grain. Lightly sprinkle with salt and pepper.
Whisk orange zest and orange juice, brown sugar, vinegar, soy sauce, chili sauce, ginger, and cornstarch together in a bowl.
Heat a large nonstick skillet over medium high heat. Drizzle pan with oil and tilt to coat. Add half of beef, breaking up any clumps and let cook without stirring for one minute. Stir beef and continue to cook until browned, about 2 minutes; transfer to a bowl and cover. Repeat with remaining beef and transfer to bowl.
Whisk sauce to recombine, add to now-empty skillet, and cook over medium heat until thickened, about 2-3 minutes. Return cooked beef, with any accumulated juices, to skillet and toss to combine. Serve over rice and garnish with green onions.
Source: Our Best Bites
Cinnamon Chip Scones

The end of last week marked the end of my 14th week of AHECs (also known as rural health rotations). We are required to do 8 weeks in a rural health setting as part of our medical school curriculum, but I have had such good experiences in these small towns that I chose to do another 6! This last one was definitely no exception. I got to work one-on-one with probably the second nicest radiologist I’ve ever met (father-in-law will always be first!), who taught me something new everyday, and really helped me to feel prepared for residency by letting me go through films on my own when we had free time. The staff was all so welcoming and made me feel like part of the team, and the patients are just so sweet and so in need of good healthcare in these rural areas.

I had seen this recipe for cinnamon scones almost a year ago and hunted down some cinnamon chips shortly after; but then never actually made these. Then randomly, I saw 2 of my favorite bloggers post scone recipes within days of each other, and I took it as a sign. Scones were clearly the answer of what to bring for my last day of my last rural health rotation! I ended up going with the original recipe I found, because I already had a lot of the ingredients on hand, and I liked that I didn’t have to buy a lot of heavy whipping cream or buttermilk. You can certainly use the method I used in the lemon blueberry scones, and freeze these unbaked, and then bake from a frozen state whenever a morning treat is calling. I am confident they would turn out wonderfully, as cold butter is one of the key ingredients to good scones. I’m certainly glad I had some wonderful staff members to share these with because free time + baked goods is not a good combination around here :-).
Cinnamon Chip Scones
– Makes 16-24 scones
- 3 cups All-purpose Flour
- 1/4 cup granulated sugar
- 2 Tablespoons brown sugar
- 5 teaspoons Baking Powder
- 1/2 teaspoon Ground Cinnamon
- 2 sticks (1 Cup) Unsalted Butter
- 3/4 cups Heavy Cream
- 1 whole Egg
- 1 teaspoon Vanilla Extract
- 1 cup Cinnamon Chips
- Topping
- 1/2 cup Sugar
- 1 teaspoon Ground Cinnamon
- 1-1/2 teaspoon Heavy Cream
1) Preheat oven to 350 degrees. (Unless you chose to freeze and bake later*)
2) In a large bowl, mix together flour, granulated and brown sugar, 1/2 teaspoon ground cinnamon, and baking powder. Cut butter into pieces, then cut into dry ingredients with a pastry cutter or 2 knifes until mixture resembles coarse crumbs. Stir in cinnamon chips.
3) Mix together cream, egg, and vanilla extract. Pour into flour/butter mixture, stirring gently with a fork to combine.
4) Turn onto work surface (mixture will be very crumbly and falling apart.) Divide the dough into 2-3 equal portions. Gently press together the sides as you roll the top of each. Form either into either 2 large circles (to make 16 scones) or 3 medium circles (to make 24 smaller scones).

5) Mix together topping ingredients, stirring with a fork. Sprinkle over the top of the dough, lightly pressing.
6) Cut each circle into 8 wedges. Transfer to a cookie sheet and bake for 20 to 25 minutes. Allow to cool completely. Serve with coffee.
*If freezing, flash freeze for 20 minutes, then wrap individually and store in freezer. When ready to bake, preheat oven to 375º and bake for 25-30 minutes or until just beginning to brown.
Adapted from The Pioneer Woman
Cookies and Cream Cupcakes

I promised you the recipe for these cupcakes, and I didn’t want to disappoint! I had a few ideas in mind for my friend’s birthday, which perfectly coincided with the academy awards, but I’m so glad she chose these! I made them once before for another birthday, but for some reason decided I didn’t like the pictures I took, and so never posted the recipe. Of course with the business of the party, I didn’t get around to taking any better pictures this time, but in retrospect the ones I took way back in June aren’t bad! In fact, they look so delicious, they kind of make me want to make these cupcakes again!

I really made my day when one of the guests at the party said, “Seriously…These look so good, I thought they were from Cake in a Cup! ” – which is the local cupcake place that happened to have won Cupcake Wars. The truth is, it’s pretty easy to make these look professional, and as long as you follow the recipe, you can’t go wrong with taste. In fact, I think these cupcakes are even better then any you could buy, because I don’t think too many places put a half an oreo on the bottom of the cupcake, and then another 20 in the batter. Let’s just say this isn’t exactly a “light cupcake”…like seriously when you pick it up you will be like, OMG this is heavy! But it is SO good!

In order to get half an oreo with the frosting on the bottom of the cupcake, I ended up using a sharp knife to get the frosting all on one side. I tried the old “twist” method, but ended up breaking (and then eating) a few too many oreos. Overall you will need 56 oreos for these, so be sure to buy 2 packs.
Cookies and Cream Cupcakes
– Makes 24 Cupcakes
- 24 Oreo halves, with cream filling attached
- 2¼ cups all-purpose flour
- 1 tsp. baking powder
- ½ tsp. salt
- 8 tbsp. unsalted butter, at room temperature
- 1 2/3 cup sugar
- 3 large egg whites, at room temperature
- 2 tsp. vanilla extract
- 1 cup milk
- 20 Oreo cookies, coarsely chopped (I quarter them)
- 8 oz. cream cheese, at room temperature
- 6 tbsp. unsalted butter, at room temperature
- 1 tbsp. vanilla extract
- 4 cups confectioners’ sugar, sifted
- 2 tbsp. heavy cream
- Oreo cookie crumbs
- 24 Oreo cookie halves
1) Preheat the oven to 350˚ F. Line the wells of two cupcake pans with 24 paper liners. Place an Oreo halve in the bottom of each liner, cream side up. In a medium bowl, combine the flour, baking powder and salt; stir together with a fork to blend and set aside.
And the award goes to…

I know this is another non-traditional post, but what can I say, my life has been a little non-traditional lately! Since our schedules have been laid back, with no major exams looming over our heads, John and I made a goal to see all of the Oscar nominees for best picture before the big event. (We love movies, and $5 movie night on Tuesdays is hard to pass up!) We got to 89% of our goal – seeing all but Amour before the awards began. Amour was a hard movie to track down, especially in a small place like Toledo, OH. I was kind of bummed about not batting a thousand; but after seeing how depressing it looked, I’m kind of glad that’s the one we missed. To honor our movie loving nature, and to have some extra fun on a Sunday night, we decided to have an Oscar’s Party – which I’m hoping is something we can make an annual event! I had a ton of fun planning the food, decorations, and watching the winners announced with my own ballot made it quite a nail biting experience! I would like to take credit for the decorations, but truthfully, when my mom heard about the party she sent me home with a box of ideas, and then a few days later I got a “red carpet” in the mail ;-).
My personal favorite was this centerpiece that included miniature movie posters for all 9 of the best picture nominees. I simply went onto ABC’s website and printed the pictures of each nominee on photo paper, as well as the Oscars logo.

Then of course there was the star of the show – The Oscars themselves. John can take complete credit for turning these mermaids from the dollar store into masterpieces. I’m quite sure you could buy some imitation Academy awards, but this was much more fun, and I’m sure less expensive. These also served as first, second and third place prizes for the winners. The mermaids were $1 each, and then we also bought some mini frisbees to serve as the bases. John pulled the hair off of them, tied their hands together (creepy, but necessary), and then hot glued the whole thing in place. He put 3 coats of a Rust-Oleum Metallic Brass Spray paint over the whole thing. In retrospect, you could see the glue much more than anticipated, but they still looked really awesome, and a lot funnier then store bought awards.

Here’s the process:


It’s amazing what a can of spray paint can do!

Then there was the red carpet, which was actually made of 3 red bath mats (found at Marc’s), taped together with some duct tape. We made sure to wash these before placing them on top of our carpet, since cheap bright red towels can bleed. Next time I really want to take pictures of people coming in on the carpet, but there is just so much going on at the start of a party.


I wanted to keep the menu classy (this is a red carpet affair after all), but also reasonable in price and manual labor. Appetizers for a big group can be very time intensive, so I tried to limit the number of things that had to be individually assembled. If you have questions about any specifics, feel free to ask.
- Tortellini with a creamy lemon and roasted garlic dipping sauce
- Crostini with goat cheese and roasted red peppers
- Spinach and artichoke dip with pumpernickel and crostini
- Mini phyllo cups filled with seafood salad
- Bacon wrapped pineapple and water chestnuts
- Assorted Cheeses
- Salami with crudites
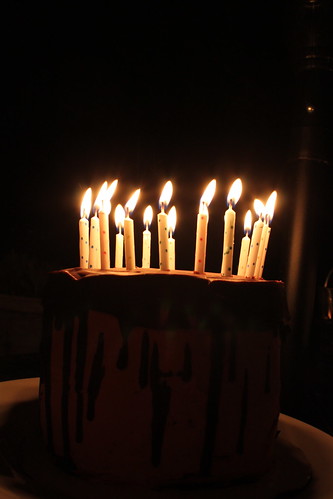
- Cookies and Cream Cupcakes
The cheese and dessert table. Rope lights are a really fun and easy way to make the whole event “sparkle”.

A few of the appetizers sitting out, and some serious ballot decisions in the background :-).
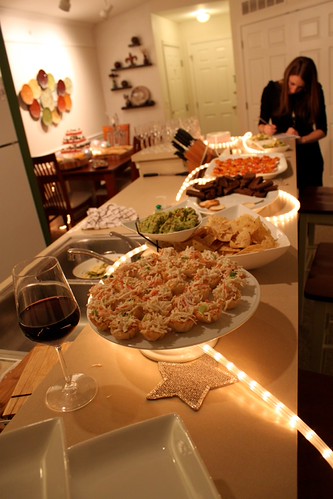
With last minute prep, welcoming people, and trying to have fun, I didn’t get to take any close up pictures of the appetizers in order to post recipes. I figured I’d just post about the party in general, because it would gives me something to improve upon for next time, and it’s a good way to remember where to start. Since I made the cupcakes especially for a friend’s birthday, I do have some pictures of those, which I will be posting, along with the recipe about shortly! Stay Tuned!

Overall, it was quite a hollywood affair :-)!

Traveling the World like an M4
I know, it’s been a while since my last post….but I’m hoping these pictures will make up for it! Between traveling to 10 different cities for interviews and taking a family trip to Tanzania and Zanzibar, it has been a very busy last 2 months- but I have enjoyed (almost) every minute of it :-)!
We all happened to have several weeks off at Christmas, and since the holidays can be kind of a hard time, it seemed like the perfect time to take a big family trip together. Africa was somewhere we all happened to agree on- and I’ll have to say it was the coolest place I’d ever been. Big shout out to my mom who treated us all to the trip of a lifetime… She is probably one of the most adventurous 60 year olds I know.

One of my favorite pictures: Zebra, Rhino, Buffalo, Elephant and Flamingos in the background in Ngorongoro crater.

We saw lions mating….

And Simba!!!

A mamma monkey holding her baby tight.

Water buffalo, and heards and heards of wildebeast and zebras during their great migration.

And elephants! We took over 2000 pictures, but I thought I’d spare you all of them. 
In addition to the thousands of animals we saw, we also got the opportunity to go into the towns and meet some of the locals. This is a Masai boy, who is sent away from the rest of the tribe for several months after being circumcised at the age of 15.

And to end the trip we got to spend several days on the beaches of Zanzibar.

Spending Christmas in a tropical climate is definitely something I could get used ot. 
When we got back to America, John was able to come with me on a few interviews, which proved to make the interview trail a lot more fun. 
We were able to travel the coast in California for a few days, and it’s safe to say I’m in love. I’m not really a big city girl, but you can’t really argue with 75 degree sunny days in the middle of January.

And then my favorite part, we headed to Santa Barbara. Probably my new favorite place in the United States. I’d been there once before when we convinced our parents we needed to look at California colleges :-), but this time I was really able to take it all in. 
We hiked up to inspiration point. 
Had some wonderful meals, and some pinkberry ice cream, and of course watched the sunset.

It was kind of hard to come back to the snow at DTW, but here’s to hoping Santa Barbara is hiring some docs in 5-6 years :-)! I’m living the good life of a fourth year from here on out, so I’ll be back with some great recipes soon! If you have any questions about going on a safari, feel free to contact me!
Three Bean and Beef Chili

As much as I love an interesting dessert, or a buttery breakfast baked good, usually when I am scouring the internet for recipes, I am looking for dinner. After all, it is technically possible to go a day without dessert (well not for me, but for some people); but most everyone would agree that at least one meal is a necessity. So while classic chili might not be the most exciting thing ever posted here, I can say that this is a tried and true recipe that will keep you warm on a wintery night. This is a real crowd pleaser, and my mom even requested that we make it as her birthday meal. Personally, I would’ve gone with the Lobster and Corn Chowder, but I guess that’s why it’s her birthday ;-).
For the longest time I only liked turkey chili, but I’ve found that extra lean beef actually has the same amount of fat as turkey, with the added benefits of a healthy dose of iron and a lot more flavor. Be careful though, because using anything less than 90/10 will give you that greasy chili that I personally think is gross. (I prefer my fats disguised in baked goods, not floating on top of my soup). This chili is not particularly spicy, but can easily be toned down or up with the addition of extra jalepenos or crushed red pepper. Similar to the Cincinnati Chili, this recipe uses bittersweet chocolate, which really adds a dimension of flavor so don’t leave it out.

Classic Beef and Bean Chili
Makes 8 servings
Ingredients:
- 2 pounds lean ground beef
- 2 large onions, chopped (2 cups)
- 6 cloves garlic, minced
- 2-4 jalapeño peppers, seeded and finely chopped
- 2 tablespoons chili powder
- 2 teaspoons ground cumin
- 1 15-ounce can tomato sauce
- 2 cups beer (or water)
- 1 15-oz can kidney beans, rinsed and drained
- 1 15-oz can black beans, rinsed and drained
- 1 15-oz can chili beans, in sauce
- ½ teaspoon salt
- ¼ cup chopped fresh cilantro
- 1 ounce semisweet chocolate, chopped
- Crushed red pepper, if desired
- Shredded cheddar, green onions, additional jalapeños and corn chips for topping
Directions:
Brown the beef in a large Dutch oven set over medium heat. Drain off fat if necessary. Add the onions, garlic and jalapeños and continue cooking for about 5 minutes, until starting to soften. Add the chili powder and cumin and cook until fragrant, about 1 minute. Stir in the tomato sauce and beer (or water) and increase heat to bring the mixture to a boil. Once boiling, reduce heat to medium-low and cover. Simmer for 10 minutes.
While the beef mixture is cooking, place one can of beans in a medium bowl and mash with a fork. Stir the remaining two cans of beans, along with the mashed beans, into the chili and return to a simmer. Cook for 15 to 20 minutes. Remove from heat and stir in salt, cilantro and chocolate. Continue stirring until the chocolate has melted. Taste and adjust seasoning as needed. Serve with desired toppings.
Adapted from Cook Like a Champion
Baked French Toast

After 5 straights days of early wake-ups to cold, dreary rain, sleeping in on a Saturday and enjoying breakfast sounded like a much better idea then running. Back in Toledo, when the weather gets bad I tend to hit up the treadmill at our apartment complex, but on my last away rotation, it just seemed like a waste to brace the weather to drive to the gym, just so I can run in place. I’ve actually been pleasantly surprised that my runs in the cold rain have been pretty enjoyable, it’s just much harder to take that first step out the door on a Saturday morning. In fact, I’ve now made it my goal to run outside all winter this year. So in comes this amazing french toast, that can be made the night before and ready within 30 minutes of waking up on a sleepy Saturday.
This is really the perfect meal for company because to make a double batch would be no extra trouble. It certainly beats sitting over the stove and flipping pancake after pancake while the finished ones sit in the oven getting soggy. Besides, I have always preferred French toast to pancakes, which likely stems from my childhood (okay..and high school..and college) obsession with all things French. This dish is really wonderful enough to eat on its own, with out added syrup or butter, which is something I would rarely say about pancakes. We served it with some turkey sausage, and it made for such a cozy warm Saturday morning. And thanks to some help from lululemon (my unfortunate new obsession), I still had a good run in the rain later that day.

Baked French Toast
Serves 4-6
Ingredients:
- 4 tablespoons (1/2 stick) unsalted butter, melted
- 3/4 cup packed light brown sugar
- 1 loaf (about 1 pound) brioche or challah, sliced 1 1/2 inches thick
- 6 large eggs, lightly beaten
- 1 cup milk (at least 2%)
- 1 tablespoon pure vanilla extract
- 3/4 teaspoon ground cinnamon
- 1/4 teaspoon ground ginger
- sprinkling of ground nutmeg
- 1/2 cup chopped pecans
- Maple syrup, confectioners’ sugar or fresh fruit for serving, optional
Directions:
Combine the butter and brown sugar in a 9×13-inch baking dish. Arrange the bread slices in the dish. (It’s fine if they overlap.) In a large bowl, whisk together the eggs, milk, vanilla, cinnamon and ginger. Pour the mixture evenly over the bread and allow it to soak in. Top with pecans and nutmeg and cover tightly with plastic wrap. Refrigerate at least 3 and up to 12 hours.
When ready to bake, preheat oven to 350º. Set the dish out while the oven is preheating. Bake until browned and set, about 35 minutes. Allow to cool slightly on a wire rack before serving.
Adapted from: Cook Like a Champion, Originally from Bon Appetit, Y’all
The Perfect Turkey

I know you might be thinking that this post is about 9 days too late, but I figured I’d post my Thanksgiving turkey, because you still have plenty of time to plan a turkey for Christmas! I mean really….turkey only one day per year is clearly not enough. Especially when the turkey is this good.
This Thanksgiving we had a fairly small family gathering, especially compared to the 24 people my Aunt Mary managed to get around one amazing table last year! It’s been a hard year for us and today is especially difficult. I can’t believe it was just a year ago that my family showed up at my apartment to break the news that my father had passed away. That’s a day I will never forget. I just remember seeing Max fly through the door, leash trailing behind him with no owner attached, and before my mom even got to the door, I knew he was gone. As hard as this year has been, it’s also been a lesson in how resilient the human spirit is. At first I had no idea how I would even make it to the next day, let alone the rest of medical school. But here I am a whole year later, with an adorable puppy, an awesome husband, and only 6 months of medical school left! If you have had the misfortune of losing someone you loved recently, let me just promise you that it will get easier. And seriously, I really think some turkey for comfort food could really help. I’m sure my dad would’ve preferred these snowball cookies, but don’t worry, I already made a batch in his honor.
This turkey is a little bit involved, but it is by far the most moist, tender and delicious turkey you will ever eat. I used to be disappointed by the fact that turkey would take up space on my plate in lieu of more sides- but this turkey is really the star of the meal. First you throw all the ingredients in a pot and bring it to a boil. Then you have to let it cool, which unfortunately always takes longer than I think it will.

Houston wouldn’t let this turkey out of his sight. I’ve never seen him like this before…he obviously knew this turkey was special. I think this is his “Is that for me? Awww please mom….” face.

Then you have to pour the cooled brine, along with ice cubes and cold water over the turkey. The trickest part about this is finding a container that will allow the turkey to be totally covered. In fact, I ended up taking it out of the container pictured here and putting it in a GIANT stock pot. Last year I used a gray “sterelite” container I found at Walmart that was perfect – but it was at my apartment. I’ve also heard of people using new and throughly cleaned 5 gallon paint buckets from Lowe’s/Home depot. Just remember you need to keep this container cold, so if it’s 60 degrees on Thanksgiving like it was in Ohio this year, putting it in the garage will not cut it.

After the turkey has soaked in a cold place for 12-24 hours, take it out, rinse it it in cool water and set it in a pan. In case you didn’t know, that’s me with the awkward smile on my face. There’s some sage butter in the white bowl in front of me, which you spread under the skin in as many places as you can. Then you take a delicious mixture of chicken broth, butter and garlic, and inject it all over the turkey meat. This part is pretty fun. Between injecting the meat, and suturing the cavity closed with 2-0 vicryl, I was feeling like a real surgeon by the end of the day :-).

Then stuff the turkey according to your liking. This year we used my Grandma’s traditional (and amazing) stuffing, but last year I just put some onion, apple and celery in the cavity – both worked great. Then put the turkey in a “Turkey Bag” and cook according to the directions on the box – ours took about 3 hours. (I know that turkey bags might not seem very gourmet, but I promise they make the most moist turkeys!).
Then of course let the turkey sit for 20-30 minutes before cutting to let the juices redistribute. True comfort food. Why don’t we make turkey like 10 times per year! I’ve included all the specifics below. I hope you had a great Thanksgiving and just remember all through this season (and always) to tell the people how much they mean to you. You will never regret saying I love you just one last time.
The Perfect Turkey
Equipment
- large container that will hold turkey plus 2 gallons of liquid
- oven safe thermometer
- Flavor injector/syringe
- Turkey roasting bag
- heavy duty roasting pan
Ingredients
- 1 turkey, 12 – 16 pounds
- 1 gallon (16 cups) chicken broth
- 1 tablespoon whole peppercorns
- 1/2 cup white or brown sugar
- 1 cup kosher salt
- 5-6 cloves smashed garlic
- 1 tablespoon dehydrated onion
- 1 large sprig fresh thyme*
- 1 large sprig fresh sage*
- 1 large sprig fresh rosemary*
- 1 handful fresh parsley
- 8 cups cold water
- 8 cups ice
*the poultry blend of fresh herbs should contain these 3
- 3/4 c. salted butter, divided
- 1 tablespoon chopped fresh sage
- 1/2 c. chicken broth
- 2-3 cloves garlic
Stuffing
- Traditional Bread stuffing OR
- 1 apple (chopped in half), 1-2 small onions (chopped in half), 4 celery stalks (cut into thirds)
About a week before you begin brining your turkey, place it in the refrigerator to defrost. Alternatively, purchase a fresh turkey. (I have done both and I don’t actually think it makes a significant difference in the final product).
The day before you roast your turkey, combine the chicken broth and the remaining brine ingredients (through the parsley) in a very large stockpot. Bring to a boil and then remove from heat and allow to cool to room temperature, which will take over an hour.
Remove the packaging from the turkey. Remove the neck and giblets (be sure to check both the body and neck cavities) and reserve for gravy, if desired. Rinse the turkey in cool water and then place it in the appropriate container. Add the cold water and the ice cubes, then add the brine mixture. Stir to combine. Cover with the lid and then place in a cold place for up to 24 hours.
When you’re ready to roast your turkey, preheat the oven according to the directions on the roasting bag packaging. Soften 1 stick of butter and mix it with 1 tablespoon fresh sage and set aside. Remove the turkey from the brine, rinse it in cool water, and place in the roasting pan. Use your hands to loosen the skin between over the breast. Spread handfuls of the sage butter between the breast and the skin, rubbing any excess over the outside of the skin.
In a blender, combine 1/2 c. chicken broth, 2-3 cloves garlic, and 1/4 c. melted butter until completely smooth. Let sit for at least 20 minutes, then strain out garlic to make it easier to draw up. Use the flavor injector to inject the mixture all over the turkey.
Slip any remaining rosemary and thyme sprigs under the skin.
Stuff the turkey cavity with bread stuffing or a mixture of apple, onion, and celery. Insert the meat thermometer into the thickest part of the turkey breast and then place the turkey into the roasting bag and roast until the thermometer registers 165 according to the roasting bag directions. When you’ve reached 165, remove the turkey from the oven and cut the bag away from the turkey. Allow it to stand for 15-20 minutes before slicing to allow the juices to redistribute and keep the turkey juice.
Slightly adapted from Our Best Bites, who adapted it from Alton Brown
Lobster Corn Chowder

Being on away rotations, I haven’t been up to my usual menu planning and weeknight meal routine. Between applications, scheduling interviews, and overall crazy hours, I haven’t missed it too much, but I’m not sure I can say the same for John (who has been eating chez chef Boyardee). But to make up for it, I was able to rationalize this fancy weekend meal. (It also didn’t hurt that Mom was buying :-)). After apple picking, running and hiking in the park, this chowder was the perfect end to a fall themed day. It is really one for the record books. It will make you feel like you on dining on the set of barefoot contessa and it would be the perfect fall meal for company, or if you just feel like indulging yourself.

This was my first time ever cooking with lobster, and I don’t pretend to know much about it. I did learn that it is very easy to overcook it, and for such an expensive meat, that is really something you don’t want to do. So err on the side of undercooked, because it will inevitably cook a bit more once you add it to the stew. Also, while this soup still tasted wonderful the next day, I did notice that there was a bit of color separation, which didn’t make for the most gorgeous photograph. If you want to see what it looked like the first night, check out this blog. Despite the work, and the amount of cream (once in a while..) this is definitely something I will be making again. In fact, it almost makes me wish I actually lived in New England, which is saying a lot for a girl who hates the cold :-).
Lobster Corn Chowder
Serves 6
Ingredients:
- 3 (1 1/2lb) cooked lobsters
- 3 ears of corn
For the stock:
- 4 tablespoons unsalted butter
- 1 cup chopped yellow onion
- 1/4 cup sherry
- 1 teaspoon paprika
- 4 cups milk (skim works fine)
- 2 cups heavy (whipping) cream
- 1 cup dry white wine
For the soup:
- 1 tablespoon good olive oil
- 1/4 pound bacon, large-diced
- 2 cups large-diced unpeeled Yukon gold potatoes (2 medium)
- 1 1/2 cups chopped yellow onions (2 onions)
- 2 cups diced celery (3 to 4 stalks)
- 1 tablespoon kosher salt
- 1 teaspoon freshly ground black pepper
- 2 teaspoons chopped fresh chives
- 1/4 cup sherry
Instructions:
- Remove the meat from the shells of the lobsters. Cut the meat into large cubes and place them in a bowl. Cover with plastic wrap and refrigerate. Reserve the shells and all the juices that collect. Cut the corn kernels from the cobs and set aside, reserving the cobs separately.
- For the stock, melt the butter in a stockpot or Dutch oven large enough to hold all the lobster shells and corncobs. Add the onion and cook over medium-low heat for 7 minutes, until translucent but not browned, stirring occasionally. Add the sherry and paprika and cook for 1 minute. Add the milk, cream, wine, lobster shells and their juices, and corn cobs and bring to a simmer. Partially cover the pot and simmer the stock over the lowest heat for 30 minutes.
- Meanwhile, in another stockpot or Dutch oven, heat the oil and cook the bacon for 4 to 5 minutes over medium-low heat, until browned and crisp. Remove with a slotted spoon and reserve. Add the potatoes, onions, celery, corn kernels, salt, and pepper to the same pot and saute for 5 minutes. When the stock is ready, remove the largest pieces of lobster shell and the corn cobs with tongs and discard. Place a strainer over the soup pot and carefully pour the stock into the pot with the potatoes and corn. Simmer over low heat for 15 minutes, until the potatoes are tender. Add the cooked lobster, the chives and the sherry and season to taste. Heat gently and serve hot with a garnish of crisp bacon
Source: Smells Like Home , originally adapted from Back to Basics by Ina Garten
Pumpkin Cream Cheese Filled Muffins

I cannot believe it is already fall. Seriously…Where did summer go? It was especially shocking this year because I was in South Carolina, and when I came back – BAM – cold, rainy weather. I have never been one of those people who looks forward to fall. Being someone who loves to be outside, I just find it much more enjoyable when the weather is warm. Sure it’s sometimes nice to curl up with a blanket on a cold night, but there are more than enough months for that here in Ohio. The one redeeming factor of fall is the promise of fall foods (well that and having an excuse to buy new boots). Actually these pumpkin muffins alone might actually be reason enough to look forward to the season.
I made these several times last year but they always went so fast I never had a chance to snap a picture. When I needed something to take into clinic for a “luncheon” we had planned, I was thrilled to make these again; both because I love them and because I knew I’d finally be able to share them with you all. Someone described them as a pumpkin roll in muffin form, and I’d have to say this is spot on, but these muffins might even be better because they have a streusel topping. Since I tend to be a late night baker, on more then one occasion I have started mixing only to remember that the cream cheese needs to freeze for a full 2 hours before you can bake with it. I tried it once without letting the cream cheese harden, and as soon at the cream cheese gets hot, it bubbles up right through the top of the muffin and spills onto the pan. Wasting cream cheese filling is pretty much an immortal sin, so plan ahead and mix up some cream cheese to put in the freezer right now. Then bring these muffins anywhere and you will become popular (but unfortunately they will not help you remember the bones in the hand.)

Pumpkin Cream Cheese Muffins
Makes 20-24 muffins
Ingredients
For the filling:
- 8 oz. cream cheese, softened
- 1 cup powdered sugar
For the muffins:
- 3 cups all-purpose flour
- 1 tsp. ground cinnamon
- 1 tsp. ground nutmeg
- 1 tsp. ground cloves
- 1 tbsp. plus 1 tsp. pumpkin pie spice
- 1 tsp. salt
- 1 tsp. baking soda
- 4 large eggs
- 2 cups sugar
- 2 cups pumpkin puree
- 1¼ cups vegetable oil
For the topping:
- ½ cup sugar
- 5 tbsp. flour
- 1½ tsp. ground cinnamon
- 4 tbsp. cold unsalted butter, cut into pieces
To prepare the filling, combine the cream cheese and powdered sugar in a medium bowl and mix well until blended and smooth. Transfer the mixture to a piece of plastic wrap and shape into a log about 1½-inches in diameter. Smooth the plastic wrap tightly around the log, and reinforce with a piece of foil. Transfer to the freezer and chill until at least slightly firm, at least 2 hours.
To make the muffins, preheat the oven to 350˚ F. Line muffin pans with paper liners. In a medium bowl, combine the flour, cinnamon, nutmeg, cloves, pumpkin pie spice, salt and baking soda; whisk to blend. In the bowl of an electric mixer combine the eggs, sugar, pumpkin puree and oil. Mix on medium-low speed until blended. With the mixer on low speed, add in the dry ingredients, mixing just until incorporated.
To make the topping, combine the sugar, flour and cinnamon in a small bowl; whisk to blend. Add in the butter pieces and cut into the dry ingredients with a pastry blender or two forks until the mixture is coarse and crumbly. Transfer to the refrigerator until ready to use.
To assemble the muffins, fill each muffin well with a small amount of batter, just enough to cover the bottom of the liner (1-2 tablespoons). Slice the log of cream cheese filling into 24 equal pieces. Place a slice of the cream cheese mixture into each muffin well. Divide the remaining batter among the muffin cups, placing on top of the cream cheese to cover completely. Sprinkle a small amount of the topping mixture over each of the muffin wells.
Bake for 20-25 minutes. Transfer to a wire rack and let cool completely before serving.
Source: Annie’s Eats

