
Bahn Mi Bowls with Lemongrass Meatballs

In the last nearly 2 years since I moved away from my hubby and Houston (the world’s cutest and most surgery prone dog), I have been trying to make as many of the foods that I enjoy but know they (he) might not care for. These bowls don’t scream “All-American”, which arguably is hubby’s favorite type of food, so I added them to the “To make before John comes” list. They stayed on that list for far too long, mostly because they called for ground pork, which a) I almost never buy and b) is not that great for you. Well then came along Chrissy Teigen’s cookbook, and somehow a scantily clad supermodel can convince me that eating pork is good. And hence, I had pork in my freezer.
Nonetheless, I was still a little worried about a meatball entirely made of pork, which led me to an important discovery. You can make ground chicken at home! I had a chicken breast in the freezer, so I partially thawed it and popped it in the magic bullet and bam! Homemade ground chicken! I mixed it about 50/50 with the pork and these meatballs turned out perfect! I actually felt like if I didn’t add the chicken they might have been a bit too greasy.
And finally, about the finished product. To make them easier I used left over brown rice from a meal earlier in the week, and then its simply mixing a few things for meatballs and shredding some carrots. These actually turned out so good that I decided I made them again for John, and even the All-American kid liked them.
Bahn Mi Bowls with Lemongrass Meatball
Quick Pickled Vegetables
- 1/3 cup rice vinegar
- 2 T sugar
- 1 teaspoon sesame oil
- 1/2 teaspoon salt
- 5 carrots, cut into thin ribbons (I used a peeler)
- 5 mini bell peppers cut into rings
- 1/2 pound ground pork
- 1/2 pound ground chicken
- 1-2 tablespoons lemongrass paste*
- 4 cloves garlic, minced
- 1 tablespoon chili paste (like Sriracha or Sambal Oelek)
- 1 tablespoon fish sauce
- 2 teaspoons cornstarch
- 1 teaspoon salt
- brown rice, quinoa, rice, or noodles
- cilantro, or other herb toppings such as basil, mint, scallions
- crushed peanuts
- spicy mayo (just mix mayo with a hit of sriracha)
- Quick Pickled Carrots: Whisk the rice vinegar, palm sugar, sesame oil, and salt together. Soak the carrots and peppers in the mixture for 30 minutes to 1 hour.
- Meatballs: Mix all ingredients. Roll into small meatballs with your hands, refrigerate if possible to increase firmness. Heat a little bit of olive oil over medium high heat. Add the meatballs and fry until golden brown on the outside and fully cooked (not pink) inside, or 165 degrees.
- Bowls: Layer the carrots and meatballs over quinoa, rice, or noodles. Top with herbs, peanuts, and/or spicy mayo.
*You can find this near the herbs in the refrigerated produce section of most grocery stores (found mine at harris teeter)
Slighlty adapted from Pinch of Yum
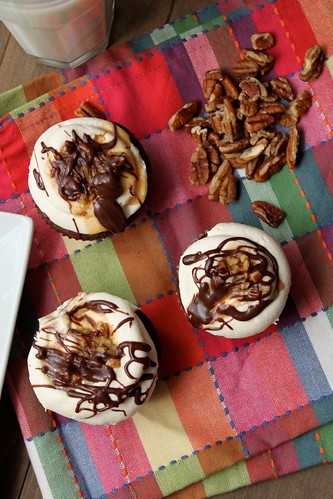
Turtle Cupcakes

Being in the position I’m in can be very stressful, with lots of uncertainty in the future and I’m not the best at dealing with it. That’s why I’m so grateful for wonderful co-workers who help keep me grounded, make me laugh and always know how to calm me down. They are the best; and while terrible at our short lived diet plans, I still love them. Eating healthy is hard when you work in a dermatology office that seems to have an endless supply of girl scout cookies and leftover cake. So when it was my funniest friend’s birthday, I obviously had to make cupcakes, to contribute to the problem.
I toyed with a few flavor ideas, but ultimately decided on turtle because, 1) I had all the ingredients and 2) who doesn’t love a turtle sundae. It’s basically a super moist, yet sturdy, cupcake base, topped with a caramel cream cheese frosting, ganache and a caramel pecan filling. “Some people” were a little worried about how nuts would taste on a cupcake, but I assure you, you have nothing to fear. It was delicious. If I had to make them again, I would probably double the caramel and pipe some caramel filling, or scoop some caramel pecan filling, into the center. I also used low fat sour cream (because it’s what I had), but no one complained :-)!
TURTLE CUPCAKES
Makes 2 dozen
INGREDIENTS
For the cupcakes:
½ cup plus 1 tablespoon Dutch-process cocoa powder
½ cup plus 1 tablespoon hot water
2¼ cups all-purpose flour
¾ tsp. baking soda
¾ tsp. baking powder
½ tsp. salt
2 sticks plus 1 tablespoon unsalted butter, at room temperature
1 2/3 cups sugar
3 large eggs, at room temperature
1 tbsp. vanilla extract
¾ cup sour cream
For the caramel and filling:
½ cup sugar
½ cups heavy cream, warmed
1 vanilla bean, split lengthwise (optional)
¼ tsp. coarse salt
½ tsp. vanilla extract
½ cup chopped pecans
For the frosting:
12 oz. cream cheese, cold
12 tbsp. (6 oz.) unsalted butter, at room temperature
6 tbsp. caramel sauce (recipe above)
2¼ cups confectioners’ sugar, sifted
Pinch of coarse salt
For the chocolate ganache:
2 oz chopped bittersweet (60% cacao) chocolate
1/4 cup heavy cream
1 T. butter
DIRECTIONS
- Preheat the oven to 350˚ F. Line cupcake pans with paper liners. In a small bowl, combine the cocoa powder and hot water and whisk until smooth. In another medium bowl combine the flour, baking soda, baking powder, and salt, and whisk to blend.
- Combine the butter and sugar in a medium saucepan set over medium heat. Cook, stirring occasionally, until the mixture is smooth and the butter is completely melted. Transfer the mixture to the bowl of an electric mixer and beat on medium-low speed until the mixture is cool, about 4-5 minutes. Add the eggs one at a time, mixing well after each addition and scraping down the sides of the bowl as needed. Blend in the vanilla and then the cocoa mixture until smooth. With the mixer on low speed, add the flour mixture in three additions alternating with the sour cream, beginning and ending with the dry ingredients and mixing each addition just until incorporated.
-
Divide the batter evenly between the prepared liners. Bake until a toothpick inserted in the center comes out clean, about 18-20 minutes, rotating the pans halfway through baking. Let cool in the pan about 5-10 minutes, then transfer to a wire rack to cool completely.
- To make the caramel, spread the sugar in an even layer over the bottom of a large, heavy-bottomed saucepan. Place over medium-low heat, watching carefully. When the sugar begins to liquefy around the edges, use a heatproof spatula to gently stir it towards the center. Continue stirring very gently until all the sugar is melted, taking care not to over stir. Measure out the heavy cream in a liquid measuring cup and scrape the seeds from the vanilla bean into the cream. Set aside. Once the caramel reaches a deep amber color, immediately remove the sauce pan from the heat. (To test the color, spoon a drop onto a white plate or bowl.) Carefully pour half of the heavy cream into the saucepan in a steady stream down the edge of the pan, whisking constantly. The mixture will steam and bubble violently. Stir until the cream is well incorporated, then whisk in the remaining cream. Stir in the salt and the vanilla. If any sugar has seized or hardened, place the saucepan over low heat and whisk until smooth. Transfer to a bowl and let cool to room temperature. If you desired, double the recipe and pipe a small dollop of caramel into the center of each cupcake at this time.
- To make the frosting, combine the cream cheese, butter, and caramel sauce in the bowl of an electric mixer. Beat on medium-high speed until smooth and creamy, about 2 minutes. Mix in the confectioners’ sugar and salt at medium speed until light and fluffy, about 2 minutes more. Transfer the frosting to a pastry bag with a large round tip. Pipe a heavy swirl of frosting over the top of each cupcake. Use the tip of a small offset spatula or a small spoon to scoop an indentation out of the center of the frosting.
- To make the chocolate ganache, chop chocolate and place in a small bowl. Heat heavy cream in a saucepan or carefully in the microwave until hot. Pour over chocolate. Let sit for 1-2 minutes, then stir until smooth. Stir in 1 T butter. Let sit at room temperature until desired consistency.
- In a small bowl, mix together of the caramel sauce and the chopped pecans. Fill the indentations in the frosting with a small spoonful of the caramel-pecan mixture. Drizzle the cupcakes with additional caramel sauce, chocolate ganache, and sprinkle with additional chopped pecans, if desired.
Recipe from Annie’s Eats
Traveling the World like an M4
I know, it’s been a while since my last post….but I’m hoping these pictures will make up for it! Between traveling to 10 different cities for interviews and taking a family trip to Tanzania and Zanzibar, it has been a very busy last 2 months- but I have enjoyed (almost) every minute of it :-)!
We all happened to have several weeks off at Christmas, and since the holidays can be kind of a hard time, it seemed like the perfect time to take a big family trip together. Africa was somewhere we all happened to agree on- and I’ll have to say it was the coolest place I’d ever been. Big shout out to my mom who treated us all to the trip of a lifetime… She is probably one of the most adventurous 60 year olds I know.

One of my favorite pictures: Zebra, Rhino, Buffalo, Elephant and Flamingos in the background in Ngorongoro crater.

We saw lions mating….

And Simba!!!

A mamma monkey holding her baby tight.

Water buffalo, and heards and heards of wildebeast and zebras during their great migration.

And elephants! We took over 2000 pictures, but I thought I’d spare you all of them. 
In addition to the thousands of animals we saw, we also got the opportunity to go into the towns and meet some of the locals. This is a Masai boy, who is sent away from the rest of the tribe for several months after being circumcised at the age of 15.

And to end the trip we got to spend several days on the beaches of Zanzibar.

Spending Christmas in a tropical climate is definitely something I could get used ot. 
When we got back to America, John was able to come with me on a few interviews, which proved to make the interview trail a lot more fun. 
We were able to travel the coast in California for a few days, and it’s safe to say I’m in love. I’m not really a big city girl, but you can’t really argue with 75 degree sunny days in the middle of January.

And then my favorite part, we headed to Santa Barbara. Probably my new favorite place in the United States. I’d been there once before when we convinced our parents we needed to look at California colleges :-), but this time I was really able to take it all in. 
We hiked up to inspiration point. 
Had some wonderful meals, and some pinkberry ice cream, and of course watched the sunset.

It was kind of hard to come back to the snow at DTW, but here’s to hoping Santa Barbara is hiring some docs in 5-6 years :-)! I’m living the good life of a fourth year from here on out, so I’ll be back with some great recipes soon! If you have any questions about going on a safari, feel free to contact me!
Salmon Cakes with Lemon Yogurt Sauce
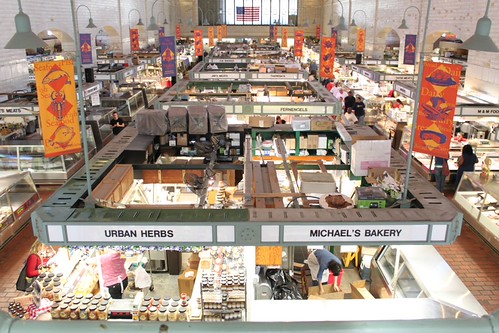
After 6 long weeks of studying (plus 2 years of med school), I finally finished that huge exam. Honestly, I will have no idea how it went until I get my score in about a month- but for now, I’m just celebrating being done! I spent the evening after my test in Toledo hanging out with friends, and then left the next day for a “vacation” to Brecksville with my Mom. While I put vacation in quotes, it really has been a vacation. Between a lot of wine and a lot of fun family time, we managed to make a trip down to the West Side Market. Of course, I had a blog menu all planned out – and my mom was really excited to take part in something that was going to go on the internet :-).

If you’re from Cleveland, or ever visiting, I highly recommend a trip downtown to see it. It’s a really unique atmosphere, with every other stand trying to sell you their best produce (or at least the produce they have too much of).

You can get some great deals on really fresh food, and they even have an indoor market where they sell meat, fish, cheese, baked goods, and even prepared foods like homemade pasta and crepes.
After getting all the ingredients at the market, we stopped at Penzey’s spices which is right across the street. I have wanted to go to Penzey’s for a while, so I was really excited that their new store happened to be so close. They have just about every spice you could ever want, including about 8 different varieties of cinnamon. I ended up getting poppy seeds, Ancho peppers and Garam Masala – all of which I’m really excited to use. And the prices are surprisingly reasonable ($8 total for my loot).

Now onto the Salmon Cakes! These babies have been one of my favorite dishes since way back when I was living in LA (that’s Louisiana not the cooler California version). I decided to try this recipe after Whitney had introduced me to crab cakes at Red Bar near Seaside, FL. I have no idea why I never tried a crab cake before this but I found that I loved them and am now constantly on the lookout for good ones.
However, the price of lump crab meat is daunting (especially here, far from the ocean), so I thought salmon cakes would be a nice alternative. These always prove to be delicious, and they are quite easy to make. I think the hardest part is removing the skin from the salmon filet – but most of the time the Fishmonger will do this for you, as long as you remember to ask.
While this recipe doesn’t call for a lot of ingredients, I think each of them is very important – so don’t skimp. I know adding pita to a salmon cake might seem a little strange, but the texture is much nicer than the usual breadcrumbs, and then you have some leftover pita bread sitting around your house (plus!). The coriander is the main spice, and it really complements the salmon well. If you like a lot of spice, feel free to up the cayenne pepper – but I usually only add a small pinch, and they are still plenty flavorful. Finally, the lemon yogurt sauce is a must to serve with these. It’s super easy to put together since you already zest a lemon and chop chives to put into the salmon cakes – the only other ingredient you need to buy is the yogurt itself.
I served the cakes with a cucumber salad – which complemented nicely but it not quite up to blog standards yet. Hopefully I’ll tweak it and share it with you soon!

Salmon Cakes with Lemon Yogurt Sauce
-Makes 4-5 salmon cakes or enough for about 3-4 people.
- 1 pound skinless salmon fillet, roughly cut into 1/2 inch pieces
- 1 large pita round (~10 inches), torn into small pieces
- 1/4 cup light mayonnaise
- 1 large egg
- 1/2 teaspoon coriander
- small pinch of cayenne pepper
- pinch of salt
- 4 T. total chopped Chives (divided)
- 2 teaspoons total lemon zest (divided)
- 2 T. olive oil (for sautéing)
For the Sauce:
- 3/4 cup plain yogurt
- 1 T. lemon juice
- Plus half the chives and half the lemon zest from above
To prepare the yogurt sauce: Mix the yogurt, lemon juice, 2 tablespoons of chives and 1 teaspoon of lemon zest in a small bowl. Keep cold until ready to serve.
In a medium bowl, mix together salmon, pita, mayonnaise, egg, coriander, cayenne pepper, salt and 2 T. chives and 1 teaspoon lemon zest.

Form the mixture into 4-5 patties, about 3-4 inches in diameter. This can be done ahead of time – just cover with plastic wrap and keep in the fridge).
Heat the oil on medium-high in a large stainless steel skillet. Cook the salmon cakes on medium high for 3-4 minutes per side (6-8 minutes total), or until golden brown on each side.
Serve warm with lemon wedges and yogurt sauce.

Adapted from Epicurious
Patio Herb Garden

School is finished! (Well sorta…) We are done with all of our classes for the 2nd year of medical school, but we still have “Step 1 Boards”, which is this huge test that covers everything we’ve learned in the past 2 years. It’s kinda important, so if you don’t hear from me for a while – that’s why. I take ‘um June 9th, but I’m still gonna try to post occasionally until then (fingers crossed). I actually made a few freezer friendly meals, and stocked up my freezer so there would be some homemade food, without having to worry about it while studying. I still plan on cooking, (I’ll need some breaks!), but I know it will be nice to have a few things to just pull out and bake. As soon as I do bake them, I will take some final product pictures and share them with you (provided they taste as good as I’m hoping :-)).
In the meantime, I’ll share with you my other project this week – an herb garden! Growing up, we had a shady backyard, so my mom and I would plant herbs in little pots and keep them on the deck. While currently, I live in an apartment and don’t have the choice of a yard, I can’t really see myself ever getting away from making a cute potted herb garden. It’s just so convenient to have everything right on your patio, and unless you’re Ina Garten, you probably won’t be needing more than a few pots of herbs.
There is something very satisfying to me about watching a garden grow under the warm summer sun, and with fresh herbs costing about $3 a pack at the store, having them fresh on your back porch is an added bonus. It is, amazingly, actually cheaper to buy an entire herb plant, then it is to buy cut fresh herbs at the store. I got each of mine for 99 cents at Monnette’s Market (that’s a local Toledo chain, but any farmer’s type market would be a great place to look). Here’s a few tips I’ve learned about potted herb gardens.
Potted Herb Garden
1) Don’t buy fancy ceramic pots and expect them to last all winter. Last year I bought some nice pots, planning on planting my herbs in them for years to come, only to have them cracked and demolished by the ice and snow. So this year I opted for the $5 Walmart plastic brand. They’re not as cute, but they do the trick. If you just can’t resist the ceramic pots, just be sure to bring them inside in the winter.
2) Fill about 3-4 inches of the bottom of the pots with stones. Or if you’re like me and had a bunch of cracked pots with no purpose – you can crack them up some more with a hammer, and use that in the bottom of your pots. This will help the soil to drain so you don’t end up with water-bogged plants. My mom and I used to use styrofoam packing peanuts, which are great because it won’t weigh the pots down – but it seems that almost everywhere now sells packing peanuts that “degrade when exposed to water” (obviously those won’t work, but it’s a good trade-off for the environment I think).
3) Don’t plant too early, and watch out for the frost. Last year I planted on the first nice day we had in the beginning of MARCH! This is too early for a garden in Ohio, (but it would’ve worked fine in Louisiana.) It can also freeze pretty late into the spring, so if there is a chance of frost, just bring your plants inside or cover them with a beach towel or plastic wrap for the night.
4) Plant a lot of basil. A lot of recipes treat basil like lettuce, and you might even need 2 cups for one recipe. You can really never have enough, and it smells so good on the patio that I would recommend planting a lot. A trick to make it grow more bushy is to plant it deep into the soil, don’t be afraid to cover some of the leaves. Another trick I learned from our friend Linda, is to always pluck the flower buds off – this will also help to keep bushy, rather than stalky.
5) Plant mint in it’s own pot. I almost avoided planting mint all together this year because I didn’t want to buy a separate pot for it, but then I remembered that my favorite drink ever is mojitos, and mint is pretty much a necessity. Mint needs its own pot because it is actually like a weed. You really couldn’t kill it if you tried. If you plant it with other herbs, it will strangle them out, so it needs it’s own pot.
So here’s what’s in my herb garden….
ANNUALS – annuals tend to need more water than perennials, so make sure to water them at least every other day in the hot summer.
- Dill – planted with the soul intention of making some homemade ranch dressing. I can’t wait to share the recipe – it looks divine.

- Parsley – a nice accent to most meals, especially italian. I end up buying it at the store bi-weekly anyway, so I figured having it on the patio would be nice.

- Cilantro – the classic salsa flavor. You either hate it or love it, but I personally just don’t think it tastes like Mexican food if you don’t have cilantro.

- Basil – pesto, pasta, with goat cheese on sandwiches, with tomatos, etc. I ended up planting 5 plants of basil in their own pot because the possibilities for basil are endless.

PERENNIALS – Unfortunately not all of my perennials came back in full force this year. The cracked pots caused their roots to be exposed to the cold – so I think they will fare better this winter with plastic pots. I also plan on wrapping the pot with plastic, and covering the soil with some mulch. I chose to plant 4 of my perennial herbs in 1 pot. I think 3 per pot would be much better, but I couldn’t decide which one to cut out. Plus having them all in 1 pot will make it much easier to take care of would be much better, This is pushing it, but I wanted it to be easier to take care of them over the winter. Additionally, generally the perrenial herbs have a strong flavor, so you don’t need a lot to make a big impact.
- Chives – these came back in full bloom from last year, cracked pot and all. This is a hearty plant, and will also be used in the ranch dressing I can’t wait to make.

- Oregano – great for meatballs or any greek dish

- Rosemary – great on potatoes or bread, or as part of a dipping sauce with olive oil.

- Thyme – great for poultry

- Mint – a fast growing herb perfect for mojitos, desserts, and a variety of Lebanese dishes.

“Doctored Up” Bean Burritos

I’m done with cookies for a while…back to some healthy meals! This is a super easy and healthy, but surprisingly delicious meal! I know you might be thinking, “Bean Burritos”, do you even need a recipe for that? Well I have made bean burritos by just warming up a can of beans, and I think that this recipe is much better. Adding a few ingredients really makes this meal go from simple to exciting! You can always add more or less spice, I tend to like my food a little on the less spicy side.
Usually have a problem eating a meal without a serious source of protein – usually meat – but I’ve found that both John and I will find a meal with beans satisfying. It’s just a plus that they are also cheap, easy and healthy! Plus, I’ve found I’m much more likely to eat the leftovers of a meatless meal, because unlike meat, beans don’t really taste all that much different a day later. I think I am going to start buying black beans in bulk from my new favorite store, Costco.
Easy Bean Burritos
– Makes 4-6 burritos depending on the size.
For the Beans:
- 2 teaspoons olive oil
- 2 garlic cloves, minced
- 1 teaspoon chile powder
- 1 teaspoon cumin
- 1 teaspoon chopped chipotle peppers in adobo sauce*
- 1/4 teaspoon salt
- 1/3 cup water (or vegetable broth)
- 1 (15-ounce) can black beans, drained
- 1 (15-ounce) can pinto beans, drained
- 3 tablespoons salsa
For the Burritos:
- Tortillas
- Mexican blend cheese
- Chopped tomatoes
- Shredded romaine lettuce
- sliced green onions
- light sour cream
*These come in a small can in the “Mexican” aisle of almost any grocery store.
1. Heat oil at medium high in a large skillet.
2. Add garlic, and 1 teaspoon of each chile powder, cumin and chipotle peppers to the oil.
3. Stir for about 45 seconds, or just until fragrant.
3. Add the 2 cans of drained beans, salt and water. Bring the mixture to a boil.
4. Turn down the heat to medium-low and let simmer, without a lid, for about 10 minutes. (You can use this time to cut up the tomatoes, lettuce and green onions for the topping)
5. Remove from heat and stir in the salsa.
To serve: Spread the bean mixture down the tortilla, and top with your choice of toppings.
Recipe found at Pink Parsley, and originally from Cooking Light.
Welcome!
I had bought a $15 App my brother told me about called, “Anti-Social”, which blocks almost all the sites that might prevent one from being productive. I even programmed it to block all of my favorite cooking blogs, and I turned it on this morning so I could get a full day of studying in. And what do I do instead? Decide to start my own cooking blog! Today, I just did enough to get the site up and running, but I hope to be posting some culinary adventures in the coming week :-). Stay tuned.

