
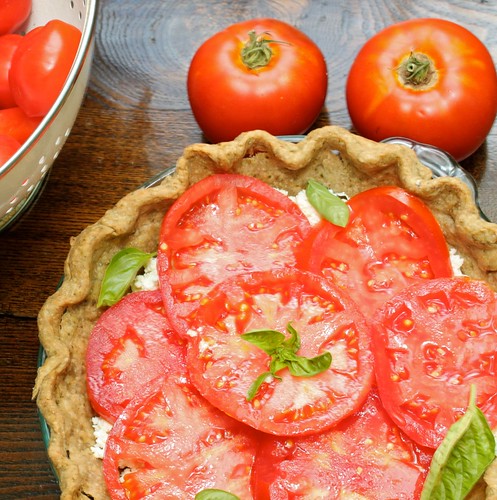
Fresh Tomato Ricotta Tarte with Garlic Herb Crust
In some parts of the country, it might be a little late for this post; but here in Ohio, we’re still trying to find ways to enjoy fresh garden tomatoes before the first frost hits. Hopefully that first frost will not present itself as 2 inches of snow in the middle of October (like it decided to last year). After the infamous 2013-2014 winter, I’d be fine waiting until Christmas Day for snow, and then having winter be over. For now, I’m still revealing in the fact that it’s beautiful, a perfect 70 degrees, with the garden is still going strong.
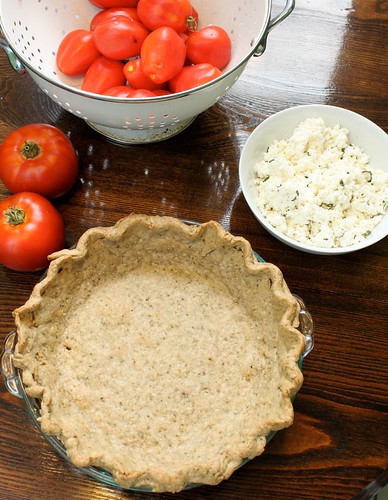
I felt like being a bit adventurous (per usual) and made ricotta cheese from scratch for this recipe. It was pretty each- basically just heat milk, add lemon juice and vinegar, and then strain over cheese cloth for about 10 minutes. It was fun to try, but it did take this from being an easy weeknight meal to kind of a production with multiple things to clean up. I made the dough for the crust a day in advance, so this was pretty simple when it came to putting together. It really highlights the tomatoes, and lets you hang onto that last bit of summer. Better get on it before it becomes a winter wonderland around here!
Fresh Tomato and Ricotta Tarte with Garlic Herb Crust
Serves 6
For the crust:
- ¼ cup fresh basil leaves
- 1 clove garlic, coarsely chopped
- 1¼ cups all purpose flour
- Coarse salt and freshly ground pepper, to taste
- 8 tbsp. cold unsalted butter, cut into small pieces
- 3 tbsp. ice cold water
For the filling:
- 2 cups ricotta cheese
- 2 cloves garlic, minced or pressed
- 1 tsp. oregano
- 2 tbsp. minced fresh basil, plus more for garnish
- Coarse salt and freshly ground black pepper, to taste
- 3-4 tbsp. milk, if needed
- 2 large ripe heirloom tomatoes, thickly sliced
- Extra virgin olive oil, for drizzling
Directions
1) To make the crust, combine the garlic and basil in the bowl of a food processor. Pulse until finely minced, scraping down the bowl as needed. Add in the flour and salt and pepper to taste, and pulse again to combine. (If you don’t have a food processor, just mince the garlic and basil as well as you can and then stir into the flour mixture. It will work just fine.) Add in the butter and pulse until the mixture resembles coarse meal and the largest butter pieces are the size of peas. Add in the water and pulse just until the dough comes together. Remove from the bowl, form into a disc and cover with plastic wrap. Transfer to the refrigerator and chill 1-2 hours, until firm. This can also be done in 1-2 days in advance.
2) Transfer the chilled dough to a lightly floured work surface. Roll out into a flat round sheet about 12 inches in diameter, or large enough to fully line a 9-inch pie plate. Transfer to the pie plate, trimming away any excess at the edges and crimping the dough to create a fluted edge. Transfer the pie plate to the freezer and chill 15-20 minutes, until firm.
3) Preheat the oven to 375˚ F. Line the chilled pie shell with aluminum foil, making sure all edges of the crust are fully covered. Fill the pie shell with baking beads if available to weigh the crust down (dry beans or rice also work). Bake for 25 minutes. Remove the foil and baking beads, return the pie shell to the oven and continue to bake until the crust is golden and fully set, about 10-12 minutes more. Transfer the pie plate to a wire rack and let the crust cool completely.
4) In a medium bowl combine the ricotta, garlic, and herbs. Stir together until evenly combined. To give the ricotta a smoother texture (if needed), stir in 3-4 tablespoons of milk until evenly combined. Season with salt and pepper to taste. Spread the ricotta into the pie shell in an even layer. Layer the tomato slices on top of the ricotta, drizzle lightly with olive oil, and season with salt and pepper. Garnish with additional minced basil. Slice with a sharp knife and serve immediately.
Source: Annie’s Eats
Apple, Ham and White Cheddar Panini

Every once in a while I see a recipe and immediately feel the need to make it that very same day. This would be one of those recipes. With an absolutely beautiful September behind us, and what I’m hoping will be an even more beautiful October ahead, I couldn’t pass up a recipe that so perfectly matched this fall weather. It helps that there’s only about 5 ingredients and that from start to finish this only took about 20 minutes. Residency + a long commute + triathlons + general career/life crises have been taking up pretty much all my time, and blogging hasn’t been at the top of my list…but truth be told, I miss it!
You know this sandwich must be pretty great, considering it made me come out of blog hibernation. In fact, it really makes me want to go apple picking and drink cider. The combination might sound a bit odd, but the apple and apple butter is really a nice balance to the saltiness from the ham and cheese. Plus, I love adding sweetness to anything I can. So if you’re looking for a quick an easy dinner to enjoy with fall, look no further. 
Apple, Ham and White Cheddar Panini
Serves 4
Ingredients
- 8 slices sourdough bread
- 3 T. butter, at room temperature
- 2 large apples, thinly sliced
- Sliced white cheddar cheese, about 4 ounces
- Thinly sliced maple ham, 6-8 ounces
- 1/2 cup apple butter
Heat a grill pan or case iron skillet to medium heat. Butter the outside of each sandwich liberally. On one piece of bread, layer apple slices, cheese and ham. On the other slice apply a thick layer of apple butter. Sandwich the pairs together so that the buttered sides are facing outwards.
Cook the sandwiches, turning once, until both sides are golden and the cheese is melted. Slice in half and serve immediately.
Source: Annie’s Eats
Grilled Blueberry BBQ Salmon

Apparently there are some people in this world who don’t like fruit with their fish. Thankfully, I don’t know any of them. If you happen to be a fruit with fish hater (tear), perhaps this recipe will convert you. Especially with summer “officially” here, this is a refreshing dinner that is easy to throw together after a day at the pool, and won’t ruin your waistline for the rest of bikini season. I was somewhat hesitant about the sauce, since it’s fruit combined with garlic, onion and mustard powder – but I figured anything originally from The Neely’s would be hard to ruin. Somehow the flavors just seem to work, and created an interesting twist on a simple salmon recipe.
I personally like to keep the skin on the salmon it because it keeps it in one piece while grilling and adds moisture to the filet, but you could also grill up a fish filet as long as you throughly oil the grate. While the sauce is mostly “hands off”, it does need about 30 minutes total of simmer time – which I kind of enjoy because it gives you a chance to shower from the pool, pick up the house, or just relax with a glass of wine on the patio. Unfortunately my brother won’t be bringing any Copper River salmon back from Alaska this year, but if your pocketbook can afford it, it’s in season now!

Grilled Blueberry BBQ Salmon
Serves 2-4 depending on amount of salmon used
- ¾ – 1 ½ pounds salmon filet, with skin on
- Salt and Pepper
For the Sauce:
- 1/2 cup fresh blueberries
- 1/3 cup ketchup
- 1 tablespoon apple cider vinegar
- 1 tablespoon balsamic vinegar
- 2 tablespoons brown sugar
- 1/4 teaspoon garlic powder
- 1/2 teaspoon onion powder
- 1/2 teaspoon ground mustard
- 1 teaspoon worcestershire sauce
Heat a small saucepan over low heat and add blueberries. Heat for about 10 minutes, then mash with a fork. Add in ketchup, both vinegars, brown sugar, onion and garlic powder, ground mustard and worcestershire sauce. Whisk well to combine and break up blueberries and turn the heat up to medium. Heat until simmering and bubbles appear, then turn heat back down to low. Cook for an additional 20 minutes, whisking every few minutes. Sauce will be thicker than a normal barbecue sauce.
Preheat your grill to it’s highest setting and spray grate with oil. Season the salmon with salt and pepper, and once the grill is hot, lay skin side up directly on grate. Cook for 5 minutes, then gently flip so that skin side is down. Using a pastry brush, brush BBQ sauce on salmon and let cook until flaky and opaque, about 5-6 more minutes. Adjust time as needed for thicker/thinner salmon (mine was about 1 1/2 inches with skin.)
Source: How Sweet It Is
Chicken Tikka Masala

Looking on a the positive side of things, I will have to say that one of the best things in the past month has been able to see a lot of my mom and brother – 2 of the most special people in this world. I know my mom thinks she’s imposing, but I seriously love it when they are here. It basically makes it feel like a vacation, because usually when we are all together – it is a vacation. Of course having “house guests” also makes me like a grown up, which is really just like “playing house”- with a slightly more sophisticated (and dangerous) fisher price set. Because I really wanted to impress them with my domestic skills, I carefully planned a few things to make when they came. One of them was an old favorite, stuffed green pepper soup, and the other was this Chicken Tikka Masala. I’m pretty sure they will be coming back again soon :-).

My mom, who claims to not really like curry, couldn’t stop raving about how deep the flavors are in this dish, and my brother stated that it was the best chicken tikka masala he had ever had (even better than some posh Asheville Indian restaurant he loves). I purposely waited a while to post this, because I wanted to see how the leftovers would be after freezing them for a while – and I can now safely say that they are still delicious. I froze the chicken, then thawed it and reheated it, adding just a little bit more milk and John and I still loved it! I would recommend making the whole batch, even if you don’t think you’ll be able to finish it all, because the frozen leftovers really are convenient.
Please don’t be intimidated by the seemingly long ingredient list, it is actually a really simple dinner and there is very little prep work. I chose to brown the meat first because it tends to add a depth of flavor, but if you don’t want to dirty another pan feel free to simply put all the ingredients in the crockpot without pre-browning. I was also really excited to finally use the Garam Masala I had bought way back when from Penzey’s. If you don’t have a Penzey’s nearby, I noticed when I was home at Christmas that even local grocery stores carry this spice. Having never used it before, I was a little worried about using a full 3 tablespoons of it. But never fear – it’s not nearly as strong as you might think and the dish was seasoned perfectly. My last pre-recipe suggestion would be to adjust the cream in this recipe for your liking. The original called for 1 1/2 cups of heavy (whipping) cream. That seemed like an awful lot, so I dialed it down and added some more greek yogurt at the end. Feel free to play with it a bit to get it the creaminess you would like.

Crockpot Chicken Tikka Masala
For the Chicken:
- 9 whole Boneless, Skinless Chicken Thighs
- 1 Tablespoon Ground Coriander
- 1 Tablespoon Ground Cumin
- 1 teaspoon Kosher Salt
- 1 cup greek yogurt
- 2 Tablespoons Butter
- 1 whole Jalapeno Pepper, Stem Removed, Pepper Pierced Several Times With a fork
For the Sauce:
- 3 Tablespoons Butter
- 1 whole Large Onion, Peeled And Diced
- 6 cloves Garlic, Peeled And Minced
- 1 Tablespoon Kosher Salt
- 3 Tablespoons Garam Masala
- 1 piece Fresh Ginger, About 2-3 Inches, Peeled And Grated
- 4 cups canned Crushed Tomatoes
- 1 Tablespoon sugar
- 1/4 to 1/2 cup Heavy Cream (depending on preference)
- 1 cup greek yogurt
For Serving:
- White Rice
- Chopped Fresh Cilantro
1) Cut the boneless, skinless chicken thighs into 1- 1 1/2 inch pieces. Sprinkle the coriander, cumin and salt over the chicken. Stir in yogurt to evenly coat the chicken. Cover and let sit 10 minutes or refrigerate for several hours.
2) Melt 1 tablespoon the butter in a large saute pan over medium heat. Raise the heat to medium high and brown about 1/2 of the chicken. . Transfer browned chicken to the slow cooker as it is finished. Then repeat with 1 more tablespoon of butter and remaining chicken. Throw the pierced jalapeno in on top of the chicken.
3) To make the sauce return pan to medium and 3 T. of butter over medium heat. Add onion, garlic, salt and stir. Cook until onions begin to brown, stirring frequently.
4) Add the 3 T. of garam masala and ginger and cook until fragrant (30 seconds), then raise heat to high and add crushed tomatoes and sugar. Scrap the bottom of the pan as you stir and bring to a boil. Then pour over chicken in slow cooker.
5) Cook chicken on low for 5 hours.
6) Mix heavy cream and greek yogurt into mixture, adding cream until you get your desired color. Heat for 1o minutes more.
7) Serve over rice and top with a generous amount of cilantro (it really adds a lot)
Adapted from Tasty Kitchen Blog c/o Eat. Live. Run.
Harvest Apple Salad with Buttered Almonds

Pretty much every type of salad that I like is some variant of spinach, fruit, good cheese and nuts. For as long as I can remember my Mom has been making a spinach salad with pears, blue cheese and salted pecans, and for a Mom who loves decorating the table but isn’t so big on the actual food – this salad was quite a delectable creation. I have made that salad countless times, and it’s still my go to, but in the interest of changing it up ever so slightly, I decided to try this recipe, and guess what, I loved it! In fact it holds the title as the first salad a certain “salad hater” has ever eaten, and liked (no…it’s not John but another picky husband who doesn’t like vegetables :-)).
I think what I really liked about this is that it includes an easy, throw together recipe for a really good dressing. So much of the time I go to the trouble of toasting nuts, chopping fruit, buying spinach, and then covering it all with some bottled dressing because making homemade just seemed like too much work. This dressing is super easy, and really complements the flavors of the salad well. Also, I think I like this salad because I love an excuse to eat my new favorite apples, ‘Honeycrisp”. (Which, ironically recently had a sign aat the grocery store that said “Everyone’s New Favorite” – good to know I’m not alone). But if you can’t find Honeycrisp, I think Fiji or Granny Smith would work equally well.

Harvest Apple Salad with Buttered Almonds
Ingredients:
For the dressing:
- ¼ cup finely minced sweet onion
- 3 tbsp. apple cider vinegar
- 3 tbsp. white wine vinegar
- 2 tbsp. sesame seeds
- Pinch of paprika
- 2 tbsp. sugar
- ¼ cup extra virgin olive oil
For the almonds:
- 2 tbsp. unsalted butter
- ¾ cup sliced or slivered almonds
- 2 tbsp. sugar
For the salad:
6-8 cups baby spinach leaves, washed and dried
2 medium apples, cored and thinly sliced
4-6 oz gorgonzola cheese, crumbled
Directions:
To make the vinaigrette, whisk all ingredients except olive oil in a measuring cup. Then slowly add the olive oil whisking vigorously to combine.
To make the buttered almonds, melt the butter in a medium skillet over medium-high heat. Add the almonds and cook, stirring occasionally until toasted and lightly browned. Stir in the sugar and cook just until melted and well incorporated. Set aside to cool.
Place spinach in a large salad bowl or on individual salad plates. Top with apple slices, gorgonzola, and the buttered almonds. Drizzle with the dressing and serve immediately. Leftovers are good for up to a day, as fresh spinach does not wilt as quickly as other types of lettuce.

Beef and Barley Stew

Ah. Real Food. This is what January was meant to be. Not including the peanut M&Ms (which I mistakenly bought a XXL bag of because I was hungry at Costco….never a good thing) the food around here has most definitely taken a turn for the more wholesome. I can’t really promise that this will last long, but while I’m craving healthy food, I might as well take advantage. There is nothing quite like a warm, hearty, filling and yet healthy stew to warm up with on chilly January evening. Or considering the 40-50 degree days we have been having I should probably say, “On a abnormally warm, almost balmy January evening in Ohio”, but it just doesn’t have the same ring. Global warming is seriously ruining seasonal eating.
No matter what the weather, I could probably eat this stew. Well I might be lying slightly. I wouldn’t eat it in the summer. That would be like some kind of sin- hot stew in the summer? But anytime September through April would be fine if you are lucky enough to live in a place like tropical Toledo. (Can you sense my bitterness at winter – and this is even after I got an automatic car starter for Christmas!). But in all seriousness, the first time I made this stew was back in Louisiana, where the humidity never drops below 100% – and it was still good. It’s the kind of stew that feels well balanced because you get vegetables, grain, and protein all in one place. I really love the addition of barley because it makes this stew seem extra hearty and yet also somewhat gourmet.
One caution is that the barley continues to absorb water after cooking. When you go to get leftovers the next day you may find that all the liquid is gone and the barley has doubled in size – but never fear – just add a bit more water, and reheat. If you are trying to make this in advance, or if you’d like to freeze it, I would probably make it without the barley, and then just add the barley when reheating it.

Beef and Barley Stew
Serves 6-8
- Cooking spray
- 2 pounds beef stew meat, trimmed and cut into 1-inch pieces
- 2 teaspoons canola oil
- 2 ½ cups chopped leaks (about 3 leeks including green stems)
- 2 ½ cups sliced carrot
- 4 garlic cloves, minced
- 6 cups water
- 1 ½ teaspoons salt
- 1 teaspoon dried thyme
- 1/2 teaspoon freshly ground black pepper
- 4 bay leaves
- 2 – 14 oz cans beef broth
- 1 cup uncooked medium pearled barley
1. Heat a large Dutch oven over medium-high heat. Coat pan with cooking spray. Add half of beef; cook 5 minutes, browning on all sides. Remove from pan. Repeat procedure with remaining beef.

2. Heat oil in pan over medium-high heat. Add leek, carrot, and garlic; sauté 4 minutes or until lightly browned. Return beef to pan. Add all ingredients EXCEPT barley and bring to a boil. Cover, reduce heat, and simmer 1 hour, or longer if desired. Add barley; cook 30 minutes or until beef and barley are tender. Discard bay leaves.

Adapted from Cooking Light
French Apricot Crock Pot Chicken

Welp, it’s happened. The first recipe on the blog made almost entirely by John. I don’t mean to belittle his cooking talents, but I think the fact that I trusted him with making this dinner should tell you something about it’s complexity. I had set the ingredients (all 3 of them ) out on the counter the night before, and planned on throwing them in the crock pot before I left for school, but as I mentioned last time, normally I barely get 2 of the same shoes while I’m running out the door, let alone make dinner 8 hours early. Despite my best intentions, if I wake up a few minutes early, then I simply diddle-daddle around longer until I am once again rushed to leave. So John was nice enough to make this for me in the morning.
While this is certainly not a complicated or gourmet cooking dish, it is definitely something worth keeping in your recipe arsenal. Also, I should mention that there is really nothing “French” at all about this, other than the fact that it uses American’s version of “French Dressing”. Nevertheless, this dinner is delicious and I had trouble saving my second piece of chicken for lunch the next day. I found myself eating every last piece rice that the scrumptious sauce had touched. Plus, its so easy you really have no excuse not to make it – it’s 3 ingredients that you put into a pot. You can adjust the cooking time to fit your schedule so it’s ready when you get home. For example, Nikki mentioned that you could use 6 frozen chicken breasts and cook it on high for 4 hours and low for 2 hours, or use 4 fresh chicken breasts and cook it on high for 3 hours. Since I think one of the best things about crock pots is coming home to them being ready, I prefer to cook things for a longer period of time on low, which I have indicated below. I think next time I am going to at least 1.5 the recipe because this really made great lunch leftovers (especially when compared to the hospital cafeteria).

“French” Apricot Crock Pot Chicken
– Serves 4 (or 2 with great leftovers the next day)
- 4 boneless skinless chicken breasts
- 1 cup french dressing (I used Newman’s Own)
- 1 cup apricot jelly or preserves
- 1 packet onion soup mix
- salt and pepper to taste
Place all ingredients in the crock pot and cook on low for a minimum of 7 hours, but longer is fine. Serve over rice.
Source: Pennies on a Platter
Greek-Style Panzanella

When I put this on our (new) menu board for the week, John had no idea what it was. I described it to him as crouton salad, partially because it’s true, and partially because John loves bread and I knew a salad made of it would intrigue him. I really liked this dinner because it was easy, fresh, and included more than a full serving of vegetables, but the really great thing about it was the John loved it as well. He even said, “Wow, this was a lot more filling than I expected.” I served this as a meal on its own, but I think it would also be great as a side dish for a summer picnic.
In terms of cooking, don’t be tempted (as I was) to turn the heat up on the croutons in order to make them brown faster – this actually only makes them burn faster. You do have to watch the croutons while cooking, which is why I think cooking them on the stove is better than the oven. Just be sure to use a large pan, and to toss the croutons every few minutes. Also, this makes a lot of salad (way more than John and I could finish), and unfortunately the leftovers aren’t good because the bread gets soggy. To avoid this, cook the bread and cut the vegetables, but only combine the ingredients you will actually use that day. Then you can make the salad again the next day for lunch!
Greek Panzanella
Serves 4-6
- 6 cups rustic bread (about 3/4 loaf), sliced into 1-inch cubes
- 1/4 cup olive oil
- 1 teaspoon salt
- 2 cucumbers, peeled, seeded and sliced (or 1 hothouse cucumber – no need to peel)
- 1 Red pepper, sliced into 1/2 inch pieces
- 1 Yellow pepper, sliced into 1/2 inch pieces
- 1 Green pepper, sliced into 1/2 inch pieces
- 1 pint cherry tomatoes, sliced in half
- 1/2 of a Red onion, sliced into thin strips
- 1/2 cup kalamata olives, pitted
- 8 oz feta, sliced into 1/2 inch cubes
For the Dressing:
- 1/4 cup olive oil
- 1/4 cup red wine vinegar
- 2 cloves garlic, minced
- Juice of 1/2 a lemon
- 1 teaspoon dried, crushed oregano
- 1/2 teaspoon dijon mustard
- salt and pepper to taste (about 1 teaspoon combined)
1. In a large frying pan heat 1/4 cup olive oil on medium- high heat. Once hot, add bread and reduce heat to medium-low. Salt the bread with 1 teaspoon salt. Toss the bread for about 10 minutes until crisp and slightly browned.
2. Chop vegetables, and in a large bowl combine all vegetables, feta cheese, and olives.
3. In a small bowl combine all ingredients for the dressing and whisk until combined.
4. Pour dressing over vegetables and toss. Add in the crisp bread and toss until evenly coated.
5. Clean up the kitchen while waiting for the flavors to meld. Add salt and pepper as needed and serve.

Slightly adapted from The Curvy Carrot, Originally from How Easy is That? by Ina Garten
Baked Creamy Chicken Taquitos

Sometimes I miss college. Well, let me rephrase. Sometimes I miss certain parts about college. Like the part where you can walk up and down the halls of the dorm and always find someone with their door open to hang out with. And the part where the most important thing on a weekend was figuring out what costume would be perfect for the theme of the next party (okay, so sometimes I still do this). But the thing I was missing this week was Torero’s – the signature Mexican restaurant in our college town. Because our meal plan was ridiculous, you could get Torero’s delivered to your dorm room anytime you wanted, on meal plan points. I had tried a variety of things from the menu, but one time someone ordered Taquitos, I tried one, and I fell in love. I’m pretty sure every time after that, I ordered chicken taquitos myself. Somehow I happened to never actually read the menu to realize they were deep fried, and although they clearly looked deep fried, I chose to ignore this little fact.
I don’t think I’ve had a taquito since college, but when I saw these baked chicken taquitos on Pink Parsley, I knew I would have to try them. Not only are they a baked version of my favorite college Mexican treat, but they also use my favorite salsa – Salsa Verde. (The same salsa I use in Chicken Enchiladas Verdes). Don’t be intimidated by the long list of ingredients, because these really don’t take that long to put together – in fact I think these are easier to make than the enchiladas. If I was a little more organized, I would’ve planned grilled chicken for dinner one night, and made sure to cook enough to have leftovers for these the next. Perhaps one of the greatest things about these taquitos is that you can freeze them (unbaked) and then bake them whenever needed. Actually, the ones in the picture were baked from a frozen state. I originally planned to post this the first time I made them – but we ate up all the taquitos so quickly that I didn’t get to snap a picture. I’ll have to say, they taste just as good from the freezer as they did the first time. This would also be a great meal for a big group dinner, because once you have the filling made it’s really simple to put together, and have you ever met a person who doesn’t like food they can eat with their fingers?

Baked Chicken Taquitos
– Recipe indicated is for 20-24 taquitos, which will serve 6-8 people
- 3 -4 chicken breasts (~4-5 cups shredded)
- 1 block (8 oz) low-fat cream cheese, softened
- 3/4 cup salsa verde (tomatilla salsa)
- Juice from 1 lime
- 2 tsp chile powder
- 1 tsp ground cumin
- pinch cayenne pepper
- 1 tsp onion powder
- 6 cloves garlic, minced
- 1/2 cup chopped fresh cilantro
- 1/2 cup chopped scallion
- 1 cup shredded extra sharp cheddar cheese
- 3/4 cup shredded Pepperjack cheese
- salt and freshly ground black pepper
- 20-24 small (6-inch) flour tortillas
- cooking spray
Bring a large saucepan filled with water to a boil over high heat. Add chicken breasts to the water, reduce heat, and simmer for about 20 minutes, or until chicken is no longer pink when cut into. Remove chicken from water, let cool slightly and then shred. (You could also use leftover chicken, or roast the chicken in the oven)
Preheat the oven to 425 degrees, and lay a wire cooling rack over a large cookie sheet.
In a large bowl, combine the cream cheese with the salsa, lime juice, cumin, chile powder, cayenne, onion powder, garlic, cilantro, scallions, and a pinch of salt & pepper. (Everything but the chicken, cheese, and tortillas). Once mixed, fold in the chicken and shredded cheeses.
Spoon 3-4 tablespoons of filling onto the lower third of each tortilla, and roll tightly. In order to help the tortilla stay closed, you may want to spray some cooking spray on the seam. Place seam side-down on the wire rack. Repeat with remaining tortillas and filling.
Spray the taquitos with cooking spray, then place the wire rack on top of a baking pan (otherwise the cooking spray creates a sticky residue when baked on the cookie sheet.) Bake 15-20 minutes, or until the tortillas are crisp and golden-brown. Serve with dipping sauces such as salsa, sour cream, and guacamole. I think sour cream mixed with salsa would also be delicious.
*To Freeze the taquitos, roll them up as usual but do not bake. Place on a baking sheet in the freezer in order to “flash” freeze them individually. Wrap in plastic wrap, then aluminum foil and freeze in a freezer bag. To bake, remove from oven, and bake un-thawed for 20-25 minutes at 425 degrees.
Slightly adapted from Pink Parsley Catering, via Pennies on a Platter, Originally from Our Best Bites
Salmon Cakes with Lemon Yogurt Sauce
After 6 long weeks of studying (plus 2 years of med school), I finally finished that huge exam. Honestly, I will have no idea how it went until I get my score in about a month- but for now, I’m just celebrating being done! I spent the evening after my test in Toledo hanging out with friends, and then left the next day for a “vacation” to Brecksville with my Mom. While I put vacation in quotes, it really has been a vacation. Between a lot of wine and a lot of fun family time, we managed to make a trip down to the West Side Market. Of course, I had a blog menu all planned out – and my mom was really excited to take part in something that was going to go on the internet :-).

If you’re from Cleveland, or ever visiting, I highly recommend a trip downtown to see it. It’s a really unique atmosphere, with every other stand trying to sell you their best produce (or at least the produce they have too much of).

You can get some great deals on really fresh food, and they even have an indoor market where they sell meat, fish, cheese, baked goods, and even prepared foods like homemade pasta and crepes.
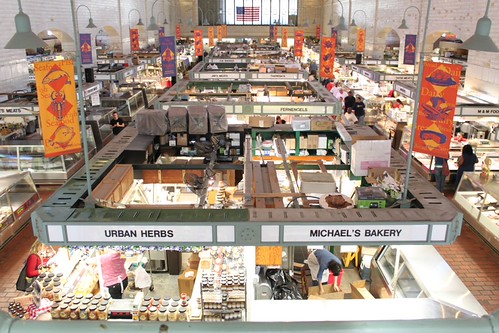
After getting all the ingredients at the market, we stopped at Penzey’s spices which is right across the street. I have wanted to go to Penzey’s for a while, so I was really excited that their new store happened to be so close. They have just about every spice you could ever want, including about 8 different varieties of cinnamon. I ended up getting poppy seeds, Ancho peppers and Garam Masala – all of which I’m really excited to use. And the prices are surprisingly reasonable ($8 total for my loot).

Now onto the Salmon Cakes! These babies have been one of my favorite dishes since way back when I was living in LA (that’s Louisiana not the cooler California version). I decided to try this recipe after Whitney had introduced me to crab cakes at Red Bar near Seaside, FL. I have no idea why I never tried a crab cake before this but I found that I loved them and am now constantly on the lookout for good ones.
However, the price of lump crab meat is daunting (especially here, far from the ocean), so I thought salmon cakes would be a nice alternative. These always prove to be delicious, and they are quite easy to make. I think the hardest part is removing the skin from the salmon filet – but most of the time the Fishmonger will do this for you, as long as you remember to ask.
While this recipe doesn’t call for a lot of ingredients, I think each of them is very important – so don’t skimp. I know adding pita to a salmon cake might seem a little strange, but the texture is much nicer than the usual breadcrumbs, and then you have some leftover pita bread sitting around your house (plus!). The coriander is the main spice, and it really complements the salmon well. If you like a lot of spice, feel free to up the cayenne pepper – but I usually only add a small pinch, and they are still plenty flavorful. Finally, the lemon yogurt sauce is a must to serve with these. It’s super easy to put together since you already zest a lemon and chop chives to put into the salmon cakes – the only other ingredient you need to buy is the yogurt itself.
I served the cakes with a cucumber salad – which complemented nicely but it not quite up to blog standards yet. Hopefully I’ll tweak it and share it with you soon!

Salmon Cakes with Lemon Yogurt Sauce
-Makes 4-5 salmon cakes or enough for about 3-4 people.
- 1 pound skinless salmon fillet, roughly cut into 1/2 inch pieces
- 1 large pita round (~10 inches), torn into small pieces
- 1/4 cup light mayonnaise
- 1 large egg
- 1/2 teaspoon coriander
- small pinch of cayenne pepper
- pinch of salt
- 4 T. total chopped Chives (divided)
- 2 teaspoons total lemon zest (divided)
- 2 T. olive oil (for sautéing)
For the Sauce:
- 3/4 cup plain yogurt
- 1 T. lemon juice
- Plus half the chives and half the lemon zest from above
To prepare the yogurt sauce: Mix the yogurt, lemon juice, 2 tablespoons of chives and 1 teaspoon of lemon zest in a small bowl. Keep cold until ready to serve.
In a medium bowl, mix together salmon, pita, mayonnaise, egg, coriander, cayenne pepper, salt and 2 T. chives and 1 teaspoon lemon zest.

Form the mixture into 4-5 patties, about 3-4 inches in diameter. This can be done ahead of time – just cover with plastic wrap and keep in the fridge).
Heat the oil on medium-high in a large stainless steel skillet. Cook the salmon cakes on medium high for 3-4 minutes per side (6-8 minutes total), or until golden brown on each side.
Serve warm with lemon wedges and yogurt sauce.

Adapted from Epicurious
Salmon with Mango Salsa

For some reason whenever I put salmon on the weekly menu, it seems to get pushed back to another day, or another week. The last time I bought salmon, it sat in the fridge until I was afraid to look at it and had to throw it out. This is really a shame considering that once I actually make salmon, I LOVE it! This meal was no exception to my salmon “fear”. I had gotten all the ingredients for the salsa and couscous, but when dinner time rolled around, I was really hesitant to pick up the salmon and make this dinner. Because we didn’t really have anything else planned for dinner, and because if I didn’t make it, all the other ingredients would go bad, I couldn’t really talk myself out of it (although I tried).
As soon as I starting chopping for the salsa, I was over my fear and glad that I had decided to make the salmon. When I tasted the final product, I was even happier. I actually couldn’t believe that I was considering scraping this dinner for grilled cheese instead :-)! This dinner came together quickly, and was delicious! I served it over plain couscous that I cooked with chopped green onion and dried cranberries – which was also pretty yummy. I think once the weather gets a little warmer, I’ll grill the salmon instead of broiling it, but broiling is easy and it came out great.
Salmon with Mango Salsa
– Makes 3-6 servings depending on the size of salmon filet used (Estimate ~4 oz per person)
For the Mango Salsa
- 1 Mango, peeled and chopped
- 1/2 of a cucumber, peeled and chopped
- A few strips of red bell pepper, chopped
- ~1/4 cup of red onion, chopped
- ~3 Tablespoons cilantro, chopped
- Juice from 1/2 a lime
- pinch of salt
Combine all ingredients in a small bowl and mix.
For the Salmon
- 1-2 lbs wild salmon filets
- Juice from 1/2 a lime
- 2-3 Tablespoons light mayonaise
- Salt and pepper
Preheat broiler. Sprinkle lime juice over the salmon. Spread mayonaise over the filet using the back of a spoon. Sprinkle with salt and pepper. Place salmon on a broiling pan lined with tin foil, and broil for about 10 minutes, until cooked through. To serve, cut into smaller filets, top with mango salsa, and serve over couscous or rice pilaf.
Source: A Spice Is Nice Original
Twice Baked Potatoes

In honor of St. Patrick’s Day, I figured what would be better than a POTATO with the colors of the Irish flag! I made mine with broccoli, scallions, and cheddar, so I could get the green, white and orange effect. I hope this brings a little St. Patrick’s Day spirit to your day!
My better half is interviewing people this week, so it’s just me here until tomorrow. Cooking for 1 can be tricky, but I think this recipe fits the bill – It’s quick, easy, and I had all the ingredients on hand. The recipe is for 4 potatoes, but can easily be adapted to make just 1, or 8. I often forget how great a good baked potato can be. In college, my friend Christine, once had a “Baked Potato Party” in which she baked a bunch of potatoes, and then had all kinds of fun toppings for us to put on them. It was such an easy and creative idea, and I have been wanting to do it ever since – maybe this will inspire you to host your own. Whatever you put on your baked potato, it can be a hearty, and filling meal that’s easy and cheap to make. I also included some suggestions for alternate stuffed baked potatoes , which I am now dying to try!
Twice Baked Potatoes
- 4 russet potatoes – scrubbed and patted dry
- Olive Oil and Salt
- 1 cup sharp cheddar cheese, shredded
- 3/4 cup light sour cream
- 1/4 cup skim milk
- 1 teaspoon garlic powder
- 3/4 cup chopped broccoli, steamed
- 1/2 cup chopped scallions
Preheat oven to 400°. Rub potatoes with a small amount of oil and sprinkle with salt. Place potatoes directly on rack and cook for 45-60 minutes. Do not wrap potatoes in foil because this will make the skins soft and it will be difficult to scoop the filling out later.
In a large bowl combine 1/2 cup of cheddar cheese, sour cream, milk, garlic powder, broccoli, and 1/4 cup scallions.
Remove potatoes from oven and let cool slightly. Cut the potatoes in half lengthwise. Using a soup spoon, scrape out as much potato as you can while leaving the skin intact – leaving about 1/8 inch. The potatoes taste better when there is less plain flesh left in them. Add the flesh to the large bowl with sour cream mixture. Mash the flesh until combined.
Spoon the flesh back into the potato shells. Place filled shells on a baking sheet coated with aluminum foil. Sprinkle remaining cheddar cheese over the tops of the potatoes.
Return potatoes to the oven for 10-15 minutes or until cheese is melted and starting to brown.
To serve, top with remaining scallions.
Variation 1: Blue Cheese, Onion and Mushroom Potatoes
- Substitute 1 cup crumbled blue cheese for the cheddar, and 1 cup sautéed mushrooms and onions for the broccoli.
Variation 2: Goat Cheese & Caramelized Onion Stuffed Potatoes
- Substitute 1 cup of herbed goat cheese for the cheddar, and 3/4 cup caramelized onions for the broccoli.
Variations inspired by America’s Test Kitchen Healthy Family Cookbook
Red Beans & Rice

There are 3 reasons why I really wanted to make this dish: First, although I really thought spring was on its way (and was planning dinner accordingly), I was quickly thrown back to reality when I found my car crystalized in 2 inch thick ice. After finally digging my car out from under the snow/ice mix, I decided that a warm, hearty, wintery meal was in order. Second, Mardi Gras is fast approaching, and it really makes me miss Louisiana and the friends I made there. Louisiana is probably the most cultural place in America, and they sure know how to cook. And third, my friend Maggie, just bought a crockpot and I promised her a good “Crock Pot” recipe.
Likely your reasons for making this dinner are going to be different than mine, but I think you should find your own reasons, and make this. This isn’t one of those crockpot meals where you have to cook everything before you put it into the crock pot (I never got the point of that), so it’s quite simple to make. In fact, when I had the cutting board out for dinner the night before, I just cut up the ingredients, and then John threw them in the crockpot this morning. But just because it’s simple doesn’t change the fact that it’s delicious. You know what would make this dinner even more delcious? King Cake! If you live in Louisiana, please go eat a king cake for me, and then tell me all about it (preferably one with cream cheese and strawberry filling). Oh how I miss you Louisiana and your sweet, sweet food and drink and people.
Red Beans and Rice
- 1 pound Dried Red Beans, rinsed and drained
- 7 cups Water
- 1 whole Green Bell Pepper, Chopped
- 1 whole Onion, Chopped
- 3 stalks Celery, Chopped
- 3 cloves Garlic, Finely Chopped
- ½ pound Turkey Polska Kielbasa, sliced (or Andouille Sausage)*
- 3 Tablespoons “Tony’s” or other Creole Seasoning
- Hot Cooked Rice
* If you want the real thing, you should go with the real sausage. I happen to like turkey sausage, but it’s not going to give you quite as thick of a sauce.
Rinse and drain the red beans. Place all the ingredients into a large Crock Pot, except for the rice.
Cook, covered, at HIGH for 7 hours or until beans are tender. Don’t peak.
Serve over hot white rice. I also made this cornbread to serve with it. (Krusteaz didn’t pay for me for this or anything, but I just thought it was a really good box mix, and it was only $1)
Adapted from Tasty Kitchen
Chicken Enchiladas Verdes

To be honest, I’ve been eating the “verde” version of enchiladas for so long, that I kind of forgot there was any other kind. But that’s perfectly fine with me, because I love this dinner. Its great because so many different cuisines are made using a red tomato base, so this really adds some variety to the dinner table. I made a similar version for the first time back in college (Friday night dinner parties!), and I’ve been adapting it ever since. At this point I’m even afraid to order enchiladas at a Mexican restaurant, for fear that they won’t live up to this version.
I thought about making the verde sauce from scratch, but I couldn’t find tomatillos at the store. (Probably had something to do with being the middle of the winter in Ohio). But it’s probably better that I didn’t because this dish is great just the way it is, and I have enough other things to keep me busy. For the cheese topping, this time I happened to use queso fresco, but I have made it before using Monterey Jack, and I like both. It just depends on what I find at the store and what happens to be on sale.

Chicken Enchiladas Verdes
– Makes about 8 enchiladas
- 1 can (10 oz) green enchilada sauce
- 1 bottle (14 oz) salsa verde (or about 2 cups)
- 1/2 an medium onion, minced
- 2 cloves garlic, minced
- 1 large (12 oz) chicken breast (or 2 smaller) – pounded to an even thickness
- 1/2 block (4 oz) reduced fat cream cheese
- 1/4 cup finely chopped fresh cilantro
- 8 corn tortillas (about 6 inch)
- 1/2 cup crumbled queso fresco or Monterey Jack cheese
Add the canned enchilada sauce, salsa verde, minced onion, and garlic to a saucepan over medium heat. Add the 1 or 2 chicken breasts to the saucepan, cover pan, and cook for 20 minutes. Cut the chicken in half to ensure it is cooked through, and if not, continue cooking until it is no longer pink.
Turn off heat, and remove chicken from the pan. After cooling slightly, shred chicken into small pieces. In a small bowl combine the chicken, cream cheese, 2/3 cup of enchilada sauce and cilantro.
The salsa mixture should still be warm at this point. Working with one tortilla at a time, dip the corn tortilla into the salsa mixture for about 10 seconds and remove with tongs. This is just to make the tortilla more pliable, so it doesn’t crack when rolling. Then place the tortilla on a plate and spread 1/3 cup of chicken mixture down the tortilla. Roll up and place, seam side down, in a 11 x 7 baking dish coated with cooking spray. Repeat with remaining tortillas.
Pour a heaping cup of remaining salsa mixture on top of the tortillas. (I usually have some left over, but I prefer this to using 1/2 a can of enchilada sauce. If you want to double this recipe, I would just use an extra jar of salsa and skip the canned sauce). Top with crumbled queso fresco or shredded Monterey jack (or both).
Bake at 425° for 15-20 minutes, or until cheese melts and enchiladas are heated through.
Cincinnati Chili

Growing up in Ohio, Cincinnati Chili was always a go-to meal for my family, so I have very fond memories of it. Because of this I might not be the best critic, but I have to say that I LOVE this dinner. If you haven’t had Cincinnati Style chili, you really must try it! It’s often called 5 way chili, because you serve: 1) the uniquely flavored chili, 2) over pasta, 3) with cheese, 4) with beans, 5) with onion, and then I like to add a little bit of sour cream. It is NOT a spicy chili. It’s actually more on the savory/sweet side. In fact, it even has chocolate in the recipe, which is probably why I love it so much.
I think one of the reasons that we often had this as kids was because there is a fancy little seasoning packet you can buy that makes this dinner super easy. Being up in Toledo, I couldn’t find it at our store and I really had a craving for it, so I decided that I would make this chili from scratch. I know – “way to complicate things again, Jacqueline,” but sometimes I just feel like you can taste the work that went into the food, and I like the taste of effort. I have since found a place that sells the seasoning, but I don’t think I will ever go back – I like this recipe too much! I was a little intimidated when I found it, because the ingredient list looked really long, but once I actually went through it I realized the only things I had to buy at the store were the turkey & sirloin, onions, and a can of tomato puree! (I do have a large collection of spices). This dinner is quite easy to throw together, and just remember, this isn’t baking – you definitely don’t really need to measure exactly. I just eyeballed it using a regular old silverware, and it goes a lot quicker.

Cincinnati Chili
- 1 pound ground turkey
- 1/2 pound ground sirloin
- 2 cups chopped onion (about 1 very large onion)
- 3 garlic cloves, minced
- 1 cup water
- 2 Tablespoons brown sugar
- 3 Tablespoons spicy barbecue sauce (ketchup would probably substitute fine)
- 4 teaspoons white vinegar
- 2 Tablespoons chili powder
- 3/4 teaspoon ground cumin
- 3/4 teaspoon ground cinnamon
- 1/2 teaspoon ground allspice
- 1/4 teaspoon ground coriander
- 1/2 teaspoon kosher salt
- 1/2 teaspoon freshly ground black pepper
- 1/2 ounce unsweetened chocolate, chopped (I used chocolate chips this time but it was better when I used the unsweetenend chocolate. You could also substitue cocoa powder if need be.)
- 1 (10 3/4-ounce) can tomato puree (I could only find a 28 oz can, so I just used half of it)
For Serving:
- Hot Cooked spaghetti
- Shredded cheddar cheese
- Kidney beans (rinsed, drained & warmed)
- Chopped Onion
- Light Sour Cream
- Oyster crackers (if desired)
1. Coat a large dutch oven with cooking spray and heat over medium-high.
2. Brown the turkey and sirloin in the dutch oven. (About 5 minutes)
3. Add the onions & garlic to the pan and cook until tender (Again about 5 minutes).
4. Add the rest of the ingredients (water, brown sugar, bbq sauce, spices, chocolate, tomato puree) and bring to a boil.
5. Turn the heat down and simmer for about 45 minutes (or longer).
6. To serve: Place a scoop of spaghetti on each plate, top with a ladle of chili. Add cheese, kidney beans, onions, sour cream and crackers as desired.
Originally from Cooking Light
Latin Inspired Falafel

If you’ve got glucose-6-phosphate dehydrogenase deficiency*, or if you generally just don’t like falafel, you might still enjoy this dish! Traditional falafel is made out of fava beans and deep fried, and personally I’m not a huge fan of fava beans or deep frying things. So when I found this recipe for a healthy version of falafel made out of pinto beans, I knew I’d be in love. Plus this gave me another excuse to make my own pita bread, and it came out so much better the second time! Watching pita bread puff up in the oven is one of the coolest baking experiences EVER!
I had made this once before, and I wanted to make it again since I’ve been on such a “bean kick” lately. Unfortunately, I tried using a cast iron skillet this time and the patties really stuck to the pan. Because of the small amount of oil used to cook these, you really need a non-stick skillet. Using the right pan, these patties are a cinch to throw together, and another easy weeknight meal. I almost didn’t post this because I had a lot of trouble taking a picture of it that looked appetizing. But I couldn’t bare not sharing it with you because I think it’s such a unique dish! It really adds some variety to the weekly menu, and seems fancy while actually being really easy! I hope you try it, despite the bad pictures.
*G-6-Phosphate Dehydrogenase deficiency is a common x-linked disorder, in which affected persons can have attacks of hemolytic anemia brought on by fava beans (as well as infections and certain medications). Sorry for being a dork, just trying to be educational around here.
Latin Falafel Patties
– Makes enough for about 4 pita halves.
- 1 (15-ounce) can pinto beans, rinsed and drained
- 1/2 cup shredded Monterey Jack cheese
- 1/4 cup crushed tortilla chips
- 2 tablespoons finely chopped green onions
- 1 tablespoon finely chopped cilantro
- 1/2 teaspoon ground cumin
- 1 large egg white
- 2 teaspoons olive oil
For the Avocado Spread:
- 1 avocado, peeled and mashed
- 1/2 of a medium tomato, finely chopped
- 1-2 tablespoons chopped red onion
- 2 tablespoons light sour cream
- Squeeze of fresh lime juice
- Sprinkling of salt
For Serving:
- 2 (6-inch) pitas, each cut in half crosswise (For updated pictures and my recipe see: Pita Bread)
- Toppings such as lettuce, red onion, peppers (if desired)
1. First make the avocado spread by mixing all ingredients in a small serving dish.
2. To make the patties, combine all patty ingredients in a large mixing bowl.
3. Preheat oil a large non-stick skillet over medium-high heat.
4. Combine mashed pinto beans, Monterey jack cheese, crushed tortilla chips, cilantro, green onion, cumin and egg white in a mixing bowl.
5. Form the pinto bean mixture into patties and place them in the oil in the large skillet.
6. Cook patties for 3 minutes on each side, or until brown and heated through.
7. To serve, place 2-3 patties in a pita half, and top with avocado spread and any other desired vegetables.
Adapted from “Falafel with Avocado Spread” from Cooking Light
“Doctored Up” Bean Burritos

I’m done with cookies for a while…back to some healthy meals! This is a super easy and healthy, but surprisingly delicious meal! I know you might be thinking, “Bean Burritos”, do you even need a recipe for that? Well I have made bean burritos by just warming up a can of beans, and I think that this recipe is much better. Adding a few ingredients really makes this meal go from simple to exciting! You can always add more or less spice, I tend to like my food a little on the less spicy side.
Usually have a problem eating a meal without a serious source of protein – usually meat – but I’ve found that both John and I will find a meal with beans satisfying. It’s just a plus that they are also cheap, easy and healthy! Plus, I’ve found I’m much more likely to eat the leftovers of a meatless meal, because unlike meat, beans don’t really taste all that much different a day later. I think I am going to start buying black beans in bulk from my new favorite store, Costco.
Easy Bean Burritos
– Makes 4-6 burritos depending on the size.
For the Beans:
- 2 teaspoons olive oil
- 2 garlic cloves, minced
- 1 teaspoon chile powder
- 1 teaspoon cumin
- 1 teaspoon chopped chipotle peppers in adobo sauce*
- 1/4 teaspoon salt
- 1/3 cup water (or vegetable broth)
- 1 (15-ounce) can black beans, drained
- 1 (15-ounce) can pinto beans, drained
- 3 tablespoons salsa
For the Burritos:
- Tortillas
- Mexican blend cheese
- Chopped tomatoes
- Shredded romaine lettuce
- sliced green onions
- light sour cream
*These come in a small can in the “Mexican” aisle of almost any grocery store.
1. Heat oil at medium high in a large skillet.
2. Add garlic, and 1 teaspoon of each chile powder, cumin and chipotle peppers to the oil.
3. Stir for about 45 seconds, or just until fragrant.
3. Add the 2 cans of drained beans, salt and water. Bring the mixture to a boil.
4. Turn down the heat to medium-low and let simmer, without a lid, for about 10 minutes. (You can use this time to cut up the tomatoes, lettuce and green onions for the topping)
5. Remove from heat and stir in the salsa.
To serve: Spread the bean mixture down the tortilla, and top with your choice of toppings.
Recipe found at Pink Parsley, and originally from Cooking Light.
Chicken “Tender” Parmesan & Marinara Sauce


I never have been one to order chicken parmesan at an Italian restaurant, but I happen to really like this meal! The idea of a chicken tender, instead of a whole chicken breast, for some reason makes this meal a lot more appealing to me. Plus, this is actually pretty healthy, which is something I generally don’t associate with chicken parmesan from restaurants. In fact, I like this version so much that it has been one of my “go to” dinners for a couple years.
It’s pretty simple to make, and since I’ve had the hang of it for a while now, I decided to re-complicate it for myself and make my own sauce . The sauce making process wasn’t very difficult, but making it at the same time as the chicken made for a lot of dirty pots and pans, as well as tomato splatters all over the kitchen. So as a note to myself, the next time I make this I’m going to make the sauce ahead of time (or remember to thaw out the leftover sauce I have frozen). I figure that will make this a really easy weeknight meal.
Chicken “Tender” Parmesan
– enough for 3-4 servings
- 1 lb chicken tenders
- 1/2 cup dry bread crumbs
- 1/2 cup grated parmesan cheese
- 1 teaspoon basil
- 1 tablespoon chopped parsley (if you have it)
- salt and pepper to taste
- 1 1/2 tablespoons butter or olive oil
- 2 cups marinara sauce***
- 1/2 cup grated mozzarella cheese
***Before I decided to complicate this recipe by making my own sauce, I used bottled tomato-basil or sundried tomato sauce and add a few tablespoons of balsamic vinegar to it. This worked fine, and made this recipe really easy.
1. Combine the bread crumbs, grated parmesan, basil, parsley, and salt and pepper in a shallow dish.
2. Lightly beat the egg white in a small bowl.
3. Dip each chicken tender into egg white and then into the breadcrumb mixture, so each is coated.
4. Heat the oil or butter in a large skillet over medium high heat. At the same time preheat the broiler in the oven.
5. Add the coated chicken tenders to the skillet and cook for 3-4 minutes on each side.
6. Warm up the tomato sauce in the microwave (especially if it’s been in the fridge because it’s not in the oven that long to get hot), and then pour over the chicken in the skillet.
7. Top with mozzarella cheese.
8. Place the skillet in the oven, and broil for 2-3 minutes to melt cheese.
Serve alone or over pasta (I like angel hair or thin spaghetti). Also works great with broccoli or a salad.
Marinara Sauce
I’m not really sure what the definition of marinara is… and since I changed this recipe a lot, I’m not even sure if you can still call it a marinara. But any who, this is a pretty basic pasta sauce and it worked great with this chicken!
- 2 – 28 oz cans whole tomatoes, drained but juices reserved.
- 1 onion, chopped
- 1-2 tablespoons olive oil
- 3 cloves garlic, minced
- 1 teaspoon dried oregano
- 1/2 teaspoon dried basil
- 1/2 teaspoon crushed red pepper
- 1/3 cup balsamic vinegar
- Sugar (a few teaspoons)
- Salt & pepper
1. Heat oil in a large, deep skillet over medium high heat.
2. Add the chopped onion and cook 5-7 minutes, until lightly browned.
3. Add garlic, oregano, crushed red pepper to the onion and stir for 30 seconds.
4. Add tomatoes to pan, but reserve 4-5 tomatoes (these will be added later to give extra texture to the sauce).
5. Cook tomato mixture for 10-15 minutes, allowing it to thicken.
6. Add the balsamic vinegar and stir for about 1 minute.
7. Add the reserved tomato juice to the pan, stir, and simmer for 10 minutes.
8. Add sugar, salt and pepper to the sauce.
9. Transfer the mixture to a food processor and add the reserved tomatoes.
10. Pulse 15-20 times until almost smooth.
– Can be refrigerated for 5 days or frozen in an airtight container for 2-3 months.
Adapted from ATK Healthy Family Cookbook

