
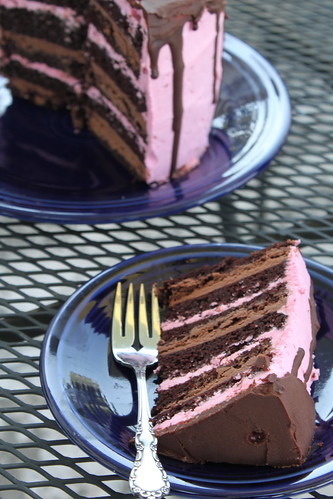
Six Layer Chocolate Cake with Raspberry Buttercream and Whipped Ganache
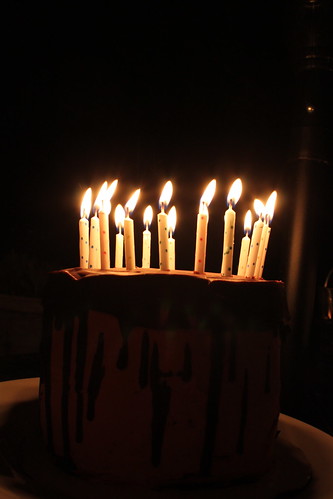
So I celebrated a big one a few weeks ago. Yep, a whole year has passed. Since my brother and I were born on the same day, our birthdays were always a big deal. It all started when I was 6, and my brother was turning 1. Tell a six year old that they have to share their birthday after 5 years of flying solo, and well, it could’ve been a little rough. Instead my parents went over the top and had an all out celebration with a tiered cake, our whole family, and a clown who doubled as a magician. I still cheered when the clown told me he was going to make my brother disappear, but overall, I LOVED sharing a birthday.
This year was no different. It’s been pretty great being back in Ohio and being able to once again share birthdays with my favorite brother. I insisted on making the cake, because it’s the one time of the year I don’t feel bad about going all out with an over the top birthday cake. Six layers was obviously a necessity, but because I didn’t want to be eating leftover cake for weeks, I thought 6 inches was perfect. The only problem – I didn’t have any six inch cake pans. Thankfully whole foods came to my rescue. I noticed they sold 6-inch cakes and jokingly asked the baker if she had any pans for sale. Well it turns out they bake all their cakes in disposable paper rounds – and she gave me 3 for a buck, steal!
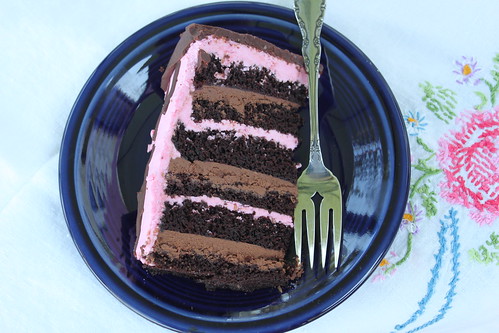
The initial recipe called only for the raspberry filling, which does make a beautiful contrasting interior, but I really wanted more chocolate, so I alternated a chocolate ganache frosting with the raspberry butter cream. It was not much more work because the ganache is just 2 ingredients, whipped to a fluffy consistency. But I will say the cake on it’s own is a moist, rich, dense chocolate cake, and could easily stand as the only chocolate in the cake if you want to double the strawberry buttercream instead. The whole thing is then topped with a rich chocolate ganache that drips down the sides and makes for a wonderful presentation. If your looking for some other wonderful birthday cakes, here’s a few I’ve made:
Six Layer Chocolate Cake with Raspberry Buttercream and Whipped Ganache
Makes 1- 6 layer, 6 inch cake.
For the Cake:
- 1-1/2 cups (180 g) all-purpose flour
- 1-1/3 cups (275 g) sugar
- 1/2 cup (60 g) dark cocoa powder
- 1-1/4 teaspoons (6 g) baking soda
- 1-1/4 teaspoons (6 g) baking powder
- 1 teaspoon (5 g) salt
- 140 ml (5 liquid oz) buttermilk
- 130 ml (4.5 liquid oz) espresso or strong, hot brewed coffee
- 75 ml vegetable oil
- 2 eggs, room temperature, lightly beaten
- 1 tablespoon (15 ml) pure vanilla extract
For the Raspberry Swiss Meringue Buttercream:
- 3 large, fresh egg whites (100 g)
- 3/4 cup sugar
- 1 1/2 teaspoons pure vanilla extract
- 2 sticks butter, cut into cubes and cool
- 1/4 cup raspberry puree, strained to remove seeds
- few drops of pink food coloring (optional)
For the Whipped Chocolate Ganache Filling:
- 8 oz bittersweet chocolate, chopped
- 1 cup heavy cream
For the Chocolate Glaze:
- 4 oz bittersweet chocolate, chopped
- 1/3 c. heavy cream
- 2 T unsalted butter
Instructions
- Preheat oven to 350° F. Prepare three 6-inch round cake pans with butter, parchment paper rounds, and flour or cocoa powder. Tap out excess.
- In bowl of electric mixer, sift all dry ingredients.
- Add all remaining ingredients to bowl with the dry ingredients and with paddle attachment on mixer, mix for 2 minutes on medium speed (you may need the plastic splash-guard that comes with mixer) and pour into prepared pans. If possible, use digital kitchen scale and weigh pans for even layers. Batter will be liquidy.
- Bake for 20 minutes and then rotate pans in oven. Cakes are done when toothpick or skewer comes out with a few crumbs, about 30 minutes total. Try not to over-bake.
- Cool on wire racks for 20 minutes then gently invert onto racks until completely cool.
- If using raspberry puree, place a handful of fresh or frozen raspberries in a food processor, and process until a smooth. Press through a mess sieve to remove seeds and retain at least 1/4 cup to add to frosting.
- Wipe the bowl of an electric mixer with paper towel and lemon juice, to remove any trace of grease. Add egg whites and sugar, and simmer over a pot of water (not boiling), whisking constantly but gently, until temperature reaches 160°F, or if you don’t have a candy thermometer, until the sugar has completely dissolved and the egg whites are hot.
- With whisk attachment of mixer, begin to whip until the meringue is thick, glossy, and the bottom of the bowl feels neutral to the touch (this can take up to 10 minutes or so). *Don’t begin adding butter until the bottom of the bowl feels neutral, and not warm.
- Switch over to paddle attachment and, with mixer on low speed, add butter cubes, one at a time, until incorporated, and mix until it has reached a silky smooth texture (if curdles, keep mixing and it will come back to smooth). *If mixture is too runny, refrigerate for about 15 minutes and continue mixing with paddle attachment until it comes together. Add vanilla and salt, continuing to beat on low speed until well combined.
- Add raspberry puree to taste and if desired a few fresh raspberries, and blend until combined. Add small amount of pink food coloring, if desired.
For the Whipped Chocolate Ganache.
- Heat heavy cream in a small saucepan until just before boiling.
- In a heat safe bowl, pour cream over chopped chocolate. Let sit for ~5 minutes, then stir to melt chocolate.
- Allow mixture to cool to room temperature, stirring occasionally (about 30-45 minutes). (Or place in the fridge for a few minutes at a time to expedite the process)
- Whip mixture on high until it becomes paler and fluffy, about 2-4 minutes.
- Place the chocolate, butter and heavy cream in a medium heatproof bowl over a pot of simmering water. Stir the mixture using a rubber spatula until melted and smooth. *Be careful to not get even a droplet of water into your bowl of chocolate and butter.
- Slice the 1st cake layer in half horizontally, using a large serrated knife or dental floss and place cut side up on your cake board, pedestal, or plate.
- The general order of the cake starting from the bottom will be:
- Cake
- Whipped Ganache
- Cake
- Raspberry Buttercream
- Cake
- Whipped Ganache
- Cake
- Raspberry Buttercream
- Cake
- Whipped Ganache
- Cake
- Raspberry Buttercream
- Finish with layer of Chocolate Glaze
- Using a small offset palette knife, spread approximately 1/2 cup of whipped ganache evenly on top.
- Add a layer of cake and cover with about 1/2 cup raspberry buttercream.
- Repeat this with remaining cake layers, until you come to the final layer, which you will place face-down on the top of the cake.
- Place cake on a turntable (if possible), and using a small offset palette knife for the top of the cake, and medium straight palette knife for the sides, cover the cake in a thin layer of buttercream to seal in crumbs. Refrigerate for 30 minutes (or more). *This does not need to be perfect, as that will come with the top “coat” of buttercream.
- Chill cake.
- If glazing the cake, make the glaze and set aside for a few moments to cool a bit. Pour glaze over chilled cake, smoothing the top with a clean small offset palette knife.
- Chill again to set, serve at cool room temperature.
Cake and Swiss Meringue Buttercream adapted from Sweetapolita, Chocolate Ganache from Martha Stewart
Salted Caramel Dark Chocolate Cake

So I finally downloaded my camera card, and realized I have way too many things I haven’t shared yet! But I decided to start with birthday cake, well because who doesn’t love birthday cake?! It has become somewhat of a tradition around here that I make my own birthday cake and then have friends over to share in eating it. Now there are those people who think that you shouldn’t have to bake on your birthday – but I would assume those are people who don’t like baking as much as I do. Really there is no other opportunity to make exactly the kind of birthday cake you’d like from start to finish, and I like to take advantage of that. Now this year I went overboard (and for me to say that is really saying something!). I decided to make a completely separate recipe of overly complicated cupcakes in addition to this three layer cake, and truthfully by the end of the day, I was starting to wonder if I’d get it all done before my birthday was over. Thankfully, John helped out a lot, but for my future reference and yours: this cake is plently on it’s own – both in terms of amount of cake and work.
First you start with a rich, moist dark chocolate cake. To really get the dark chocolate effect you should invest in some dutch processed (or dark) cocoa powder. I made the layers a day ahead, but I would guess you could even make them several days in advance and store in the fridge because they are so moist. Then you create a salted caramel, which will flavor the swiss meringue buttercream filling. Personally, I’m still kind of on the fence about swiss meringue buttercream, but I thought it worked well in this recipe because it’s not overly sweet like traditional buttercream. It also happens to be very stable, and so is able to adequately support the layers of this cake. Finally, you top it all with a dark chocolate ganache frosting and some decorative fleur-de-sel.

Although it would be really hard to top the malted chocolate and marshmallow cake of last year, this cake came close. Since I’m partial to six layer cakes, I think if I made this again that I would cut each layer in half, and then fill the additional layers with a small amount of plain salted caramel. (Simply double the recipe for caramel below.) Compared to the cupcakes I made, the caramel flavor was fairly subtle in this cake, and I think that would help to make it stronger. And if you want to save yourself some time, a traditional carmael buttercream like the one used here, would also work for the layers. This cake was quite rich, and so I decided to freeze some to take home for a second birthday celebration, and I can also say that it freezes wonderfully! Since my brother and I were born on the same day (5 years apart) we always try to get together for a fun birthday celebration – we kept it fun this year with an inflatable cake, and of course an entire table filled with desserts :-)!

Salted Caramel Dark Chocolate Cake
– Makes a 3 layer cake with 8-inch rounds (Serves ~16)
Ingredients:
For the cake:
2¼ cups all-purpose flour
2¼ cups sugar
1 cup plus 2 tablespoons dark unsweetened cocoa powder
2¼ tsp. baking soda
1½ tsp. baking powder
1½ tsp. salt
6 tbsp. vegetable oil
1 cup plus 2 tbsp. buttermilk
1 cup plus 2 tbsp. brewed coffee
3 large eggs, at room temperature
1 tbsp. vanilla extract
For the filling:
1 cup sugar, divided
¼ cup water
¼ cup heavy cream
Generous pinch of sea salt, such as fleur de sel
4 large egg whites, at room temperature
1½ cup (3 sticks) unsalted butter, at cool room temperature
For the frosting:
12 oz. good quality semisweet chocolate, finely chopped
¼ cup unsweetened Dutch-process cocoa powder
¼ cup very hot water
1 cup plus 2 tbsp. (18 tbsp.) unsalted butter, at room temperature
1/3 cup plus 1 tbsp. confectioners’ sugar
Pinch of salt
Fleur de sel, for finishing
Directions:
To make the cake, preheat the oven to 350˚ F. Grease and flour the edges of 3 8-inch baking pans, shaking out the excess. Line the bottoms with rounds of parchment paper. In the bowl of an electric mixer, combine the flour, sugar, cocoa powder, baking soda, baking powder, and salt. Mix on low speed to blend. Add the vegetable oil, buttermilk, coffee, eggs, and vanilla to the bowl and mix on low speed until well blended and completely incorporated. Divide the batter evenly between the prepared pans, using a kitchen scale if desired. Bake 20-25 minutes, or until a toothpick inserted in the center comes out clean. Let the cakes cool in the pans about 15 minutes, then invert onto a wire rack and allow to cool completely. Remove the parchment paper. Can be wrapped in plastic and stored in the refrigerator prior to assembly for 1-2 days.
To make the caramel buttercream filling, place ½ cup plus 2 tablespoons of the sugar in a medium saucepan. Mix in the water. Bring the mixture to a boil over medium heat. Stop stirring and let the caramel cook, gently swirling from time to time, until it is a deep amber color (test a drop on a white plate or bowl if necessary), watching it carefully to avoid burning. Remove the mixture from the heat and slowly whisk in the cream and then the salt. Set aside and let cool.
Combine the egg whites and the remaining ¼ cup plus 2 tablespoons sugar in a heatproof bowl set over a pot of simmering water. Heat, whisking frequently, until the mixture reaches 150-160° F and the sugar has dissolved. Transfer the mixture to the bowl of a stand mixer fitted with the whisk attachment. Beat on medium-high speed until stiff peaks form and the mixture has cooled to room temperature, about 8 minutes. (The bowl should be cool to the touch.)
Reduce the speed to medium and add the butter, 2 tablespoons at a time, adding more once each addition has been incorporated. If the frosting looks soupy or curdled, continue to beat on medium-high speed until thick and smooth again, about 3-5 minutes more (or longer – don’t worry, it will come together!) Blend in the cooled caramel until smooth and completely incorporated, scraping down the sides of the bowl as needed.
To make the frosting, place the chopped chocolate in a heatproof bowl set over a pan of simmering water. Heat, stirring occasionally, until the chocolate is completely melted and smooth. Set aside and let cool to room temperature. In a small bowl, combine the cocoa powder and water and stir until smooth. In the bowl of an electric mixer, combine the butter, confectioners’ sugar and salt. Beat on medium-high speed until light and fluffy, about 5 minutes. With the mixer on low speed, gradually blend in the melted and cooled chocolate until well incorporated. Blend in the cocoa powder-water mixture until smooth.
To assemble the cake, level the cake layers to get a more stable and cylindrical cake. Place one of the cake layers on a cake board or serving platter. Top with half of the caramel buttercream and smooth in a thick, even layer. Place a second cake layer on top and smooth the remaining caramel buttercream over that. Place the final cake layer on top. Cover the top and sides of the cake with the chocolate frosting and smooth with an offset spatula. Refrigerate until ready to serve. Before serving, sprinkle with fleur de sel.
Source: adapted from Annie’s Eats, originally from Sweetapolita

Blueberry Crumble Coffee Cake

I can hardly believe it but Friday marks the end of my third year of medical school! I can remember at the beginning of this year wondering how I was ever going to make it- “working” at the hospital everyday on top of studying for standardized exams every five weeks, and trying to live a somewhat normal life on top of it. Then before I even had time to get really stressed out about it – it’s over! Not complaining one bit :-). I am finishing up the year with pediatrics, which quite to my surprise turned out to be one of my favorite rotations of the year. I have never been one of those people who thinks, “Awwwwwwwwww, little kids are sooooooooo cute.” In fact, I kind of grouped those people into the “lovers of unicorn and all things rainbow” that I just didn’t fit in with. However, in retrospect I realize that I had never really spent enough time with the little ones in order to make such a judgement. Little kids are pretty amazing little people, and they definitely do say the darndest things. And also, children’s hospitals = 1000x cooler than adult hospitals.
So in order to commemorate the end of another very good rotation, I decided to make coffee cake for the office to enjoy. I wanted something summery yet decadent and something that would work equally well for both breakfast and dessert. I think this cake hit the nail on the head. The lemon in the batter gives it a fresh appeal, and the streusel topping makes it a crumbly delight. I really thought this cake was over the top good – and based on the number of people at the office that asked for the recipe, I’m pretty sure I’m not alone. The only thing I might change for the future is to make individual serving sizes. I think it would work well in a muffin tin – just make sure you equally distribute the amazing streusel, otherwise you might cause some fights (at least when there are little kiddos involved).

Blueberry Crumble Coffee Cake
Makes a 9-inch round cake
For the Streusel:
- 1/4 cup granulated sugar
- 1/3 cup light brown sugar, lightly packed
- 1 teaspoon ground cinnamon
- 1/8 teaspoon ground nutmeg
- 1/4 pound (1 stick) unsalted butter, melted
- 1 1/3 cups all-purpose flour
For the Cake:
- 6 tablespoons unsalted butter, at room temperature (3/4 stick)
- 3/4 cup granulated sugar
- 2 extra-large eggs
- 1 ½ teaspoons pure vanilla extract
- zest from 1/2 a lemon
- 2/3 cup sour cream
- 1 1/4 cups all purpose flour
- 1 teaspoon baking powder
- 1/4 teaspoon baking soda
- 1/2 teaspoon kosher salt
- 1 cup fresh blueberries
Directions:
Preheat the oven to 350 degrees F. Butter and flour a 9-inch round baking pan.
For the Streusel: Combine granulated sugar, brown sugar, cinnamon and nutmeg in a bowl. Stir in melted butter, then flour and mix well.
For the Cake: In a stand mixer, cream butter and sugar on high speed for 4-5 minutes, until light. Reduce speed to low to add the eggs, then add the vanilla, lemon zest, and sour cream. In a medium bowl, sift together the flour, baking powder, baking soda, and salt. With the mixer on low speed, add the flour mixture to the batter until just combined. Fold in the blueberries and stir with a spatula to evenly mix in berries. Spoon the batter into the prepared pan and spread with a knife to level the top. With your fingers, crumble all the topping evenly over the batter. Bake for 40 to 50 minutes, until a cake tester comes out clean. Cool completely and serve. Sprinkle with powdered sugar if desired.
Barely Adapated from Barefoot Contessa (Ina Garten)
Turtle Cheesecake

Sometimes I take for granted that certain things are not common knowledge. Now I’m not talking about fancy medical terms, chemistry or physics here, I’m just talking about day-to-day life stuff that you can’t actually put a finger on when, or how you learned it – you just know it and therefore assume that others must too. Well turtle sundaes were an example of such knowledge. I mean I literally have no idea when I discovered a turtle sundae, but I definetely just assumed it was common knowledge that they consist of pecans, hot fudge and caramel. Well let me tell you folks, this is not the case.
The first time I suggested that John get a turtle sundae – he didn’t know what it was! Blasphemy! After he ordered it and thought it was amazing, he was shocked to discover that almost every major ice cream shop in America makes some type of turtle sundae! How did he go so long without discovering this? Well I’m guessing it’s because he only recently started frequenting ice cream shops on a regular basis (perhaps because his wife has an unhealthy obsession with ice cream.) Imagine that :-).

When I was trying to figure out what type of birthday cake I wanted to make for John’s brother, the only request I got was “cheesecake”. Well the list of cheesecake possibilities was quite overwhelming, but I decided on this one because I was hoping that the love of turtle sundaes would run in the family. I was really looking for something that incorporated all parts of the turtle sundae into the cheesecake (not just as toppings), and I couldn’t really find one, so instead I put together a few of the things I liked best about different recipes. The results were well worth it. The crust is to-die-for and I think it would probably work well in a variety of recipes. After eating a slice of this, my sister-in-law who is from Turkey exclaimed that cheesecake may be America’s greatest invention :-). Be fairly warned, it is really hard to eat more than a sliver of this because it’s quite rich, but if you find yourself with leftovers, I think this would freeze wonderfully.
P.S. Sorry I’ve been MIA from the blog lately. Surgery clerkship has gotten the best of me. It’s true what they say – you really do work 14 hour days, but for the most part I’ve really been enjoying it. Future surgeon? We shall see….

Turtle Cheesecake
– Make 1- 9 inch round
For the Crust:
- 1 ¼ cups graham cracker crumbs
- 2/3 cup finely ground pecans
- 3 T. packed brown sugar
- 6 T. melted butter
For the Filling:
- 4 packages (8 oz each) cream cheese, softened (I used 2 regular, 2- 1/3 less fat)
- 1 cup sugar
- 1/3 cup packed brown sugar
- 1/4 cup PLUS 1 teaspoon flour, divided
- 2 T. heavy whipping cream
- 1- ½ teaspoons vanilla extract
- 4 eggs, lightly beaten
- ½ cup milk chocolate chips, melted and cooled
- 1/3 cup ice cream caramel sauce (Will be posting a homemade and easy recipe soon)
- 1/2 cup coarsely chopped pecans
For the Topping:
- 1/2 cup milk chocolate chips
- 1/4 cup heavy whipping cream PLUS 1-2 tablespoons depending on preference
- Pecan halves and additional caramel topping for garnish
To Make the Crust:
- Pre heat oven to 400 F. Wrap 9-inch spring foam pan with heavy duty foil or parchment-foil paper (this is all I had and it worked wonderfully). Be sure to wrap both sides of the pan because you don’t want any water seeping through the cracks when you bake it in a water bath.
- Mix all crust ingredients until combined. Press into 9 inch pan, pressing firmly and evenly. Bake at 400° for 15-18 minutes. Let cool completely before filling.
To Make the Filling:
- In a large bowl beat cream cheese and sugars until well combined. Then beat in 1/4 cup of flour, vanilla, and eggs until well combined.
- Remove a heaping cup of cream cheese mixture and combine with melted chocolate. Pour mixture over cooled crust.

- Combine pecans, caramel sauce and flour (not pictured here because I forgot it, but add it to stop caramel from leaking). Drop pecan mixture over chocolate layer.

- Pour remaining plain cream cheese mixture over top and spread evenly. Place spring foam pan in a large, deep pan and add about 1 inch of water to larger pan to create a water bath.

- TURN OVEN DOWN to 325º and bake for about 1 hour 20 minutes, or until the top appears dull. Carefully remove springfoam pan from water bath, and cool for 10 minutes. Refrigerate for several hours or overnight.
To Make the Topping
- Place chocolate chips in a heat-proof measuring cup. Bring cream to a boil over medium heat. Pour hot cream over chocolate chips and stir to combine. Pour ganache over cooled cheesecake and spread evenly. *NOTE: if you would like the ganache to drip down the sides, like the effect in this cake, add another tablespoon or 2 of cream to the mixture and make sure it is still very warm when you pour it over the cake.
- Top ganache with pecans, and drizzle caramel sauce before serving.
Inspired by Taste of Home
King Cake with Cream Cheese Filling & Happy Mardi Gras!

As I’ve mentioned on this blog before, I used to live in Louisiana. I’ve also mentioned how much I absolutely love it, but I’m just going to tell you again. It has got to be the most cultural place in America. It’s the kind of place where you go to take your trash out and end up spending the evening sharing a beer with your neighbor as you sit on the sidewalk. It’s also the kind of place where any excuse to celebrate is not taken for granted. Pretty sure there is no other place in America that gets a whole week off school in the middle of February. And most importantly, it’s the kind of place that seriously knows good food. King cake is no exception.
Now originally king cake was a rather plain cake filled with cinnamon and sugar, and the toppings were the really delicious part; but as we tend to do in America, we have made it more and more gluttonous over the years. Nowadays even the most famous bakeries like Gambino’s , serve cream cheese filled king cake as their “simple” selection. I’ve also heard that the bread has gotten much sweeter over the years, but I’m not complaining. This was a delicious and pretty simple recipe, even though I managed to mess it up a bit. There are quite a few steps, but each of them takes less than 20 minutes of hands on time. The problem I ran into was that I attempted to roll the dough into a huge rectangle, which made for a huge mess when I went to fill it with the cream cheese filling, but I have adapted the instructions below to make for an easier outcome. Other than that, this recipe really surprised me with how easy, and pretty much foolproof it was. I promise if you make it as soon as you get home from work, you will still be able to eat it for Fat Tuesday!
King Cake with Cream Cheese Filling
Makes 1 round king cake, about 10 servings
Dough
- 2 ½ tablespoons unsalted butter
- 8 ounces sour cream
- ¼ cup + 1 T. granulated sugar, divided
- Pinch of salt
- 1 package (2¼ teaspoons) active dry yeast
- ¼ cup warm milk (between 100 and 110 degrees)
- 1 egg
- 3 to 3½ cups all-purpose flour
- Oil for your hands and the bowl
Filling
- 8-ounce package cream cheese
- 1/2 cup (3 1/2 ounces) sugar
- 3 tablespoons All-Purpose Flour
- 1 large egg, lightly beaten
- 2 teaspoons vanilla
Icing
- 2 cups powdered sugar
- 1 teaspoon vanilla extract
- 1 tablespoon unsalted butter, melted
- 4 tablespoons whole milk
- Pinch of salt
Sprinkling Sugar
- 1 1/2 cups granulated sugar, separated into 3 bowls
- yellow, green, and purple (or blue + red) food coloring
- Bean/plastic baby for tradition
1. In a small saucepan over medium heat, add the butter, 1/4 c. of sugar and salt. Stir. Once butter has melted, add the sour cream and heat until lukewarm. Meanwhile, in a mixing bowl, add ¼ cup warm water, yeast, and 1 tablespoon of the sugar; stir. Allow the yeast to sit for about five minutes until it bubbles and becomes active.
2. Once the yeast is active, whisk in the warm butter/sour cream mixture, the egg, and 1 cup of the flour. Whisk until smooth. Using an oiled wooden spoon, being mixing in small amounts of the remaining flour until you form a soft dough. This will take about another 2 1/4 cups of flour. You want the dough to be tacky, but not sticky.
3. Using the dough hook of a mixing bowl, knead the dough until smooth and elastic, about 5-8 minutes, adding flour by the teaspoon if the dough is stickin to the sides of the bowl, more than itself.
4. Place the ball of dough into a large, well-oiled bowl, then flip the dough so all of the surface area of the dough is oiled. Cover the bowl with oiled plastic wrap, then set the bowl in a warm, draft-free area and allow the dough to rise until it has doubled in size, about 1 hour.
5. To make the filling: beat together the cream cheese, sugar and flour until smooth. Add the egg and vanilla and stir to combine.
6. Once the dough has doubled in size, turn it out onto a lightly floured surface. Lightly flour the dough and a rolling pin. Roll the dough into a rectangle about 24 inches long and 6 inches wide.
7. Dollop the filling down the center of the long strip of dough. Then fold each edge up and over the filling till they meet at the top; roll and pinch the edges together, to seal the filling inside as much as possible. Don’t worry about making the seal look perfect; it’ll eventually be hidden by the icing and sugar.
8. Place the log of dough seam side down or to the side onto a baking sheet covered with parchment paper. (A ring mold would be most helpful for this, but I didn’t have one). into the prepared ring mold, seam down or to the side (just not on top), or onto the baking sheet. The dough will be very extensible, i.e., it’ll stretch as you handle it. So pick it up and position it in the pan quickly and gently. Pinch the ends together to form a ring. Cover and let rise for about an hour, until it’s puffy. Preheat the oven to 350°F while the dough rises.
9. Once risen, bake at 350 for 25-30 minutes. Once golden, remove from oven and cool on a wire rack for 15 minutes.
10. While the cake is baking, make the sugar. (This can also be made far in advance). Combine 1/2 cup of sugar with a few drops of food coloring and stir continously until desired color is reached. *Gel colors will also work here, but you need to work the color into the sugar by pressing against the bottom of a spoon.
10. Once the cake is mildly cool, it is tradition to poke a small plastic baby, or a dried bean somewhere in the cake. Whoever gets this piece in their cake is supposed to buy/make the king cake for next year.
11. While the cake is cooling, make the icing. Combine all ingredients and whisk until smooth. Pour over the cooled cake. Before the icing has set (ie within 10-15 minutes), sprinkle sugar over the icing in 3 equal portions.
Cake Adapted from Brown Eyed Baker, Filling adapted from King Arthur Flour Company
Tuxedo Cake

For as long as I can remember, I have loved making from scratch birthday cakes. One of the first ones that comes to mind is a chocolate hazelnut birthday cake for my brother’s (and my) birthday. Unfortunately, I somehow measured the wrong amount of hazelnuts in that cake, and it pretty much ruined Nutella for me for at least 5 years (don’t worry, I’ve now come to my senses). There were other times in college, where cooking in a small dorm kitchen that literally had no cooking utensils seemed like a great idea. There was freshman year, where I figured I had nothing better to do than to make a 3 layer meringue cake with whipped cream and fruit. There were several $50 german chocolate cakes, since they required buying not only the ingredients, but also pans, bowls and something to stir with. There were multiple coffee cheesecakes that served as birthday cakes, pies that served as birthday cakes and then of course the most recent Malted Chocolate and Marshmallow Six Layer Cake.
So last year, when John’s only wish for his birthday cake was boxed chocolate cake mix with simple whipped cream as the frosting, I was slightly appalled. I made the cake, I even ate a piece, and I was glad he liked it, but seriously – how boring! As his birthday approached this year, I was almost afraid to ask what kind of cake he might like, because I knew that no matter what I suggested, he would come back with the same chocolate cake with whipped cream. Then this cake popped into my mind, or rather popped up on my google reader. I had seen it earlier on Annie’s blog, but it was way back in January when I wasn’t thinking about October birthdays. I immediately knew that this would be the perfect birthday cake for John because it’s basically a dressed up of version of his favorite. The flavors are still simple, but the ganache adds just that oomph it needed to make it not only more delicious but also quite stunning. The strawberries are obviously optional, but they certainly add to the presentation. I sized down the original recipe because everyone mentioned how it was such a tall cake, and I felt a little guilty putting 4 cups of sugar in a cake (but of course, in my head, 3 was fine). I thought it came out perfectly with a slightly downsized recipe, and so that is the version I have included below. This cake is definitely a keeper and I’m really glad I was able to find something that both I enjoyed making and John enjoyed eating. Happy Birthday baby! I still love you no matter what kind of birthday cake you want :-)!

Tuxedo Cake
Yield: 3- 9 inch layers
For the cake:
3/4 cup (1.5 sticks) unsalted butter
1 1/2 cups water
3/4 cup canola oil
3 cups sugar
3/4 cup unsweetened cocoa powder
3 cups all-purpose flour
3 large eggs
3/4 cup buttermilk
2 1/2 t. baking soda
1/2 tsp. salt
1 tbsp. vanilla extract
For the frosting:
4 cups chilled heavy whipping cream
1¼ cups confectioners’ sugar, sifted
For the chocolate topping:
4 oz. bittersweet chocolate, finely chopped
½ cup heavy whipping cream
¼ cup light corn syrup
2 tsp. vanilla extract
Directions:
To make the cake layers, preheat the oven to 350˚ F. Line three 9-inch round cake pans with parchment paper. Butter and flour the inside edges of the pan, shaking out the excess flour.
In a saucepan over medium heat, combine the butter, water and canola oil; heat until the butter is melted. In a large mixing bowl, combine the sugar, cocoa powder, and flour; whisk to blend. Pour the melted butter mixture into the dry ingredients and whisk until smooth. Whisk in the eggs one at a time, then whisk in the buttermilk. Add the baking soda, salt and vanilla to the bowl and whisk just until incorporated. Divide the batter evenly between the prepared pans. Bake for 35-40 minutes or until a toothpick inserted in the center comes out clean.
Let cool in the pans for 15 minutes. Run a knife around the edge of each cake layer and invert onto a wire cooling rack. Allow the cake layers to cool completely before frosting, at least 2 hours.
To make the frosting, add the heavy cream to the bowl of an electric mixer fitted with a whisk attachment. Whip on medium-high speed until soft peaks form. Add the powdered sugar and continue to whip until thoroughly combined and stiff peaks form. Be careful not to over-beat!
To assemble the cake, place one cake layer on a cake platter and spread a layer of the whipped cream frosting over the top. Top with a second cake layer, more frosting (and the third cake layer, if using). Frost the top and sides of the assembled cake. Refrigerate until the frosting has stabilized, at least 1 hour.
To make the chocolate glaze, place the chocolate in a medium bowl. Heat the cream in a small saucepan over medium heat until simmering. Pour the hot cream over the chocolate and let sit 1-2 minutes. Whisk until the mixture is smooth and homogenous. Blend in the corn syrup and vanilla. Pour the glaze into a pitcher or measuring cup and let cool for 10 minutes. (Do not let the glaze cool longer or it may become difficult to pour over the cake.) Slowly pour the glaze over the cake, ensuring that the top is covered and the glaze drips over the sides.
Refrigerate the cake until the glaze is set and the whipped cream frosting is firm, at least 1 hour. Slice with a long, sharp knife, wiping the blade clean between slices.
Adapted from: Confections of a Foodie Bride, who adapted it from The Pastry Queen by Rebecca Rather

Pineapple Upside Down Cake

If I had my choice of desserts, pineapple upside down cake would not be at the top of my list. Well at least it wasn’t until I made this cake. If you think like me, you might think that pineapple upside down cake is stuck in the 1980s. While I must admit that the ho-hum yellow-tan color occasionally mixed with the bright red of a maraschino cherry is somewhat unappetizing and does indeed remind me of 1980s wallpaper, I must give some respect to the deliciousness that is this cake.
I made this for my dad’s birthday because for as long as I can remember, it has been his favorite cake. Perhaps this is because I was raised in the 80s, at a time when yellow-tan was in style. Or perhaps my dad has not ventured out into the world of other cake flavors. But most likely I think that my dad just realized that this is a simple cake base that could be eaten on it’s own, combined with a pineapple-carmel syrup that is to die for.
When I decided that I was going to make this for his birthday, I searched high and low for what I thought would be the best recipe. I have made a few pineapple upside down cakes in the past, but I wanted something that would be truly exceptional. While I am not normally one to alter a baking recipe much from the original, I had to make an exception for this cake. I ended up combining the best parts from 2 separate recipes so that I could get a rich cake that would fit in a 9-inch pan and not use the entire pound of butter. I think it turned out to be a success. The cake has a rich and nutty flavor and is so moist in part because of the sour cream and pineapple juice and in part because of the rich syrup sauce it is drenched in. Of course the pineapple itself is on the of the best parts, so feel free to use real pineapple if you have it handy. I have a feeling that I will be making this around September 1st again next year :-).

Pineapple Upside Down Cake
– Makes one 9-inch cake
Pineapple Topping
- 1-20 oz can pineapple slices in juice (reserve juice)
- 3/4 stick unsalted butter
- 3/4 cup brown sugar
Cake
- 1 cup all purpose flour
- 1/4 cup cake flour
- 1/4 cup ground almonds
- 1 teaspoon baking powder
- 1/2 teaspoon salt
- 1 cup sugar
- 1 teaspoon vanilla extract
- 1/4 cup pineapple juice
- 10 Tablespoons butter (1 stick + 2 T.)
- 2 large eggs
- 1/2 cup light sour cream
1. Heat brown sugar and butter in a saucepan over medium heat until bubbling (several minutes). Remove from heat and pour mixture into a non-stick 9 inch cake pan. Place slices of pineapple over the sauce, cutting pieces as necessary to fit as many as possible.
2. Preheat oven to 325º.
3. Whisk flours, almonds, baking powder and salt in a medium bowl. In the bowl of a mixer blend sugar and butter. Add eggs, one at a time and then mix in vanilla and pineapple juice. Once blended slowly add the flour mixture, alternating with the sour cream. Batter will be thick.
4. Pour batter on top of pineapple slices in pan. Bake at 325 for 50-60 minutes or until a toothpick inserted in center comes out clean.
5. Cool for 5-10 minutes and then invert cake on a rimmed plate to insure no juices are lost. Serve warm or refrigerate for 1-2 days before serving.
Inspired by Smitten Kitchen and Simply Recipes
Malted Chocolate and Marshmallow Six Layer Cake

In case you didn’t know, my birthday was on Monday, and our anniversary was the day before that. Needless to say it’s been a food-filled week! With my brother having the same birthday as me, it’s always felt like Christmas in July, but now with an anniversary to add to the festivities, July is quickly becoming my favorite month of the year. Unfortunately, (or fortunately for him), brother John is spending the summer fishing working in Alaska, so I might just have an excuse to make another celebratory birthday cake when he returns in August. I know some people would view it as work to make their own birthday cake, but I view it as an excuse to buy fancy ingredients and make something over-the-top without any regrets. It’s basically like my present to myself. I had a lot of fun sifting through recipes, but with so many combinations of cake and icing to chose from, it was really hard for me to decide on one. I ended up picking this cake because Sweetapolita named it “Campfire Delight” and since I love summer and the campfires that come with it, I couldn’t resist. After making this, I don’t think campfire delight is really a fitting name (after all it’s missing the essential graham cracker part of the s’more), however this cake is totally over the top delicious.
I was set on the fact that I wanted to make a 6-layer cake, only because I had never made one before and I wanted to try something new. Unfortunately I didn’t want to be taking pictures while visiting with friends, so I have no pictures to show you of the inside of this mile-high cake. You’ll just have to trust me: 6 layers really makes a nice presentation and is definitely worth the extra effort. How can you go wrong with an almost equal filling to cake ratio? Keeping that in mind, you can’t eat very much of this cake (at least at one time). But that makes it a perfect birthday cake to share with some friends!

Rich Chocolate Cake
– Recipe as indicated is for 3-9′ inch rounds
- 2 2/3 cups all-purpose flour
- 1 1/2 cups granulated sugar
- 1 cup + 2 T. good quality cocoa powder*
- 3 teaspoons baking soda
- 1 1/2 teaspoons baking powder
- 1 1/2 teaspoons salt
- 3 eggs
- 1 1/2 cups strong black coffee (hot or cold is fine)
- 1 1/2 cup buttermilk, room temperature
- 3/4 cup vegetable oil
- 1 1/2 T. pure vanilla extract
*I used Williams-Sonoma’s Dutch cocoa powder, but I think this is a better deal. A good quality cocoa powder really makes this cake.
1) Prepare 3 x 9″ pans by cutting out a circle of parchment to line the bottom, and butter and flour to coat the edges. Preheat oven to 350°.
2) Sift all dry ingredients together in the bowl of a stand mixer. With the paddle attachement, add the remaining ingredients to the dry ingredients and mix for 2 minutes on medium-low. (You may need a splatter guard on your mixer as batter will be liquidy).
3) Pour into prepared pans. To ensure even layers, I weighed the pans until I get the same amount in each.
4) Bake for 20 minutes, then rotate placement of pans in oven. Bake for an additional 15 minutes (35 minutes total) or until a toothpick comes out clean when placed in the center. Cool on wire racks for 20 minutes, then remove from pans and let cool completely. Wrap in plastic wrap and place in the refrigerator until you are ready to assemble.
5) To cut the cake layers to get a 6 layer cake, start with cold cake. Using a knife, score a line around the outside of the cake as to where you want to cut. With a serrated knife cut along the line, turning the cake as you go until all cuts reach the middle of the cake. Frost as desired.
Toasted Marshmallow Frosting
– Makes enough to fill 3 (of the 6) layers
- 24 large white marshmallows
- 1 cup powdered sugar
- 2 sticks (1 cup) butter at room temperature
- 1/2 teaspoon pure vanilla extract
- 1 large (13 oz) container marshmallow fluff (or cream)
Place the marshmallows in a pan with a silicone baking mat or parchment paper. Place on the bottom rack of the oven and broil until brown. Make sure to watch them continuously as they go from brown to burnt very quickly. In a mixer fitted with the paddle attachment, mix butter and powdered sugar on low for about 1 minute. Add vanilla and mix on high for 3 minutes. Finally add marshmallow cream and powdered sugar and blend until just mixed through (about 1 minute). Spread evenly onto cooled layers.
Malted Chocolate Frosting
– Makes enough to fill 3 (of 6 layers) and to cover a 9″ cake
- 4 sticks (2 cups) butter at room temperature
- 4 cups powdered sugar
- 3 teaspoons pure vanilla extract
- 3/4 cup Ovaltine Chocolate malt mix (in the hot cocoa aisle)
- 8 oz bittersweet chocolate, chopped and melted (I used Ghirardelli)
- 1/2 cup heavy whipping cream*
Clean out the bowl and paddle used for toasted marshmallow frosting, and beat the powdered sugar and butter on low for about 1 minute. Add vanilla and ovaltine malt powder and beat on low to combine. Add the melted chocolate and beat on medium speed until smooth. Add whipping cream and beat on med-high for another minute. Use right away.
*Do not try to substitute half and half or any other milk- You will end up with a runny frosting (speaking from previous experiences).

All 3 recipes slightly adapted from Sweetapolita.

