
Brown Sugar Spice Cookies for Fall

At first I was kind of bummed when I got assigned Neuro-Psych for my second rotation block – namely because I really wanted to get one of the very time intensive, 10 week long rotations out of the way earlier in the year. However, I’m learning that everything works out in the end because I have truly loved having some free time to enjoy the fall. (Remind me of this when I am waking up for surgery at 4:30 and driving through a snowstorm). Beyond the obvious fall cooking adventures, I have really enjoyed running in the park, which has been continuously blanketed with colorful leaves for several weeks now. Every time I enter Wildwood I think, ” I wish I could take my camera on runs” or “I really need to get John out here to see this before its gone”. (He gets a little reluctant to go running….well usually…..but especially when the weather drops below 70º ). I’ve managed to get him out a few times though and it has been truly gorgeous.
In celebration of the wonderful season, we had the pleasure of attending a bon fire and a halloween party. I really wanted to impress with my improving cookie decorating skills, but unfortunately I forgot how long it takes to work with royal icing. I managed to finish a few cookies to bring over, but if you really want to use royal icing, plan on making the cookies the night before. Nevertheless, I thought that these were a perfect autumn treat- just a hint of spice, but enough to remind you of fall. I’m hoping to make them again to take down for thanksgiving (especially because the 3 cookie cutter set I bought also came with a turkey!) Any icing will work for these, but if you plan on using royal icing check out my tutorial for instructions.
Brown Sugar and Spice Cookies
Makes about 40 cookies depending on the size of your cutouts
- 3 c unbleached, all-purpose flour
- 2 tsp baking powder
- 1/2 tsp cinnamon
- 1/4 tsp ginger
- 1/4 tsp pumpkin pie spice
- 1/8 tsp nutmeg (freshly grated, if possible)
- 1/8 tsp allspice
- 1/2 c granulated sugar (I use sugar that I’ve stored vanilla beans in)
- 1/2 c light brown sugar (packed)
- 2 sticks butter
- 1 egg
- 1 tsp pure vanilla extract
Preheat oven to 350.
Whisk the flour, baking powder and spices, set aside.
Cream the sugar and butter. Add the egg and extracts and mix until well-blended.
Gradually add the flour mixture and beat just until combined, scraping down the bowl, especially the bottom. (The dough will be quite thick…you may need to knead in stray bits of flour from the bottom of the bowl by hand.)
Roll dough to 1/4 inch thickness and cut into desired shapes.
Place on a cookie sheet lined with parchment paper or a silicon baking mat. Refrigerate or freeze tray for about 5 minutes if you want to insure that cookies will retain shape. Bake for 10-12 minutes
Let cool on cookie sheet for 1 minute. Then transfer to a cooling rack to cool completely.
Ice the cookies as desired.
Recipe barely adapted from Bake at 350°

On a side note, I was really excited about these containers. 40% off Hobby Lobby is the best…

Pumpkin Cupcakes with Cream Cheese Frosting

Based on my experience thus far in life, I can firmly say that you can never go wrong with pumpkin flavored anything and cream cheese frosting. I made a different version of these cupcakes last year, and there are a few things I liked about each recipe. Last year’s recipe was ridiculously moist, but almost to the point where the cupcakes stuck to the wrapper and couldn’t support the weight of the frosting when you went to take a bite. I liked this new recipe because the cupcakes are a little bit sturdier, and you don’t have to use part of a box of cake mix (what does one do with a left over 2/3 cup of cake mix? ). Plus, when I’m going to the trouble of making cupcakes from scratch I really prefer ones made with unique ingredients that wouldn’t be part of a box mix – like butter instead of oil and buttermilk for some extra moisture. I used to think that recipes that called for buttermilk were a bit annoying because you generally have to buy a whole quart, but I’ve found it lasts a lot longer than milk (like over a month) and I’ve found several other things to do with it in that time – like John’s birthday cake, ranch dressing, and then these cupcakes. But as I said before, you can’t go wrong with pumpkin and cream cheese so if your so inclined, try both recipes!
I actually made these for the children’s Halloween party that our medical school hosts every year. Now technically this party if for children with diabetes, and while you might think cupcakes wouldn’t be the best idea, the point of the party was to help the children learn how to balance their carbohydrates with their insulin. (And it is really hard to find low carbohydrate halloween desserts). So I made a double batch of these cupcakes, and calculated that each cupcake with frosting has 35 grams of carbohydrate. I got about 40 cupcakes from the double batch, and saved a few to take with us to Cincinnati for my now living in Ohio brother and sister -in-law. These went so fast that I’m pretty sure my father-in-law thought he wasn’t going to get one. Apparently they were also a big hit at the halloween party – but really what kid can resist sprinkles?

Pumpkin Cupcakes with Cream Cheese Frosting
Yield: 20-24 cupcakes with piped frosting
- 1/2 cup unsalted butter, room temperature
- 1 1/3 c brown sugar, lightly packed
- 2 eggs, room temperature
- 1/2 teaspoon vanilla
- 2 cups flour
- 1 1/2 teaspoons baking powder
- 1/2 teaspoon baking soda
- 1 teaspoon cinnamon
- 1/4 teaspoon nutmeg
- 1/4 teaspoon pumpkin pie spice
- 1/4 teaspoon salt
- 3/4 cup pumpkin puree
- 3/4 cup buttermilk
For the Icing:
- 8 oz cream cheese
- 1 stick butter (softened)
- 1/2 teaspoon vanilla
- 10 oz powdered sugar (about 3 cups), sifted
To Make the Cupcakes:
Line two muffin pans with cupcake liners; set aside.
Preheat the oven to 350˚F.
In the bowl of a stand mixer fitted with the paddle attachment, cream together the butter and brown sugar until light and fluffy. Beat in the eggs one at a time. Mix in the vanilla until fully incorporated.
In a separate mixing bowl, whisk together the flour, baking powder, baking soda, cinnamon, nutmeg and salt. In another small mixing bowl, combine the pumpkin and buttermilk until smooth.
Turn the stand mixer on to the lowest setting and alternately add the dry ingredients and the pumpkin mixtures to the creamed butter. Start and end with the dry ingredients. Mix until just combined.
Spoon the batter into the pans, filling about 2/3 full. Bake for 20 minutes, or until a toothpick inserted in center comes out clean. Allow to cool enough to handle and then move to a cooling rack. Store in airtight containers until frosted. Store frosted cupcakes in the refrigerator.
To Make the Icing:
Cream the butter, cream cheese and vanilla together on high speed. Add the powdered sugar, a small amount at a time and blend until smooth and creamy. To ice the cupcakes using a pastry bag, chill icing in the refrigerator or freezer for about 15 minutes in order to harden the icing enough to frost. Alternatively, frosting can be added immediately to cooled cupcakes using an offset spatula.

Cupcakes from Pennies on a Platter, Originally from My Kitchen Addiction
Icing inspired Ina Garten
Candy Corn Shortbread Cookies

Ina Garten’s Shortbread
- 3/4 pound unsalted butter, at room temperature
- 1 cup sugar, plus extra for sprinkling
- 1 teaspoon pure vanilla extract
- 3 1/2 cups all-purpose flour
- 1/4 teaspoon salt
Directions
1) In the bowl of an electric mixer fitted with a paddle attachment, mix together the butter and 1 cup of sugar until they are just combined. Add the vanilla. In a medium bowl, sift together the flour and salt, then add them to the butter-and-sugar mixture. Mix on low speed until the dough starts to come together. Divide the dough evenly into 3 separate bowls. Using gel food coloring color 1 bowl of dough orange, 1 bowl yellow and leave one uncolored. Mix until the colors are thoroughly incorporated.

2) Line a baking pan with plastic wrap (smaller pans work best if you have one).

3) Press the plain colored dough into the bottom of the pan, spreading to an even layer. I did not fill the entire length of the pan because I wanted slightly taller cookies. Continue with the orange and then the yellow layers.


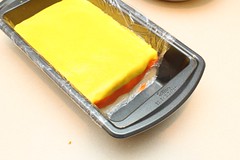
4) Refrigerate the dough for 1 hour, or up to 3 days. You want the dough to be firm and easy to cut. Once chilled, remove from the pan and place on a cutting surface.

5) Slice the the dough into a 1/2 inch wide slice. You may also want to cut a straight line across the top yellow layer in order to get a more finished look. Then cut diagonally through the slice in order to get 5-6 pieces of candy corn. You may have some small, not perfectly shaped pieces at the edges, but that’s okay – they still bake up nicely and someone will eat them.

6) Preheat oven to 350º
7) If you have coarse sugar, you can sprinkle the piece with sugar. Place on a baking sheet and bake for 18-22 minutes. Do not over bake or they will become discolored from browning.

Recipe adapted from Barefoot Contessa, Idea from Our Best Bites

