But Sugar is Sweeter

Latest

Bahn Mi Bowls with Lemongrass Meatballs

bahn mi bowls
In the last nearly 2 years since I moved away from my hubby and Houston (the world’s cutest and most surgery prone dog), I have been trying to make as many of the foods that I enjoy but know they (he) might not care for.  These bowls don’t scream “All-American”, which arguably is hubby’s favorite type of food, so I added them to the “To make before John comes” list. They stayed on that list for far too long, mostly because they called for ground pork, which a) I almost never buy and b) is not that great for you.  Well then came along Chrissy Teigen’s cookbook, and somehow a scantily clad supermodel can convince me that eating pork is good. And hence, I had pork in my freezer.

Nonetheless, I was still a little worried about a meatball entirely made of pork, which led me to an important discovery.  You can make ground chicken at home! I had a chicken breast in the freezer, so I partially thawed it and popped it in the magic bullet and bam! Homemade ground chicken!  I mixed it about 50/50 with the pork and these meatballs turned out perfect! I actually felt like if I didn’t add the chicken they might have been a bit too greasy.

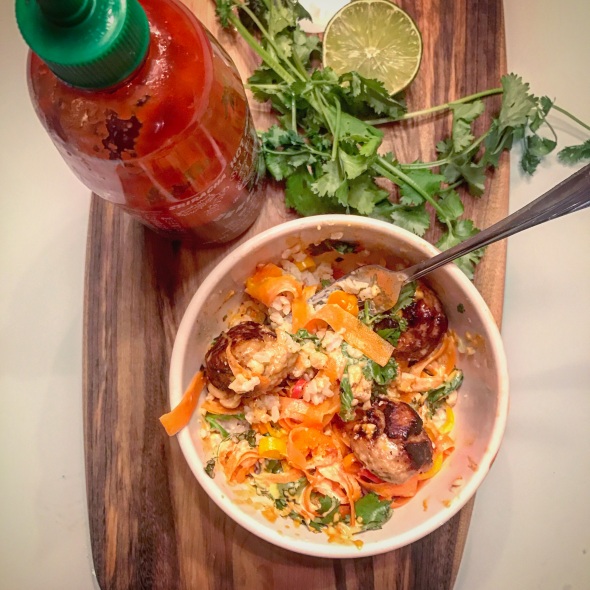
And finally, about the finished product. To make them easier I used left over brown rice from a meal earlier in the week, and then its simply mixing a few things for meatballs and shredding some carrots. These actually turned out so good that I decided I made them again for John, and even the All-American kid liked them.

Bahn Mi Bowls with Lemongrass Meatball

Quick Pickled Vegetables 

  • 1/3 cup rice vinegar
  • 2 T sugar
  • 1 teaspoon sesame oil
  • 1/2 teaspoon salt
  • 5 carrots, cut into thin ribbons (I used a peeler)
  • 5 mini bell peppers cut into rings
Meatballs
  • 1/2 pound  ground pork
  • 1/2 pound ground chicken
  • 1-2 tablespoons lemongrass paste*
  • 4 cloves garlic, minced
  • 1 tablespoon chili paste (like Sriracha or Sambal Oelek)
  • 1 tablespoon fish sauce
  • 2 teaspoons cornstarch
  • 1 teaspoon salt
Bowls:
  • brown rice, quinoa, rice, or noodles
  • cilantro, or other herb toppings such as basil, mint, scallions
  • crushed peanuts
  • spicy mayo (just mix mayo with a hit of sriracha)
  1. Quick Pickled Carrots: Whisk the rice vinegar, palm sugar, sesame oil, and salt together. Soak the carrots and peppers in the mixture for 30 minutes to 1 hour.
  2. Meatballs: Mix all ingredients. Roll into small meatballs with your hands, refrigerate if possible to increase firmness.  Heat a little bit of olive oil over medium high heat. Add the meatballs and fry until golden brown on the outside and fully cooked (not pink) inside, or 165 degrees.
  3. Bowls: Layer the carrots and meatballs over quinoa, rice, or noodles. Top with herbs, peanuts, and/or spicy mayo.

*You can find this near the herbs in the refrigerated produce section of most grocery stores (found mine at harris teeter)

Slighlty adapted from Pinch of Yum

Salted Brown Butter Chocolate Chip Cookies

Hi y’all.  So it has been about 2 years …eeek. Sorry about that.  There have been  new jobs, new cities, new friends, lots of vacations, and 2 dog surgeries that have happened since then, but I have been cooking the whole time! I decided to start an instagram account (@spicenice), more for a personal way to keep a log of things I have made and liked; but I got a request for this chocolate chip cookie recipe and I figured, why not start blogging again!

I made these cookies for a very specific purpose – to give to the wonderful workers at Pet Palace, who saved our dear dog Houston’s life by recognizing immediately that something was wrong with our normally bubbly and light hearted pup, and got him to the vet ASAP. They really couldn’t have been more wonderful  – between covering the initial diagnostic vet bill, to transporting him all the way across town to where he could have the needed emergency surgery done, to just generally loving our pup, we are really grateful. And so I figured they deserved a special cookie. Chocolate chip will forever be my favorite (and the most popular); but how can you make it even better….brown butter and flakey sea salt, that’s how. These were really good.  I actually consider it a serious win on the new years resolutions that I managed to only eat 2.  Enjoy, and hopefully you’ll be hearing from me again soon!

img_0610

Salted Brown Butter Chocolate Chip Cookies

Ingredients

16 tablespoons (2 sticks) unsalted butter

2 and 1/4 cups flour

1 teaspoon salt

1 teaspoon baking soda

1/2 cup granulated sugar

1 cup light brown sugar

1 large egg

1 large egg yolk

2 tablespoons milk

1 and 1/2 teaspoons vanilla

One bag semisweet chocolate chip cookies

Fleur de Sel or flaky sea salt

Instructions

1. In a medium saucepan over medium heat, melt the butter and cook, swirling the pan occasionally, until it is frothy and browned, about 7-8 minutes or so (the browning process goes quickly once it starts so watch it carefully.)

2.  Transfer the butter to a small bowl and let cool to room temperature, or place in fridge to help the process.

3.  In a separate bowl, whisk together the flour, salt, and baking soda.

4. In the bowl of your standing mixer fitted with the paddle attachment, beat the browned butter and both types of sugar, until smooth and light, about 7 minutes. This will only work if you have let the butter cool completely.

5. Add in the whole egg, the egg yolk, milk, and the vanilla.

6. Decrease the mixer speed to low and add the dry ingredients.

7. Gently fold in the chocolate chips.

8. Cover the cookie dough tightly with plastic wrap and refrigerate overnight.

9. The next day, preheat the oven to 375 degrees and line two baking sheets with parchment paper or silicon mats.

10. Using a cookie dough scoop, place about 2-3 Tablespoons of dough onto the prepared baking sheets, spacing them about 2 inches apart. Sprinkle each cookie individual with flakey sea salt. For thinner cookies let the dough reach room temperature before baking.

11. Bake each cookie sheet until the cookies are golden brown on the bottom, about 12-14 minutes or so.  Because of they previously browned butter they brown quickly so check yours accordingly.

Adapted from:  The Curvy Carrot, Originally from Food and Wine magazine,  June 2012 issue.

Turtle Cupcakes

IMG_5771

Being in the position I’m in can be very stressful,  with lots of uncertainty in the future and I’m not the best at dealing with it.  That’s why I’m so grateful for wonderful co-workers who help keep me grounded, make me laugh and always know how to calm me down. They are the best; and while terrible at our short lived diet plans, I still love them.   Eating healthy is hard when you work in a dermatology office that seems to have an endless supply of girl scout cookies and leftover cake.  So when it was my funniest friend’s birthday, I obviously had to make cupcakes, to contribute to the problem.

I toyed with a few flavor ideas, but ultimately decided on turtle because, 1) I had all the ingredients and 2) who doesn’t love a turtle sundae.  It’s basically a super moist, yet sturdy, cupcake base, topped with a caramel cream cheese frosting, ganache and a caramel pecan filling.  “Some people” were a little worried about how nuts would taste on a cupcake, but I assure you, you have nothing to fear.  It was delicious.  If I had to make them again, I would probably double the caramel and pipe some caramel filling, or scoop some caramel pecan filling, into the center.  I also used low fat sour cream (because it’s what I had), but no one complained :-)!

IMG_5774

TURTLE CUPCAKES 

Makes 2 dozen

INGREDIENTS

DIRECTIONS

Recipe from Annie’s Eats 

Funfetti Sugar Cookie Bars

IMG_5764

In case you missed it, the super bowl was this weekend, and…it. was. amazing.  While I will never give up hope of seeing a Browns super bowl in my lifetime, the caliber of the patriots vs. seahawks game really made appreciate ‘Merica. Also, can we please talk about that half time show?  While I am by no means being unfaithful to my one true love (Taylor Swift), Katy Perry did a phenomenal job.   The whole thing was American entertainment at its finest.

We had a small get together at our house, in the midst of a terrible snow storm. There may or may not have been multiple difficulties getting both in and out of the driveway, but everyone (amazingly and thankfully) made it both here and back safely.  Thanks for braving the weather for us!  There was lots of food, including my all time favorite pizza bites, and of course these cookie bars.

I picked these because they were relatively simple and can be made with ingredients you probably have lying around the house – butter, sugar and sprinkles -so they are perfect for a snow day.   I actually used left over halloween sprinkles for the inside, and then some left over stars for the topping.  What I like most about these bars is that they can so easily be adapted for any holiday depending on the sprinkles you choose.  With valentine’s day around the corner, there may be another batch coming up shortly (I’m sure no one will protest). IMG_5768

Funfetti Sugar Cookie Bars

adapted from  Smells Like Home
Makes one 13×9 inch pan

  • 2 1/2 cups all-purpose flour
  • 1/2 tsp salt
  • 1/4 tsp baking soda
  • 1/2 cup (1 stick) unsalted butter, at room temperature
  • 1 cups sugar
  • 2 large eggs
  • 1 tsp vanilla extract
  • 3 Tbs sprinkles

Preheat oven to 350° F. Lightly grease a 9×13 inch baking dish and set aside.

Whisk the flour, salt, and baking soda together in a large bowl; set aside.
In the bowl of a stand mixer fitted with the paddle attachment, beat the butter and sugar together on medium-high speed until light and fluffy, about 2 minutes. Beat in the eggs one at a time, beating well after each addition and scraping down the bowl as needed. Mix in the vanilla.
Pour the dry ingredients into the bowl along with the sprinkles and mix by hand until flour is just incorporated. On low speed, combine the dry ingredients into the wet ingredients, mixing until blended.
Lightly press the dough into the prepared baking sheet. Bake for 12 to 15 minutes. The bars will still look pale with barely a hint of browning around the edges.
Transfer the pan to a wire rack to allow the bars to cool completely in the pan.

Whipped Vanilla Frosting

  • 1 cup (2 sticks) unsalted butter, at room temperature
  • 2 cups confectioners’ sugar, sifted
  • 2 tbsp heavy cream (substitute sour cream if unavailable)
  • 1 tsp vanilla extract
In the bowl of a stand mixer fitted with the paddle attachment, beat the butter for 6 to 8 minutes on medium speed; it will be very pale and light. Add in the sugar, milk, vanilla, and salt and mix on low for 1 minute and then on medium speed for 6 minutes; the frosting will be very light and fluffy. If using food coloring, blend it in until it is fully incorporated.
Use an offset spatula to frost the fully-cooled bars in the pan.  Use a sharp knife to slice them into your desired size and shape, garnish with more sprinkles, and serve.


Fresh Tomato Ricotta Tarte with Garlic Herb Crust

IMG_5738


In some parts of the country, it might be a little late for this post; but here in Ohio, we’re still trying to find ways to enjoy fresh garden tomatoes before the first frost hits.  Hopefully that first frost will not present itself as 2 inches of snow in the middle of October (like it decided to last year).  After the infamous 2013-2014 winter, I’d be fine waiting until Christmas Day for snow, and then having winter be over.  For now, I’m still revealing in the fact that it’s  beautiful, a perfect 70 degrees, with the garden is still going strong.

IMG_5729


I felt like being a bit adventurous (per usual) and made ricotta cheese from scratch for this recipe.  It was pretty each- basically just heat milk, add lemon juice and vinegar, and then strain over cheese cloth for about 10 minutes.  It was fun to try, but it did take this from being an easy weeknight meal to kind of a production with multiple things to clean up.  I made the dough for the crust a day in advance, so this was pretty simple when it came to putting together.  It really highlights the tomatoes, and lets you hang onto that last bit of summer.  Better get on it before it becomes a winter wonderland around here!

Fresh Tomato and Ricotta Tarte with Garlic Herb Crust

Serves 6

For the crust: 

  • ¼ cup fresh basil leaves
  • 1 clove garlic, coarsely chopped
  • 1¼ cups all purpose flour
  • Coarse salt and freshly ground pepper, to taste
  • 8 tbsp.  cold unsalted butter, cut into small pieces
  • 3 tbsp. ice cold water

For the filling: 

  • 2 cups ricotta cheese
  • 2 cloves garlic, minced or pressed
  • 1 tsp. oregano
  • 2 tbsp. minced fresh basil, plus more for garnish
  • Coarse salt and freshly ground black pepper, to taste
  • 3-4 tbsp. milk, if needed
  • 2 large ripe heirloom tomatoes, thickly sliced
  • Extra virgin olive oil, for drizzling

Directions

1) To make the crust, combine the garlic and basil in the bowl of a food processor. Pulse until finely minced, scraping down the bowl as needed. Add in the flour and salt and pepper to taste, and pulse again to combine. (If you don’t have a food processor, just mince the garlic and basil as well as you can and then stir into the flour mixture. It will work just fine.) Add in the butter and pulse until the mixture resembles coarse meal and the largest butter pieces are the size of peas. Add in the water and pulse just until the dough comes together. Remove from the bowl, form into a disc and cover with plastic wrap. Transfer to the refrigerator and chill 1-2 hours, until firm.  This can also be done in 1-2 days in advance.

2) Transfer the chilled dough to a lightly floured work surface. Roll out into a flat round sheet about 12 inches in diameter, or large enough to fully line a 9-inch pie plate. Transfer to the pie plate, trimming away any excess at the edges and crimping the dough to create a fluted edge. Transfer the pie plate to the freezer and chill 15-20 minutes, until firm.

3) Preheat the oven to 375˚ F. Line the chilled pie shell with aluminum foil, making sure all edges of the crust are fully covered. Fill the pie shell with baking beads if available to weigh the crust down (dry beans or rice also work). Bake for 25 minutes. Remove the foil and baking beads, return the pie shell to the oven and continue to bake until the crust is golden and fully set, about 10-12 minutes more. Transfer the pie plate to a wire rack and let the crust cool completely.

4) In a medium bowl combine the ricotta, garlic, and herbs.  Stir together until evenly combined.  To give the ricotta a smoother texture (if needed), stir in 3-4 tablespoons of milk until evenly combined. Season with salt and pepper to taste. Spread the ricotta into the pie shell in an even layer. Layer the tomato slices on top of the ricotta, drizzle lightly with olive oil, and season with salt and pepper. Garnish with additional minced basil. Slice with a sharp knife and serve immediately.

Source: Annie’s Eats


Six Layer Chocolate Cake with Raspberry Buttercream and Whipped Ganache

IMG_5707
So I celebrated a big one a few weeks ago.   Yep, a whole year has passed.  Since my brother and I were born on the same day, our birthdays were always a big deal.  It all started when I was 6, and my brother was turning 1.  Tell a six year old that they have to share their birthday after 5 years of flying solo, and well, it could’ve been a little rough.  Instead my parents went over the top and had an all out celebration with a tiered cake, our whole family,  and a clown who doubled as a magician.  I still cheered when the clown told me he was going to make my brother disappear, but overall, I LOVED sharing a birthday.

This year was no different.  It’s been pretty great being back in Ohio and being able to once again share birthdays with my favorite brother. I insisted on making the cake, because it’s the one time of the year I don’t feel bad about going all out with an over the top birthday cake.  Six layers was obviously a necessity, but because I didn’t want to be eating leftover cake for weeks, I thought 6 inches was perfect.  The only problem – I didn’t have any six inch cake pans.  Thankfully whole foods came to my rescue.  I noticed they sold 6-inch cakes and jokingly asked the baker if she had any pans for sale.  Well it turns out they bake all their cakes in disposable paper rounds – and she gave me 3 for a buck, steal!
IMG_5703
The initial recipe called only for the raspberry filling, which does make a beautiful contrasting interior, but I really wanted more chocolate, so I alternated a chocolate ganache frosting with the raspberry butter cream.  It was  not much more work because the ganache is just 2 ingredients, whipped to a fluffy consistency.  But I will say the cake on it’s own is a moist, rich, dense chocolate cake, and could easily stand as the only chocolate in the cake if you want to double the strawberry buttercream instead. The whole thing is then topped with a rich chocolate ganache that drips down the sides and makes for a wonderful presentation.   If your looking for some other wonderful birthday cakes, here’s a few I’ve made:

IMG_5695

Six Layer Chocolate Cake with Raspberry Buttercream and Whipped Ganache

Makes 1- 6 layer,  6 inch cake.

For the Cake: 

  • 1-1/2 cups (180 g) all-purpose flour
  • 1-1/3 cups (275 g) sugar
  • 1/2 cup (60 g) dark cocoa powder
  • 1-1/4 teaspoons (6 g) baking soda
  • 1-1/4 teaspoons (6 g) baking powder
  • 1 teaspoon (5 g) salt
  • 140 ml (5 liquid oz) buttermilk
  • 130 ml (4.5 liquid oz) espresso or strong, hot brewed coffee
  • 75 ml vegetable oil
  • 2 eggs, room temperature, lightly beaten
  • 1 tablespoon (15 ml) pure vanilla extract

For the Raspberry Swiss Meringue Buttercream:

  • 3 large, fresh egg whites (100 g)
  • 3/4 cup sugar
  • 1 1/2 teaspoons pure vanilla extract
  • 2 sticks butter, cut into cubes and cool
  • 1/4 cup raspberry puree, strained to remove seeds
  • few drops of pink food coloring (optional)

For the Whipped Chocolate Ganache Filling:

  • 8 oz bittersweet chocolate, chopped
  • 1 cup heavy cream

For the Chocolate Glaze:

  • 4 oz bittersweet chocolate, chopped
  • 1/3 c. heavy cream
  • 2 T unsalted butter

Instructions

For the Cake:
  1. Preheat oven to 350° F. Prepare three 6-inch round cake pans with butter, parchment paper rounds, and flour or cocoa powder. Tap out excess.
  2. In bowl of electric mixer, sift all dry ingredients.
  3. Add all remaining ingredients to bowl with the dry ingredients and with paddle attachment on mixer, mix for 2 minutes on medium speed (you may need the plastic splash-guard that comes with mixer) and pour into prepared pans. If possible, use digital kitchen scale and weigh pans for even layers. Batter will be liquidy.
  4. Bake for 20 minutes and then rotate pans in oven. Cakes are done when toothpick or skewer comes out with a few crumbs, about 30 minutes total. Try not to over-bake.
  5. Cool on wire racks for 20 minutes then gently invert onto racks until completely cool.
For the Raspberry Swiss Meringue Buttercream:
  1. If using raspberry puree, place a handful of fresh or frozen raspberries in a food processor, and process until a smooth. Press through a mess sieve to remove seeds and retain at least 1/4 cup to add to frosting.
  2. Wipe the bowl of an electric mixer with paper towel and lemon juice, to remove any trace of grease. Add egg whites and sugar, and simmer over a pot of water (not boiling), whisking constantly but gently, until temperature reaches 160°F, or if you don’t have a candy thermometer, until the sugar has completely dissolved and the egg whites are hot.
  3. With whisk attachment of mixer, begin to whip until the meringue is thick, glossy, and the bottom of the bowl feels neutral to the touch (this can take up to 10 minutes or so). *Don’t begin adding butter until the bottom of the bowl feels neutral, and not warm.
  4. Switch over to paddle attachment and, with mixer on low speed, add butter cubes, one at a time, until incorporated, and mix until it has reached a silky smooth texture (if curdles, keep mixing and it will come back to smooth). *If mixture is too runny, refrigerate for about 15 minutes and continue mixing with paddle attachment until it comes together. Add vanilla and salt, continuing to beat on low speed until well combined.
  5. Add raspberry puree to taste and if desired a few fresh raspberries, and blend until combined. Add small amount of pink food coloring, if desired.

For the Whipped Chocolate Ganache.

  1. Heat heavy cream in a small saucepan until just before boiling.
  2. In a heat safe bowl, pour cream over chopped chocolate. Let sit for ~5 minutes, then stir to melt chocolate.
  3. Allow mixture to cool to room temperature, stirring occasionally (about 30-45 minutes). (Or place in the fridge for a few minutes at a time  to expedite the process)
  4. Whip mixture on high until it becomes paler and fluffy, about 2-4 minutes.
For the Glaze:
  1. Place the chocolate, butter and heavy cream in a medium heatproof bowl over a pot of simmering water. Stir the mixture using a rubber spatula until melted and smooth. *Be careful to not get even a droplet of water into your bowl of chocolate and butter.
Assembly of the Six-Layer Dark Chocolate & Strawberry Buttercream Cake
  1. Slice the 1st cake layer in half horizontally, using a large serrated knife or dental floss and place cut side up on your cake board, pedestal, or plate.
  2. The general order of the cake starting from the bottom will be:
    • Cake
    • Whipped Ganache
    • Cake
    • Raspberry Buttercream
    • Cake
    • Whipped Ganache
    • Cake
    • Raspberry Buttercream
    • Cake
    • Whipped Ganache
    • Cake
    • Raspberry Buttercream
    • Finish with layer of Chocolate Glaze
  3. Using a small offset palette knife, spread approximately 1/2 cup of whipped ganache evenly on top.
  4. Add a layer of cake and cover with about 1/2 cup raspberry buttercream.
  5. Repeat this with remaining cake layers, until you come to the final layer, which you will place face-down on the top of the cake.
  6. Place cake on a turntable (if possible), and using a small offset palette knife for the top of the cake, and medium straight palette knife for the sides, cover the cake in a thin layer of buttercream to seal in crumbs. Refrigerate for 30 minutes (or more). *This does not need to be perfect, as that will come with the top “coat” of buttercream.
  7. Chill cake.
  8. If glazing the cake, make the glaze and set aside for a few moments to cool a bit. Pour glaze over chilled cake, smoothing the top with a clean small offset palette knife.
  9. Chill again to set, serve at cool room temperature.

Cake and Swiss Meringue Buttercream adapted from Sweetapolita, Chocolate Ganache from Martha Stewart 

Beef Bourguignonne

IMG_3439
This French delicacy, labled by Julia Child as “certainly one of the most delicious beef dishes concocted by man”,  comes to you from no other than my very own Mom.  That’s right, the lady who we tease about being “Irish”, and who would much prefer to set the table then make the food, made Beef Bourguignonne.  In fact, this isn’t the first time she has made it – I would go so far as to call this one of my mom’s signature dishes.  I can remember coming home from college to this meal.  It instantly became my perfect comfort food.  After a long week on a new service, mom invited us over for Sunday dinner, and this was the absolute perfect compliment to a snowy and cold February day.

At first I figured that because it came from a crock pot, it must be easy…. Don’t be fooled –  this recipe is actually quite a bit of work because everything has to be browned before slow cooking.   However, it’s great for company because all the work can be done early morning and then you can relax the rest of the day and actually visit with your guests.  It is a stick to your ribs kind of meal that will certainly get you through this seemingly endless winter.  

IMG_3438

Beef Bourguignonne

Serves 8-10

  • 1 ½ cups all purpose flour
  • 5 lbs. beef stew meat, in 1 inch pieces
  • salt and ground pepper to taste
  • 1/4 c. olive oil
  • 4 bacon slices, cut into 1 inch pieces
  • 5-7 large carrots, peeled and cut into 1/2 inch slices
  • 2 yellow onions, slices 1/4 inch thick
  • 5 garlic cloves, chopped
  • 2 bay leaves
  • 6 fresh tyme springs
  • 6 fresh parsley sprigs
  • 1 lb. white button mushrooms, halved
  • 1 bottle Pinot Noir (from Burgundy if you want to be fancy)
  • 1 Tbs. beef demi-glace
  • Steamed baby red potatoes (about 4 per person)

Place the flour in a large bowl. Season the beef with salt and pepper, add to the flour and stir to coat evenly. Transfer to a plate, shaking off the excess flour.

In a large sauté pan over medium-high heat, warm the olive oil until almost smoking. Working in batches, brown the beef on all sides, 5 to 7 minutes. Transfer to a slow cooker.Add the bacon, carrots, onions and garlic to the sauté pan and cook, stirring occasionally, until just tender, about 10 minutes. Transfer to the slow cooker along with the bay leaves, thyme, parsley and mushrooms.

Off the heat, pour the wine into the sauté pan and set over medium-high heat. Whisk in the demi-glace and bring to a boil, stirring to scrape up the browned bits from the pan bottom. Add to the slow cooker, cover and cook until the meat is fork tender, 6 hours on high or 8 hours on low. Discard the bay leaves.

Transfer the beef bourguignonne to a platter and serve with steamed potatoes. Serves 10.

Apple Cider Caramels

IMG_5537

I know you are probably up to your ears in left over Halloween candy, and the last thing you want to think about is making your own candy….but I promise you, these are worth it!  This recipe has been circulating the internet for over a year, and despite coming from THE Smitten Kitchen, I was still a bit hesitant as to whether these would actually taste like apple cider.  Well my friends, I can attest to ahhhmazingness of these caramels.   Somehow, magically, they do indeed taste like apple cider. (Or maybe not so magically….you do use an entire quart of the stuff and boil it down to a mere 1/3 cup to infuse the caramel with cider flavor).

I actually had made these for our pumpkin carving party, but because of the unpredictable nature of intern year (and medicine in general), I was 2 hours late to my own party….  so instead, I have been enjoying these myself for the past 2 weeks.  (Good thing I’m not the dentist in the family…)  I also insist that everyone who comes to our house tries at least one – and the response is always the same….”ahhhhmazing.”  So before cider is gone until next fall, make these. You won’t regret it.
IMG_5542

Apple Cider Caramels

Makes 64 caramels

  • 4 cups apple cider
  • 1/2 teaspoon ground cinnamon
  • 2 teaspoons flaky sea salt, such as Maldon, or less of a finer one
  • 8 tablespoons (1 stick) unsalted butter, cut into chunks
  • 1 cup granulated sugar
  • 1/2 cup  packed light brown sugar
  • 1/3 cup  heavy cream

Boil the apple cider in a 3- to- 4- quart saucepan over high heat until it is reduced to a dark, thick syrup, between 1/3 and 1/2 cup in volume, stirring occasionally. This took about 1 hour on my stove.

Line the bottom and sides of an 8- inch straight- sided square metal baking pan with 2 long sheets of crisscrossed parchment, then butter. Set it aside. Stir the cinnamon and flaky salt together in a small dish.

Once you are finished reducing the apple cider, remove it from the heat and stir in the butter, sugars, and heavy cream. Return the pot to medium- high heat with a candy thermometer attached to the side, and let it boil until the thermometer reads 252 degrees, about 5 minutes. Do not take your eyes off it as it burns quickly.

Immediately remove caramel from heat, add the cinnamon- salt mixture, and give the caramel several stirs to distribute it evenly. Pour caramel into the prepared pan. Let it sit until cool and firm—about 2 hours, though it goes faster in the fridge. Once caramel is firm, use your parchment paper sling to transfer the block to a cutting board. Use a well- oiled or buttered knife to cut the caramel into 1-by-1-inch squares.  Sprinkle with additional flaky sea salt if desired. Wrap each one in a 4-inch square of parchment or waxed paper twisting the sides to close. Caramels will be somewhat on the soft side at room temperature, and chewy/firm from the fridge.

Caramels keep, in an airtight container at room temperature.

Source: Smitten Kitchen

Pumpkin Whoopie Pies

IMG_5523
While it may be the end of October, it’s certainly not the end of fall inspired treats.  I made these for a trip down to Lexington to see some of our best friends, and they were definitely a big hit.  I knew Samiya in particular would like them because, well, because they’re cute and little and involve pumpkin! Moving to a new place, with new people, has really made me miss the awesome friends we had in med school.   Following college, I moved to Louisiana with three crazy awesome roommates, and there was pretty much a constant source of entertainment and adventure at our house (and in Louisiana in general).  Then in medical school, our apartment complex was basically like a grown-up college dorm, where study groups, dinner parties and watching people play video games was always only a step away.  It’s a lot different now,  living in a neighborhood, with friends scattered all over, and schedules that are completely different because of residency.  But I guess that’s just part of growing up, and it’s not so bad.
IMG_5515
Now these pumpkin whoopie pies were described as a pumpkin cupcake in a different form, and I’d say that’s pretty close to accurate!  The batter is a bit more dense than a cupcake, but just as moist, and the filling is strikingly similar.  Truthfully, can you go wrong with cream cheese frosting?  I really liked these because they are visually appealing, and easy to eat…which turned out to be both a good and bad thing.  Just glad I had people to help me finish them off :-).
IMG_5520

Pumpkin Whoopie Pies

Makes approximately 36 sandwiches

For the pumpkin cookies:

  • 3 cups all-purpose flour
  • 1 tsp. salt
  • 1 tsp. baking soda
  • 1 tsp. baking powder
  • 2 tbsp. cinnamon
  • 1 tsp. ground ginger
  • ½ tsp. ground nutmeg
  • 1 cup granulated sugar
  • 1 cup dark brown sugar, firmly packed
  • 1 cup canola oil
  • 3 cups chilled pumpkin puree
  • 2 large eggs
  • 1 tsp. vanilla extract

For the maple cream cheese filling:

  • 3 cups powdered sugar, sifted
  • ½ cup unsalted butter, at room temperature
  • 8 oz. cream cheese, cold
  • 2 tbsp. maple syrup
  • 1 tsp. vanilla extract

To make the pumpkin cookies, preheat the oven to 350° F.  Line two baking sheets with parchment paper or silicone baking mats.  In a large bowl, whisk together the flour, salt, baking soda, baking powder and spices.  Set aside.  In a separate bowl, whisk sugars and oil together.  Add the pumpkin puree and whisk to combine thoroughly.  Add the eggs and vanilla and whisk until combined.  Sprinkle the flour mixture over the pumpkin mixture and whisk until completely combined.

Transfer the cookie batter to a pastry bag fitted with a large plain round tip.  Pipe small rounds of the batter onto the prepared baking sheets, about 1½-2 inches in diameter. If desired, smooth the top of cookies with a few drops of water and the bottom of a spoon.

Bake for 10-12 minutes, until the cookies are just starting to crack on top and a toothpick inserted into the center of a cookie comes out clean.  Remove from the oven and let the cookies cool on the pan for about 10 minutes.  Transfer to a wire rack to cool completely.  Repeat with remaining batter.

To make the filling, combine the butter and cream cheese in the bowl of an electric mixer.  Beat on medium-heat speed until smooth, about 1-2 minutes.  Add the powdered sugar, maple syrup and vanilla and beat until smooth.  Be careful not to overbeat the filling or it will lose structure, if this occurs refrigerate for 20 minutes. Transfer the filling to a pastry bag fitted with a plain tip.

To assemble, pair the cookies up by size.  Pipe filling onto the flat side of one cookie of each pair, and sandwich together with the remaining cookie.  Refrigerate for at least 30 minutes to firm before serving.

Adapated from Annie’s Eats

Apple Cider Muffins with Browned Butter Glaze

IMG_5511

So, you know my previous obsession with California?  Well, because we’ve had the most amazing weather for the last month,  I’m starting to realize that Ohio is pretty awesome!   The leaves are starting to change, there is fog over the valleys when I drive to work, and the sun has that autumn  glow.   It’s wonderful!  Although you will surely need to remind me of this come February, when I cannot wait for winter to be over! To keep my California dream alive, my best friend from like the fourth grade just landed a coveted fellowship spot at UCLA, so  I’m quite sure my love will be rekindled when I go to visit.  But for now, I’m loving Ohio.

Now about these muffins.  Obviously, they totally go with October, but they would be equally perfect for Thanksgiving breakfast. They are actually pretty healthy – chunks of apple and apple sauce keep them very moist without much fat.  Then of course you add this browned butter glaze, which sort of ruins the healthy aspect, but  you absolutely cannot leave it off.  It is amazing. Together, these were best apple muffins I’ve ever had.

A few technical points….  First, you precook the apple with a bit of sugar and spice.  This step gives the apples a pie-like texture, instead of the dehydrated apple you find in some baked goods.  Additionally, I found out the hard way that there are so many liquid components to these, that they will seep if allowed to sit in an air tight container.  I’m quite sure this didn’t make the best presentation when John brought them into class, but apparently they were still well loved. To avoid this, go a little lighter on the amount of apple in the batter, and store with a rack underneath. These muffins are just hearty enough that you can call them breakfast without too much guilt.IMG_5512

Apple Cider Muffins with Browned Butter Glaze

  • 4 Tablespoons butter
  • 2 -2 ½ honeycrisp apples, peeled and diced
  • 3 tablespoons apple cider
  • 1 1/2 cups whole wheat pastry flour
  • 1/2 cup old-fashioned rolled oats
  • 1 teaspoon baking soda
  • 1/2 teaspoon baking powder
  • 3/4 teaspoon cinnamon
  • 1/4 teaspoon allspice
  • 1/4 teaspoon salt
  • 1 pinch of nutmeg
  • 1 large egg
  • 1/3 cup loosely packed brown sugar
  • 2 teaspoons vanilla extract
  • 1 cup unsweetened applesauce
  • 1/4 cup apple cider

For the Glaze: 

  • 4 tablespoons browned butter, melted and cooled*
  • 1 1/2 tablespoons apple cider
  • 1 cup powdered sugar

Directions:

Begin by melting the butter in a small skillet over medium heat. Continue to cook, swirling occasionally until the butter turns a deep golden brown.  Be careful not to burn. *Repeat this step for the browned butter in the glaze.

Preheat oven to 350 degrees F. Heat a small skillet over medium-low heat and add diced apples with 3 tablespoons apple cider, and a pinch of cinnamon and salt. Cook, stirring occasionally, until apples are soft and caramely, about 8-10 minutes. In a bowl, whisk together flour, oats, baking soda, baking powder, salt and spices. Set aside. Line a muffin tin with liners.

In a large bowl, whisk egg and brown sugar together until smooth and no lumps remain. Add in vanilla extract, butter, apple sauce and apple cider, whisking again until smooth. Gradually add in dry ingredients, mixing until just combined. Fold in diced apples. Do not overmix. Fill each muffin liner 3/4 full to scantly full.

Bake for 15-17 minutes, or until tops slightly golden. When cool enough to handle, transfer to a wire rack to cool.

Brown Butter Apple Cider Glaze
In a medium bowl,  combine browned butter, vanilla extract and powdered sugar. Whisk until the mixture comes together then add in 1 tablespoon of apple cider, continuing to mix.  If it still doesn’t appear glaze-like, add in cider 1/2 tablespoon at a time and mix again. Don’t worry if it becomes too liquidy – just add a tiny bit of powdered sugar until you get the desired consistency. Spoon glaze on warm muffins or dip each top in the glaze, then serve.

Slightly Adapted from How Sweet It Is